Wednesday, June 29, 2011

Lily Allen Does Vintage Repro

A few readers have sent me links to Lucy in Disguise (thank you!), and it's pretty amazing. This is Lily Allen's debut clothing collection, for which she teamed up with her sister. The pair were inspired by actual vintage garments, and I think this is very nicely done vintage repro. There are designs that span from the 30s to the 70s, but my very favorites are the mid-Century stuff. (No surprise there.)

I adore this 40s day dress, with great collar and pocket details. 

This organza prom dress is so fluffy and fun.

There's something so Patsy Cline-ish about the Western vibe of this bandana-print Honky Tonk dress. I want to wear it square dancing!


This ombre-dyed gown is luscious and romantic, with a pretty back collar detail.

And a nautical playsuit! Extremely tiny and impractical, but I love it.

I have the perfect leopard jersey for something like this.

A lot of it seems very Betsey Johnson to me, maybe a bit toned-down and more wearable. The line is pretty expensive, so I'll be using it for inspiration only. But it's so nice to see a celebrity line with real vintage integrity, don't you think?

Tuesday, June 28, 2011

If You Could Have One Dress Pattern . . .

Readers, I'm looking for your help today. I've been asked to write a guest post for Sew, Mama, Sew! It's a great honor, of course. They mentioned particular interest in the way I match up patterns with dresses in my Daily Dress posts (which, yes, have been a bit scarce lately!). What I'm looking for is reader submissions of dresses that you'd like pattern suggestions for. Maybe it's something you've seen at Anthropologie, maybe it was something that Marilyn Monroe wore, who knows?! It just has to be a dress (or ensemble) that you want to make, that you need pattern suggestions for. A few ideas:


{source}

{source}

{source}


What do you think? You can post your suggestions here or e-mail me at gertie@blogforbettersewing.com.

Thank you!

Monday, June 27, 2011

The Giveaway Winner Is . . .

. . . Misty! She will get the pattern, fabric, lipstick, and sewing book, ALL courtesy of The Blue Gardenia. Misty, please e-mail me and we'll get your prizes to you.

Many thanks to all who entered. Denise of The Blue Gardenia loves to treat us to amazing goodies, so I'm guessing you'll see more giveaways soon!

Friday, June 24, 2011

Making a Shirred-Back Dress, Part Three: Stitching the Bodice and Skirt

Okay, home stretch! (Home shirr?) If you missed them, go back and read part one and part two.

This part is important because if your back bodice stretches, you want the back waistline seam to stretch too. If it doesn't stretch, your shirring won't be able to stretch at the waistline and that's no good! So it's just a simple process of elasticizing the seam.

First, gather your back skirt waistband by sewing a line of stitching with elastic thread still in the bobbin with a 1/2" seam allowance. This will help ease the skirt into the shirred bodice. (Note: I'm sewing shorts into my bodice below, but it's the same idea.) It doesn't matter which side the bobbin thread is on, since it will be hidden in the seam allowances. Steam it to shrink it up a bit more if needed.


Next, pin your back bodice to your skirt right sides together. Pin at one end and then stretch the bodice so you can pin it at the other end. Distribute evenly and pin throughout.


Sew by stretching the pieces to fit each other. You still have elastic thread in the bobbin. 

Press the seam allowances as usual. Now you have a stretchy seam!


Note: You can also do this by sewing the bodice and skirt together the tradtional way--in the round--you just have to switch from regular to elastic thread in the bobbin once you get to the back.

Note: For this romper, I used a side zipper, which didn't work very well since it rippled along the side seam . If you followed the instructions from part one, you'll have a center back zipper like the dress in the first photo. So attach each side of the skirt to the two back pieces separately, using the technique to elasticize the seam, and then insert the zipper using a centered application. Hand picking works well with the smocking.

That's it, friends. I hope you've enjoyed this series and will be making yourself many comfy sundresses. Please share the results!

Thursday, June 23, 2011

The Daily Dress: Shirred-Back Anthro Slip Dress

Since we're in the middle of the shirring series, how about a shirred-back Anthropologie dress? This is their Verdant Slip Dress. Oddly, Anthropologie always refers to shirring as "smocking." I don't think heirloom seamstresses would appreciate that!


This is such a pretty print, don't you think? I love those big clusters of flowers.

But let's talk about what's important here: the shirring. The back has a panel of shirring and the skirt below has lovely soft pleats.

I'm kind of dying to check out the construction of this dress. Has anyone tried it on? Or better yet, own it? I especially want to know how they elasticized the skirt below the shirred panel.

I'll be in Rockefeller Center today; I might need to take an Anthro trip!

Hemmed Silk Organza

Is it wrong to feel positively breathless over the results of one's own sewing? I love the rush of finally mastering a technique. (Ah, cheap thrills.) This is my first use of the narrow hemmer foot that's been nearly flawless. Only took three years to get it right!

Making a Shirred-Back Dress, Part Two: Shirring!


First, read part one to modify your pattern to make it wider. Now we're going to shirr!

To start with, you need to press the top of your dress backs. We're going to use a method that avoids getting the ruffled top look that you see on little girls' sundresses--a bit more elegant and vintage-inspired.

Press down 5/8" at the top and then fold the raw edge in to meet the fold.


Hand-wind a bobbin with elastic thread. This is the brand my notions store carries.


As you're winding, you'll need to stretch the thread a little so there's a bit of tension. I just give mine a little tug at the top of the "wind." I'd recommend winding a couple bobbins to start, since the elastic thread is fairly thick and not much fits on one bobbin.

Load the bobbin into your machine, pull it up, and treat it as your regular bobbin thread. Stitch as normal from here on. All stitching will be done from the right side of the fabric so that the elastic is in the inside of the dress. I used my usual length and tension, but I know some people lengthen their stitch and tighten their tension. Do a practice run to see what works for you.

Edgestitch about 1/8" away from the top.
Do another row of stitching at the bottom of the turned-under seam allowance, about another 1/8" away. It won't really get stretchy yet; it might just ripple a bit.
Now you begin shirring rest of the rows. Make the next line 1/4" away from the last, and then continue in rows 1/4" apart until the end.
The fabric will continue to tighten up as you go.
From the inside:
When you're done, give the piece a steam with your iron and it will shrink up!

I've done this technique on a Bernina and a Janome, and both worked really well (though the Janome made shirring that was a bit tighter). Many people mentioned having trouble shirring at all on a Brother machine. If you have one, definitely check out this video that will help you adjust your bobbin tension so it will work.

I made a couple videos showing the process, but the sound quality is bad enough that I decided not to post them here. (Last time I use my iPhone for this sort of thing.) You can watch them at your own risk here and here.

Tomorrow I'll show you how to sew the bodice back into your dress. You'll be using the elastic thread again so make sure you have a little left.

Wednesday, June 22, 2011

Wordy Wednesday

Hello friends! There's a problem with Blogger right now and no images can be uploaded. Hence, part two of the shirring tutorial is delayed until further notice. But I will tell you things with my words instead!

Now seems like a good time to let you know that my TV debut is happening next week on PBS; Threads did a great post on it here. It's Sew Easy is set to premiere on June 30th.  My session is the first one of the first show!

If you don't see the show on your local PBS listings, you can contact them and ask them to include it in their programming. It would be much appreciated!

I'll be back (hopefully with pretty pictures) tomorrow.

Tuesday, June 21, 2011

Daily Outfit 6.21.11

I didn't make this dress, but it's notable since it's been a big style inspiration to me. I bought it at Betsey Johnson maybe 5 years ago. The style is called "40s Frock" and I loved it so much I actually paid full price for it. It's silk with a zipper front, tulip sleeves, lace trim, and a back tie. I actually based one of the style variations in my book on this dress!

As you can see, the granny shoes are making yet another appearance. I love them that much.

I styled my hair in hot rollers, and then put each side back in a comb. The comb was a revelation this week. In Bettina May's pin-up class, she suggested them as an alternative to Victory Rolls if you want something a little flatter. Two symmetrical Victory Rolls look kind of ridiculous on me, so I'm thrilled with the comb solution. I just got a pair of plastic Goody side combs from the drugstore. So easy!

I've been working at the studio all day today and the look has held up pretty well, except that I took the necklace off and am barefoot. Ah well.

Making a Shirred-Back Dress, Part One: Modifying Your Pattern

As promised! This technique isn't difficult, but it has a few parts, so I'm going to break it up into three posts. Part one is modifying a dress back pattern so it's the right size to be shirred with elastic thread. We're going to be talking about strappy and strapless patterns, so no full-coverage dress backs. (Note: there is a way to shirr a full coverage dress back, and that's to change the style lines so you have side panels underneath the arms, and then shirr those.) Note: the only special supply you'll need for the whole tutorial is elastic thread. It's widely available and made by a variety of brands, including Gutermann, Stretch Rite, Dritz and Designer's Choice. It generally only comes in black and white, so choose the best color for your fabric.

You can modify a basic dress back bodice like so. The green is your new style line. (Note: CB is center back and SS is side seam.) Pretend these sketches are good and they weren't done on an envelope, okay?


Important: don't forget to add a seam allowance at the top of the new back pattern piece.

If you're using a basic sloper or simple dress pattern, you'll also want to change the front. You can do sweetheart:

 Or a simple straight front:
Isn't patternmaking fun? No matter which shape you do, make sure your front and back side seams are the same height so they match up when you sew them together. They should form a smooth line, rather than dipping down into a v-shape. Also, always do a test run of the front, even if it's just a tissue fitting.

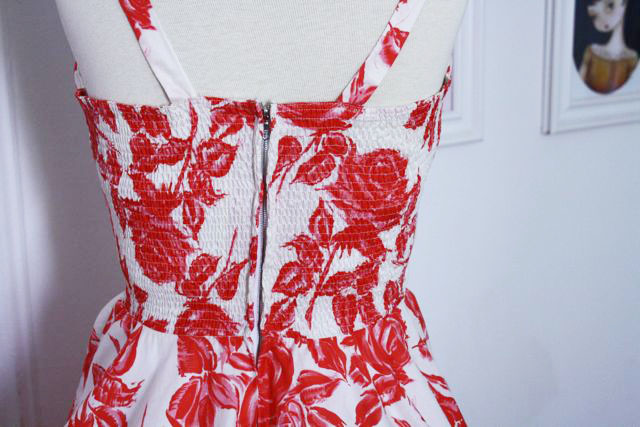
We'll be shirring the whole back, rather than side back panels, which is often what you'll see on vintage sarong dress and rompers. This just keeps it simpler, but you can certainly break up your back into panels and shirr only the side panels.

With a fitted-waist skirt like a circle skirt or pencil skirt (or even fitted shorts for a romper), you'll still need a zipper. But we WILL be adding elastic shirring to the top of the back skirt, so it will stretch with the back bodice. More to come on that. (If you make a gathered skirt and elasticize it, you won't need a zipper, but I'm not focusing on that technique here.) I highly recommend doing your zipper center back. (This is the sleekest, flattest zipper application for this kind of dress. A lapped side zipper gets kind of ruffly and adds width to your side. ) This means you'll have seam allowances at the center back for the zipper. Add them if your pattern doesn't have them already.

Now, close up the back darts and trace the pattern. It's now dart-less, which is what we want.


Now you need to figure out how much extra width to add to accommodate the shirring. It's a process of trial and error, really. Shirring reduces the pattern piece width by half. But you can't just double the pattern width, because you want the elastic to be snug on you, so it stretches a bit and conforms to your body. Make sense? The first pattern I did this with, I slashed and spread to add a bunch of inches to the middle of the piece. It was way too big. (Which isn't a big deal, I just made big seam allowances in the back and then trimmed them down.)

The next one I did, I took a simpler approach: adding just an inch to each side of the pattern piece. Make sure you don't make the piece taller in the process, since it still needs to fit in to the front pattern piece at the side seams. The green shading below is the extra width.


This approach worked really well, though it is very snug. It's bombshell-fitted, which is exactly what I was going for in the Shaheen-style dress I was making. If you want your dress to be a little looser, add 1-1/2" inches at each side of the back pattern piece.

Next, cut two of your modified back pattern piece in your dress fabric.

Tomorrow we shall shirr. Shirrly we shall! (You must excuse just one bad "shirr" pun.) There's video and everything. On Wednesday, I'll show you how to sew the shirred piece into dress.

Ask any questions in the comments!

Monday, June 20, 2011

Daily Outfit {6.20.11}

If you're not sick of looking at pictures of me today, here's an outfit post for you! I decided I need to practice my new modeling skills at least a few times a week.

Here's what I wore to run some errands today.

Dress: My new roses dress, sans crinoline, self-drafted pattern
Sweater: J. Crew Jackie cardigan
Sweater clips: vintage, from eBay
Shoes: Spring Step "Bow" wedge

I managed to get my bangs to "hide" by sweeping them to the side and pinning them. It was a fun change for a bit. 

Also, a few of you requested pics of my "grandma" shoes in action! Here they are:
I love them unapologetically. They are SO comfy and the peep toe shows off my pedi. And after all, vintage is what our grandmothers wore, right?

Ice Blue Romper, Pinup Style

I took a pinup modeling workshop yesterday! It was such fun. It was led by the adorable Bettina May (who is a fellow seamstress!), who taught us tips and tricks for doing our hair and makeup, posing secrets, and then gave us each a photoshoot.

Of course I had to make a special outfit for the day. This is my "bathing beauty" romper, based on the swimwear designs of Rose Marie Reid. It has a shelf bust, lots of front ruching, elastic shirring in the back, and an inner corselet made of cotton bobbinet.
My makeup, in all its glory. How about those eyelashes? (And, no. They're not real. Everything else is though.) 

I definitely feel like I got what I went for, which was modeling tips--ones that aren't given to me by Tyra Banks, specifically. I'm feeling much more confident for my upcoming photoshoot for my book. I just wish I could model all my clothes lying on my back with my legs up and against the wall and my hair artfully arranged around my head. It's such a natural state for me that I almost drifted peacefully to sleep. (Not really.)


And don't worry, ladies. That shirring tutorial is coming your way!

Friday, June 17, 2011

Huge Blue Gardenia Giveaway (Plus Discount)


Well, Denise at The Blue Gardenia certainly spoils us, doesn't she? That woman is always planning another giveaway, each more fabulous than the last. This one is a 60s-themed smorgasbord.

First, this awesome pattern which looks like it would make an amazing dress for hot summer days. Bust 34", but this one would be easy to resize.


Second, fabric to make it with. A pinky-red linen blend with a lovely hand and drape.


Third, a lipstick. MAC Supreme Sheen lipstick in Insanely It, a sheer vivd pink.


And fourth. A vintage sewing book, Sewing Made Easy.

To enter, just leave a comment here by midnight EST on Tuesday, June 21st. Readers from all locations eligible. If your profile doesn't link to a page with your e-mail address, please leave your e-mail address in your comment.

Lastly, something for everyone! A discount on The Blue Gardenia's amazing selection of vintage patterns AND jewelry. Buy $75 or less, get 15% off, buy more and get 20% off. Good for patterns or jewelry. Use code 60sGertie. The discount is good until Thursday, June 23rd.
© Gertie's Blog For Better Sewing. Powered by Cake