
You can modify a basic dress back bodice like so. The green is your new style line. (Note: CB is center back and SS is side seam.) Pretend these sketches are good and they weren't done on an envelope, okay?

Important: don't forget to add a seam allowance at the top of the new back pattern piece.
If you're using a basic sloper or simple dress pattern, you'll also want to change the front. You can do sweetheart:


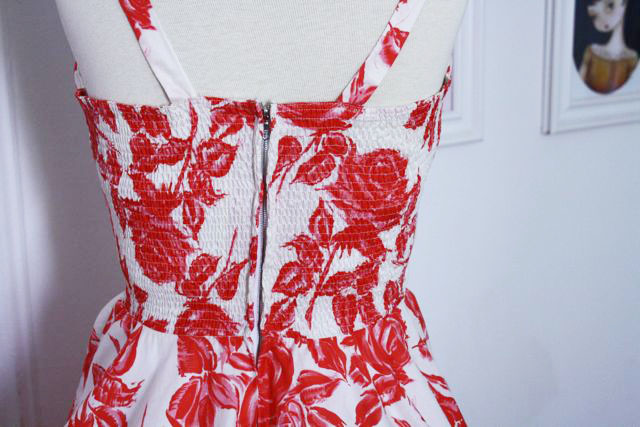
We'll be shirring the whole back, rather than side back panels, which is often what you'll see on vintage sarong dress and rompers. This just keeps it simpler, but you can certainly break up your back into panels and shirr only the side panels.
With a fitted-waist skirt like a circle skirt or pencil skirt (or even fitted shorts for a romper), you'll still need a zipper. But we WILL be adding elastic shirring to the top of the back skirt, so it will stretch with the back bodice. More to come on that. (If you make a gathered skirt and elasticize it, you won't need a zipper, but I'm not focusing on that technique here.) I highly recommend doing your zipper center back. (This is the sleekest, flattest zipper application for this kind of dress. A lapped side zipper gets kind of ruffly and adds width to your side. ) This means you'll have seam allowances at the center back for the zipper. Add them if your pattern doesn't have them already.
Now, close up the back darts and trace the pattern. It's now dart-less, which is what we want.

Now you need to figure out how much extra width to add to accommodate the shirring. It's a process of trial and error, really. Shirring reduces the pattern piece width by half. But you can't just double the pattern width, because you want the elastic to be snug on you, so it stretches a bit and conforms to your body. Make sense? The first pattern I did this with, I slashed and spread to add a bunch of inches to the middle of the piece. It was way too big. (Which isn't a big deal, I just made big seam allowances in the back and then trimmed them down.)
The next one I did, I took a simpler approach: adding just an inch to each side of the pattern piece. Make sure you don't make the piece taller in the process, since it still needs to fit in to the front pattern piece at the side seams. The green shading below is the extra width.

This approach worked really well, though it is very snug. It's bombshell-fitted, which is exactly what I was going for in the Shaheen-style dress I was making. If you want your dress to be a little looser, add 1-1/2" inches at each side of the back pattern piece.
Next, cut two of your modified back pattern piece in your dress fabric.
Tomorrow we shall shirr. Shirrly we shall! (You must excuse just one bad "shirr" pun.) There's video and everything. On Wednesday, I'll show you how to sew the shirred piece into dress.
Ask any questions in the comments!

Do you need especial foot attachment? And maybe a quick supply list. I have e perfect dress to modify tonight, but want o make sure I'm prepared for next steps. Thanks.
ReplyDeleteYour command is my command! Updated with supply info.
ReplyDeleteYOU ARE THE BEST, GERTIE!!
ReplyDeleteThanks so much for all the info, and for updating with the supplies needed.
I'll shirrtenly read tomorrow's post for the next exciting installment (said in my best Sean Connery accent! - just in case you missed it....)
I love the look it's given to the back of your dress Gertie - plus you get a snug-fit look + comfort to move (clever!) :)
ReplyDeleteKathleen on Grosgrain has a couple of good posts on shirring:
Technique Tuesdays: Shirring
Shirring with your brother (it seems to be tricker on Brother sewing machines!).
Thanks for a great tutorial! I've just done my first bit of shirring, but haven't tried modifying a pattern yet - now I think I'll have to try it out!
ReplyDeleteAt risk of sounding like a plonker, when you say 'close the darts', how would I do that? I don't remember seeing that in any of my books, so I'm not really sure how I'd go about it ... the only thing I can think of would be pulling them together on the paper pattern, but wouldn't that end up making it 3D, which would make it hard to trace, and that makes me think that that's not what you mean! Sorry, hope that makes sense!
Thanks again, Gertie - very inspiring stuff :)
Clare, you just bring the dart legs together, fold the dart to one side, and pin it down temporarily. Then it's flat so you can trace it. Make sense?
ReplyDeleteI can't wait! I've been wondering how shirring is done :)
ReplyDeleteIf you've got a Brother machine, good luck, they're known to be resistant to shirring. I think I've damaged my new Brother trying to force it to do so.
ReplyDeleteReally good directions,tips, and hints, so to speak. This is what sewing is about....knowing the professional techniques. Appreciate you sharing of this information.
ReplyDeleteI'm so excited to follow you on this one! I love shirred dresses, and have been dying to get going on one myself =D
ReplyDeleteAhh, my daily dose of Gertie! It's like a delicious combination of my favorite classes, books, and movies. You've got drama, humor, and ... a cliffhanger!
ReplyDeleteI have never used elastic thread, and I'm a little scared of it. So I look forward to tomorrow's installment.
If I were going to do a gathered skirt would I gather it and sew it to the bodice (because of the elastic in the shirring), or would I sew elastic to the seam allowance (or make a channel for the elastic).
ReplyDeleteGreat tutorial, Gertie! I'll have to bookmark for when I have more time to try out this technique. My machine runneth over with work! I have about 5 outfits ready to work on since my trip to the fabric store over the weekend!
ReplyDeleteThis tutorial could not have come at a better time. I am about to embark on a shirred summer dress, given that I go on holiday on Sunday, I need all the guidance I can get! I am poised for tomorrow's tutorial, elastic thread at the ready!
ReplyDeleteThank you for coming back to me, Gertie! I get you - think I'd had too little sleep and too much coffee, so I was imagining the flattened dart wrongly - derp!
ReplyDeleteCan't wait to try this tutorial out!
i just altered a pattern and made a smocked back. Now I wish I had waited for this tutorial! it's an excuse to make another one though. thanks for this!
ReplyDeleteIf anyone is having trouble shirring, I have a tutorial on my blog. I have a Brother sewing machine and can still shirr. I found another way to shirr besides the usual raising the upper thread tension.
ReplyDeleteBy the way, lovely dress, Gertie, and congratulations on your first book! :)
Sabrina Wharton-Brown
http://thesewingcorner.blogspot.com
I've been waiting for this tutorial all week! :) I have a 50s midriff top I'm dying to make, but wanted to convert the back to shirred elastic, rather than the button back it original had. (Seemed to be wiser since I swell during the summer and something that fits now while it's hot, will be too big next spring!) Thank you so much for sharing this technique; I think once all three parts are published I'll be shirring everything! lol.
ReplyDeleteInvaluable lesson. Thanks for all you do. Now, if only I wasn't totally intimidated...
ReplyDeleteHi Gertie,
ReplyDeleteI have a question about shirring. If the back of your dress constists of one piece, would it be possible to just shir a part of it? You know, like a few inches at the heigth of the bra line? Or do you really have to make separate pattern pieces?
Thanks!
Lisa
Great tutorial, I like it very much, I will try it. Thanks for sharing
ReplyDeleteI know I'm a little late on this, but will I be cutting the back in half for the zipper?
ReplyDelete