Showing posts with label techniques. Show all posts

Friday, September 18, 2015

Dirndl Trim

Lena Hoschek Röschen Dirndl
Dirndl Fever is no where near subsiding! And it's just in time for Oktoberfest, so let's keep the dirndl posts rolling. One of the many reasons I am so attracted to dirndls is their beautiful craftsmanship. And that craftsmanship really shines in the use of gorgeous handmade trims. The Lena Hoschek dirndl above is one of my favorite examples: the trim around the neckline is a piped ruffle with handmade herzruche ("heart ruching") set in the center. That's an astounding amount of work, and the results are so lovely.

Here's another Lena Hoschek design that uses just the herzruche around the neckline. The effect is stunningly simple.

Lena Hoschek Kiritag Dirndl

Other typical dirndl trims involved origami-esque hand pleating, like this Sonja Fellner design:


The subtly amazing thing about the trim above is the way the gingham side of the strip was cut a little wider than the red, so the gingham wraps slightly around to the red side. It's that kind of detail that blows my mind a bit.

I especially love designs that incorporate the contrasting apron fabric into the bodice trim.

Lena Hoschek Cordula Dirndl
Of course, the question is: how does one learn how to make this type of trim? (Especially with no German language skills and only the beginnings of understanding of the subject.) A great resource I found is Folkwear pattern #123, which has several pages of instructions for making various types of dirndl trim.


My vote for the best trim name? Froschgoscher,  which is translated to "frog lips."

A good online resource for making ribbon herzruche is Kenneth King's article "How to Make Ribbon Trim." However, you will need a Threads Insider membership to view the entire thing. King, in his turn, recommends the book The Artful Ribbon by Candice Kling.

Other potential book resources (I say "potential" because I don't have them to look at) are Fabric Manipulation by Ruth Singer and The Art of Manipulating Fabric by Colette Wolff.

Readers, have you ever made your own dirndl trim? Do you have any resources to share?

Wednesday, September 16, 2015

Dirndls and Boning

Lodenfrey Dirndl, which uses boning at center front, concealing the hook and eye closure
I've always loved the subject of adding structure to fitted vintage-style dresses. Boning, padding, underwires, underlining, interfacing, interlining: no topic is too minuscule or technical for me to obsess over! So when I caught Dirndl Fever in Germany recently, one of my first questions was about dirndls and boning. Since dirndl bodices are so fitted, it seems like using boning would be a common technique. However, I was surprised to find that the Hammerschmid dirndl I purchased in Passau has no boning in the bodice (though the entire outer layer is interfaced with what appears to be fusible Weft interfacing).

After buying my dirndl, I shopped again in a couple dirndl shops in Rothenburg specifically looking at the structure of the bodices. Evidence of boning was found! A few of the dirndls in the Pollinger shop had just two rows of boning, one on either side of the front zipper opening. The closest example I could find online was this Lodenfrey dirndl on eBay. See how there's a centered zipper with topstitching, and then two more rows of topstitching to either side of the zipper? The bones are inserted into the channels formed by the topstitching.

Source
This center front boning placement seems fairly common, and would be especially helpful if you were concerned about keeping the front opening of your dirndl sturdy and wrinkle-free (functioning like a busk on a corset). A few resources on this type of boning placement:


I was curious if there were other ways of placing boning in a dirndl. Some more obsessive web searching brought me to Gössl, a traditional Austrian design house that seems to use boning much more liberally in their dirndl bodices. Bingo! Check out these photos.
Source 
You can see a boning channel underneath the bust and then one that extends diagonally from the underarm to the waist.

Source
These dirndls also have a line of boning on the back bodice. The back boning extends from the underarm to the waistline, near the side seam.

Source
In these cases, it's interesting how the bones appear to be inserted into a stitched channel between the outer bodice and the lining, much like a corset.

On a side note, I went down some interesting rabbit holes with Google Translate. Gössl refers to their boning as miederstäbe, which translated back to me as "bodice rods." Lodenfrey uses the term formstäbchen, which Google translated as "shape chopsticks." Shape chopsticks! I love that! (On a side note to my side note, I obviously need to learn German if I'm going to really sew some dirndls.)

So readers, this is just a collection of my initial research into the use of boning in dirndls. All this said, it's also very common for dirndls not to use boning at all. I wrote to the kind ladies at Limberry (a site that carries some rather high-end designer dirndls), and they quickly wrote back saying the only designer they carry who uses boning in her dirndls is Sonia Fellner, whose designs incorporate a lot of corseting details.
Sonja Fellner dirndl


Now, I know I'm not the only one out there who's spent time pondering this very subject. I would love to hear your experiences and thoughts on the matter of dirndls and boning, readers!

Tuesday, March 31, 2015

Making a Quilted Skirt, Part 1


I absolutely love the look of a quilted skirt! Using machine quilting on full skirts was very popular in the '50s. The best thing is that the quilting adds lots of body, for a very full look.

Did you know the skirt on the cover of my book Gertie Sews Vintage Casual is quilted?

For that skirt, I used a layer of cotton and a layer of flannel and then outsourced the quilting to my mom. Here's a view of the inside.

See how well the skirt is supported by the quilting? It's like magic!

I recently got a yen to make another quilted skirt in spring-like fabrics. I'm using the rose print sateen from my new fabric line. (It seems to be sold out online, but it's definitely available in Joann stores. The print also comes in yellow on poplin. In other fabric news, it looks like the border print is back!)

I decided to try a more traditional quilting configuration, using batting between two layers of fabric. So the first thing I did was gather my supplies:


  • About 3 yards each of the sateen and a backing fabric. I'm using Kona Cotton in Red for my backing. 
  • Cotton batting. I chose a twin size package, and will have plenty leftover. 
  • A skirt pattern. I'm using my flared skirt pattern from Gertie Sews Vintage Casual. (See the section on the quilted skirt for more specifics on how to use the pattern and draft a waistband.) 
  • A 9" regular zipper. 
  • Spray fabric adhesive, to hold the layers together. 
  • Painters tape (or masking tape), to mark quilting lines. 
  • Lightweight fusible interfacing for the waistband (not pictured).
  • Also handy: a walking foot for your machine (this keeps the layers smooth while quilting). Having a foot with a "bar guide" is especially handy for this. 
Start by washing and drying your two fabrics to pre-shrink. Then iron and starch, if desired. (Starching helps put some body back into the fabric after pre-washing. I learned this on quilting message boards! You can even make your own starch, which I totally did. Just mix a tablespoon of corn starch and a pint of water in a sauce pan. Heat, mixing well, until boiling. Leave to cool. Add two drops of essential oils, like lavender (optional). Pour into a spray bottle using a funnel.)

Cut your skirt front and backs out in both fabrics and in the batting. 


Lay out the layers one at a time and spray with the adhesive. Roll up the next layer, and set it down, unrolling it so that the edges match and they stick together from the adhesive. 


Once you have your "skirt sandwiches," mark your first quilting line with the painters tape. Find the exact center front of the skirt (you can fold it in half and mark with pins) and then find the 45 degree angle to this. I like to use a 2x18" ruler, and align a 2" square with the center front line, as in the illustration below: 

By Sun Young Park, from Gertie Sews Vintage Casual
Place your tape along the 45 degree angle, starting at one upper corner of the skirt. 


Before stitching along your taped line, make a quilting sample! Use a small swatch of all three layers together. Make sure you're happy with your chosen thread color and the width of your stitching lines. 

Once you're happy with everything, start stitching along the tape. Remove the tape and stitch parallel lines, using either the guide on your walking foot or more rows of tape. 

Hey, the quilting guide even works well when you put the bar in upside down! (Whoops.)


Keep on making those parallel quilting lines. I hope you have a good podcast to listen to. (OMG, have you heard Serial? I binged on all 12 episodes last week.)


Next time, on Serial: how to make the crisscrossing lines, matching the quilting lines on the skirt backs, seam finishes, and skirt construction!

Friday, May 23, 2014

Adding Underwires to a Bustier-Style Bodice


This has got to be one of my most frequently asked questions: how do you put underwires into a dress? (Especially one like my bombshell dress or other bustier-style design.) Is it possible? To be honest, I really didn't know. So I decided to spend some time exploring the possibility while making B6019, my Butterick Shaheen-style dress pattern. You'll need a pattern with a underbust seam and, ideally, some sort of bra cup seaming.

This pattern is ideal because it has a bodice lining. The underwires will get stitched to the lining only, so that the stitching lines don't show on the outside. If you wanted to put underwires into an unlined bodice, it would need to have actual bra cups (that are the shape of an underwire) or you would have to not care about underwire stitching lines.

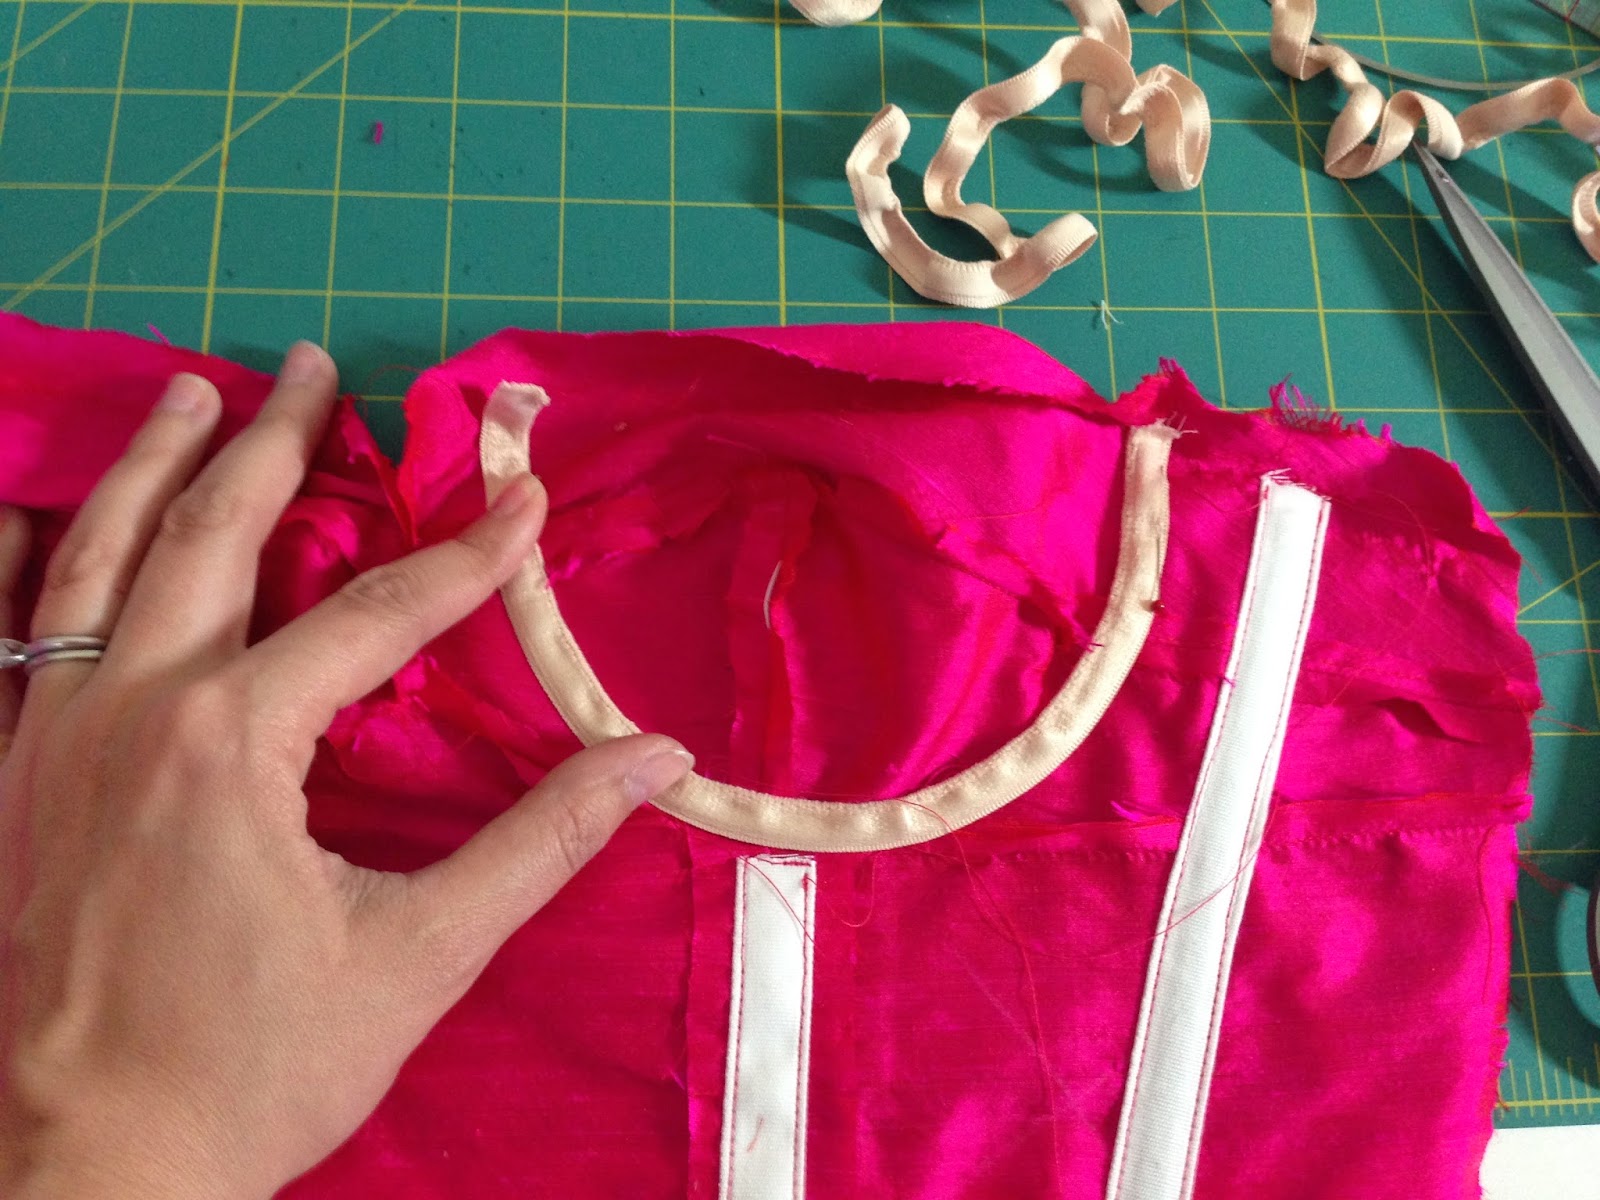
Here's how I started. Construct the bodice front lining and add boning channels where desired. Practice positioning the underwires and see if you're happy with how they fit by holding the bodice up to your torso. The underwires should not extend past the top of the neckline. (Tip: you can remove underwires from a worn out bra to avoid having to buy them--plus you'll know they're the right size!)


Place the underwires into channeling. (If you don't have channeling, 1/4" wide bias tape could work in a pinch.)


Mark the underwire placement. It's very important to remember that the underwires will expand when worn. See how I'm stretching them slightly open with my hand in the picture above? This is how you want to mark the placement. Add some chalk lines while stretching the underwire open so you know where to stitch the channeling. The bottom of the underwire should match the underbust seam.


Remove the underwires from the channeling and pin the channeling in place along your marked chalk lines. Stitch along each side of the channeling.


Put the underwire back into the channel and secure the open ends of the channel with stitching. Repeat on the other side of the bust.

Prepare the outer bodice front. I put fusible fleece in the cups for support and woven interfacing in the midriff.


Complete the bodice as usual. Here's how the underwired lining looks from the inside.


I ended up adding some thin circular bra pads between the layers for a little extra oomph--the upper cup was collapsing a bit on my smallish bust (sad, I know). 

And here's the outside!

You want support? This thing is super supportive! Plus it has elastic shirring in the back to hold it snug to the body, and a halter strap for a little extra lift.

Hope this is helpful! Do you all have any other tips for sewing underwires into a dress?

P.S. This method would work for a swimsuit too!

P.P.S. I'll be back with the sew-along on Monday! I'm going to do a video to show y'all how to make bra straps.


Thursday, December 19, 2013

Vintage Pattern Illustrations: Fantasy Vs. Reality (Plus Other Questions About McCalls 4144)

There were some interesting comments in the post last week about the difference between the envelope illustration and the actual finished garment. This difference is especially pronounced in 50s vintage patterns, where the illustrations are so much more fantasy than reality. So how does one visualize the end product? For me, it's a result of analyzing the garment construction, fabric choices, and my own body type.

Here's what I mean:

 1. Garment construction: McCalls 4144 has an interesting skirt feature. It's actually a pencil skirt with a big fluffy overskirt. Take a look at the line drawing and the pattern pieces. You basically make a pencil skirt in lining fabric (I made mine in coordinating ombre silk charmeuse), and then cut 8 of the overskirt panels that get gathered over the pencil skirt.

Since the skirt lining is slim, I knew the design wasn't intended to be worn with a crinoline underneath. So, the fullness was meant to come from the overskirt on its own.

2. Fabric choice: Since I decided on chiffon for the dress, I knew I couldn't count on the fabric to provide a poofy look like on the envelope. For me, this was kind of a plus since I wasn't looking to have a huge skirt going on. I also decided to minimize the poofy effect by cutting 6 overskirt panels, rather than 8.

Now, if I really wanted the poofy effect, I would have to choose another fabric, like organza or tulle.

3. Body type: This is the trickiest thing to analyze, and you have to be brutally honest with yourself. Is your waist this small?

No. No, it's not. Also, keep in mind that fashion illustrations have a proportion that is entirely fictional--really! The standard for fashion figures is a height of 9 heads.

[source]
The average person is 7 heads high, for comparison's sake.

Given these three factors, I expected the dress to have more of this silhouette, but on my body.

And now! A couple other reader questions.

Anonymous asks: I love love this dress!! I do have a couple of technical questions. When looking at the pattern and then your dress, the front darts appear to be much shorter on the pattern front, did you lengthened them? if so why? Did you encounter any problems gathering and attaching the silk chiffon overskirt? One of the things I love about your blog is your attention to details.

Why thank you! I did not lengthen the darts. Looking back, I wish I'd shortened them! They looked great on the muslin, and then behaved a little differently in chiffon. By the time I'd sewn and pressed them, though, it was too late. Ripping stitches in chiffon is almost impossible, because it always shows. Also, the creases from pressing really wouldn't have come out. So, I decided the lesser evil was to have dart points on my boobs, rather than damaged, creased chiffon on my boobs. The gathering of the chiffon was one of the easiest parts since chiffon is so lightweight. I basted it by hand to the underskirt once it was gathered, and it was very easy.

Another Anonymous says: I'm in the minority on this, but while attention grabbing, this is not a look that flatters. Your eyes have disapeared between hair and the the undulating green waves of the dress. The darts at the shoulders are also not restful. I think the light pink dress from the top of the site is more complementary.

Okay, that's not really a question but I thought I'd address it. I agree that this isn't my best dress, but not every dress can be the awesomest, most flattering. One of the things I love about sewing is that we can try out different styles. Even if light pink shift dresses are the most flattering thing on me, that doesn't mean that I have to make only that for the rest of my life. I want to sew with chartreuse ombre chiffon! And wear swishy skirts even if I know dirndls make my hips look bigger! Screw it! As a sewing blogger, I post everything I make, not just the things I think will be unanimously agreed-upon as successes. It's all about the process. (As for the shoulder darts, they're actually tucks/pleats. They're not meant to lay flat. I can see how they might look weird, but I really like them!)


Tuesday, October 15, 2013

One Garment, Two Stay Tapes

The topic of stay tape is perennially interesting, don't you think? It also seems to be one of the least-understood notions. Lately, I've been taking pictures of stay tape when I apply it, to get a better understanding of its many uses. (If this topic is entirely new to you, start with my post, "The Wild World of Stay Tape" as a primer.)

Today I'm making a pair of shorts, and it turned out to be the perfect example of two different applications--as well as two different types of stay tape. Note: I'm using fusible stay tape from Emma Seabrooke. It's a fantastic product that comes in many varieties.

Okay, example #1: the zipper opening.

Here you see wide black woven stay tape applied to the center back seam, where an invisible zipper will go.


I chose 1-1/4" wide stay tape because it's double the width of a 5/8" seam allowance. When folded in, the seam allowance will be very stable. Added bonus: I insert invisible zippers by pressing in the seam allowances first, and the stay tape gives me a guide so I don't have to measure them.

The zipper opening is very important to stabilize. Have you ever sewn one side of a zipper, only to find that the other side is shorter and won't match up when the zipper is closed? That's because stitching a zipper in place can stretch out the fabric, making it longer than the other side. This is VERY annoying when you're trying to match up waistline seams!

Stay tape in the zipper opening seam allowances completely takes care of this problem. It also makes your zipper area look crisper and nicer.

Okay, on to the next area: the pocket opening.

 
These shorts have a very curved pocket opening, which easily stretches out of shape because of the fabric's bias. A narrow tape will stabilize the opening, preventing it from stretching during construction and wear.

In this case, I used a 1/2" knit stay tape. When stabilizing curves, it's crucial to use a stay tape that will curve as well. Knit stay tape can be manipulated around a curved seam. You can also find bias woven stay tape for this purpose. When stabilizing a seam like this, apply the tape so that it is centered over the seamline.


So there you have it--two real-world examples of choosing and using stay tapes!

Tuesday, July 16, 2013

Sewing a Lace or Eyelet Collar


I've been super into lacy peter pan collars lately. In fact, I'm making two dresses that have them! (Both are variations on Simplicity 1609.) Both collars were cut from yardage, either lace or eyelet. Originally, I cut both the upper collar and the under collar out of the lace/eyelet. But two layers of the lace on top of each other didn't work--it obscured the lace pattern and made the whole thing look heavy.

Monday, July 1, 2013

Sewing the Scalloped Peter Pan Collar on Simplicity 1609


I've been working a bit on my new version of Simplicity 1609, which will be in lime green gingham with a white pique collar. (I made the bow version in plaid last week.) The collar on this design is a Peter Pan collar with a twist--it has a scallop on either side on the front. Cute!

When sewing my collar this weekend, I noticed that the instructions for sewing the collar are a little scant. If I were a beginner and followed these instructions, I have a feeling I'd be confused and unhappy with my results. (Not ragging on the pattern here--I know they only have limited space!) So I thought I'd do a tutorial with more detail to help you out if you want to sew this pattern.

Here we go.

1. Select your interfacing. Choose a fusible interfacing that gives good support but isn't too stiff. For my lightweight pique, I choose Fashion Sewing Supply's Weft interfacing in white. I did samples on scraps with three interfacings before I decided on that one--be prepared to try a few and see which you like best!

2. Preshrink your interfacing, if necessary. I only use interfacings from the above source because they are preshrunk. If your interfacing shrinks after washing your garment, you will hate the effect and never want to wear it, trust me. You'll get ugly bubbles on your collar that won't iron out. To preshrink interfacing, put it in a bowl of warm water, let the water cool, and then hang the interfacing to dry.

3. Cut out four of the collar piece in your fashion fabric, and two in interfacing.

4. Apply interfacing to one set of the collar pieces. Use a presscloth to avoid mucking up your iron. Note: your interfaced collar pieces will be the top collar pieces, and then uninterfaced set will be the undercollars. These totally look the same, but the one on on the right is interfaced!


5. Pin one top collar to its undercollar piece, right sides together. Transfer the stitching line marks from the pattern; these will help you immensely. (If you don't want to dig out your pattern piece, you can just draw in a 3/8" stitching line around the scallop--that's all the marking is. It's there to help you figure out where to pivot when stitching.)


6. Stitch around the outer edges of your collar, pivoting at the scallop point. Note: The seam allowance here is 3/8", not your normal 5/8". 


7. Notch the curves and the scallop point. Where the curves are most extreme, you need to do a lot of notching. You can ease up on the notching on the less curvy curves. Around the scallop, make thin notches about every 3/8". Notch all the way to (but not through) the stitching lines.


8. Trim down the seam allowances to about 1/8". If you've notched all the way to the seamline, your tiny little notches will still be there.


9. Using a hard surface like a point presser (I'm guessing there are other household items that would work well too), press open those tiny seam allowances as best you can. You will need to keep maneuvering the collar around the surface to get where you need to press.


10. Turn the collar right side out. Use your fingers to turn the edges all the way out. It will look a little funny.


11. Remembering that the interfaced collar is the top collar, work from the underside of the collar, pressing it so that the seamline is nudged toward the underside so that it's not visible on the edge of the collar. Use lots of steam and don't press to hard--you don't want to flattern the collar. You may see some ripples from the fabric easing, but that's ok since it's on the bottom.

The top will be ripple-free, which is most important. (This is why you want the support of the interfacing on the top collar.)


12. Using a press cloth, steam the collar on the right side.
13. Baste the collar edges together. The seam allowances will be uneven because of how we pushed the seamline to the underside. Trim the undercollar seam allowance so that it matches the upper collar seam allowance.


14. Now it's ready to baste to your dress!


I know this looks like a lot of steps for one measly little collar, but they're worth it, I promise!

One last thing: I'm having a week-long 10% off sale in my fabric shop! Use coupon code HAPPY4TH until this Friday. I have the lime gingham above, new eyelet and polka dots, and more!


© Gertie's Blog For Better Sewing. Powered by Cake