Showing posts with label corsets. Show all posts

Wednesday, September 16, 2015

Dirndls and Boning

Lodenfrey Dirndl, which uses boning at center front, concealing the hook and eye closure
I've always loved the subject of adding structure to fitted vintage-style dresses. Boning, padding, underwires, underlining, interfacing, interlining: no topic is too minuscule or technical for me to obsess over! So when I caught Dirndl Fever in Germany recently, one of my first questions was about dirndls and boning. Since dirndl bodices are so fitted, it seems like using boning would be a common technique. However, I was surprised to find that the Hammerschmid dirndl I purchased in Passau has no boning in the bodice (though the entire outer layer is interfaced with what appears to be fusible Weft interfacing).

After buying my dirndl, I shopped again in a couple dirndl shops in Rothenburg specifically looking at the structure of the bodices. Evidence of boning was found! A few of the dirndls in the Pollinger shop had just two rows of boning, one on either side of the front zipper opening. The closest example I could find online was this Lodenfrey dirndl on eBay. See how there's a centered zipper with topstitching, and then two more rows of topstitching to either side of the zipper? The bones are inserted into the channels formed by the topstitching.

Source
This center front boning placement seems fairly common, and would be especially helpful if you were concerned about keeping the front opening of your dirndl sturdy and wrinkle-free (functioning like a busk on a corset). A few resources on this type of boning placement:


I was curious if there were other ways of placing boning in a dirndl. Some more obsessive web searching brought me to Gössl, a traditional Austrian design house that seems to use boning much more liberally in their dirndl bodices. Bingo! Check out these photos.
Source 
You can see a boning channel underneath the bust and then one that extends diagonally from the underarm to the waist.

Source
These dirndls also have a line of boning on the back bodice. The back boning extends from the underarm to the waistline, near the side seam.

Source
In these cases, it's interesting how the bones appear to be inserted into a stitched channel between the outer bodice and the lining, much like a corset.

On a side note, I went down some interesting rabbit holes with Google Translate. Gössl refers to their boning as miederstäbe, which translated back to me as "bodice rods." Lodenfrey uses the term formstäbchen, which Google translated as "shape chopsticks." Shape chopsticks! I love that! (On a side note to my side note, I obviously need to learn German if I'm going to really sew some dirndls.)

So readers, this is just a collection of my initial research into the use of boning in dirndls. All this said, it's also very common for dirndls not to use boning at all. I wrote to the kind ladies at Limberry (a site that carries some rather high-end designer dirndls), and they quickly wrote back saying the only designer they carry who uses boning in her dirndls is Sonia Fellner, whose designs incorporate a lot of corseting details.
Sonja Fellner dirndl


Now, I know I'm not the only one out there who's spent time pondering this very subject. I would love to hear your experiences and thoughts on the matter of dirndls and boning, readers!

Friday, August 10, 2012

Corsets as Outerwear?

Traditional undergarment corsetry
You know what's interesting? The role of corsets in the shifting role of underwear as outerwear. Every lingerie item you can think of has--at some point--taken a starring role in fashion, rather than being relegated to underneath clothing: bustiers, camisoles, slips, even panties. (Sorry, I can't stop saying the p word!)

But! Corsets are the only undergarment I can think of that are now thought of only as outerwear by the masses. They were originally worn exclusively underneath dresses, of course. While they may be an antiquated garment, there is a huge number of modern women--seamstresses and otherwise--fascinated by the corset. After making my first corset and spending much time on the various corsetry message boards and sites, I discovered something that surprised me: almost all these women are making or buying corsets to be worn almost exclusively as outerwear. (The exceptions to this are corsets worn in boudoir situations, fetish, and reenactments.)


In fact, the notion of a corset being underwear is now on the fringes. Corsetry as lingerie is usually mentioned only for those most extreme corset wearers: tightlacers--or people who wear their corsets for long periods of time (sometimes 23 hours a day) and lace very tightly, in an effort to modify their bodies. Accurately or not, this type of corset wear is associated with fetishism and BDSM lifestyles.

What a fascinating shift! If a Victorian woman showed her corset, it would be shocking, and I'm sure she would be thought of as a very loose woman (read: hooker). But now a woman showing her corset is in the mainstream, and a woman wearing her corset as underwear is the perverse one.

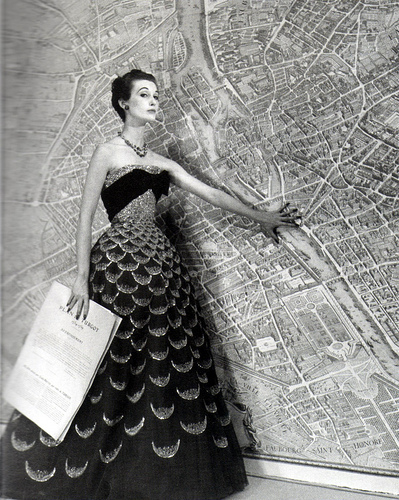
Worth gown

I'm interested in corsets pretty much only as foundation garments, in a historical sense. My further research (which I can share if you're interested!) has shown that traditional corsets were alive and well in the late 40s and early 50s. The silhouette of a Dior gown or a Jacques Fath suit would be impossible to achieve otherwise. And so, I find myself a bit in the fringes in the world of corsetry.

However, corsets were also making their way to outerwear status in the 50s, to the shock of some. This vintage pattern shows a corset-styled belt. (Though it's worth noting that, unless fully steel boned, this belt would be decorative rather than functional.)

Pattern from Mrs. Depew

Jacques Fath, one of my favorite designers of the New Look period, shocked the fashion world with his use of corset lacing on outerwear, as seen in this pink gown.


This gown is especially interesting in that it shows the foundations of a New Look dress--boning channels and all. The lacing is functional and adjustable.

But all this is still quite a shift from what we're seeing today: functional, steel-boned corsets worn with jeans as clubwear. This look can range from (sort of) elegant . . .


 . . . to downright gaudy.

Yikes!

Anyway, enough of my rambling. What do you think of this whole thing? Do you see corsets as underwear or outerwear?

Thursday, July 26, 2012

"Drifting Lace for Evenings of Dancing"

Champagne lace over a rustle of taffeta . . . one of the prettiest dresses you could wear to a dance. In white, it would be charming for a wedding or graduation. The tiny bodice has a wide neckline underscored by a double organdie collar. A wide, drifting skirt whittles in your waist, whirls gracefully as you dance. It should take about 20 hours to make. Vogue Pattern No. 7631. "Easy-to-Make." Sizes 12 to 20 (30 to 38). Price, 60 cents. Also in Junior sizes, No. 3462. 9 to 15 (29-1/2 to 33). See the pattern envelope for the yardage requirements. 

Ah, doesn't VoNBBS know how to talk to a lady? A rustle of taffeta, whirling, whittling--I'm swooning! Of course, VoNBBS is also very practical. No "instant dress" nonsense here. No "one hour project!" promises. Nope, young lady, you are going to spend 20 HOURS on this thing. And you're going to do it right--tailors tacks and all!

Here's the picture diagram on the pattern instructions.

 And VoNBBS's charming illustrations of the pattern pieces.


As for my progress, I'm happy with my bodice muslin! I didn't get good pictures of the first (sorry), but here is the second muslin.

As you can see, I'm practicing how to stand in an evening dress. This is how I imagine it must be done.

A closer look at the front. You can see that I've repinned the darts on my left side; they're a much better fit now. I plan to take in the neckline dart just a smidge to get rid of the small about of gaping.

Can I take a moment to wax rhapsodic over corsets? Where have they been all my life?! They're much more wearable than my powernet waist cincher (I've even worn it all day at work), and they provide the perfect 50s silhouette under dresses. I had a revelation about fitting too. Previously, I was trying to mold my body into a retro shape with my fitting--taking out too much ease, etc. Now I can just let the clothing skim over me and it looks lovely! (I think so anyway.) The one thing I had to do was take out fabric at center front for the corset. I notice that fabric can pool around the midsection on a corseted figure. Taking in the side seams just cause horizontal pulls. But drawing a new center front line (the "cut on fold" line) is the solution. I took out 1/2" at waistline center front, and drew a new straight line up to the original neckline center front, as shown by the red line below.


That's my new center front. It shifts the grainline a bit. It worked surprisingly well.

Here's the back.

So I'm feeling ready to cut! I want to retain the original collar shape, and the skirt is a simple gathered pattern, no fitting required. I will keep you updated on the cutting and construction, readers!

Wednesday, July 25, 2012

Evening Dresses of the New Look and Early 50s


Vogue’s New Book for Better Sewing was published in 1952, and it was a wonderful time for evening gowns. Christian Dior’s New Look was unveiled in 1947, and by the early 50s the silhouette was well established, with its full skirts, tiny waists, and structured bodices.

Waspie "corset" from the V&A collection

The New Look silhouette relied upon a corseted waist, so it’s a happy coincidence that I just made my first underbust corset. My corset is very similar to the waspies of the late 40s and early 50s, actually. It’s narrow, encircling the waist and leaving the hips and bust free. (Of course, a true New Look devotee would take this opportunity to add hip padding and bust padding to increase hourglass proportions; I think I’ll stick with what I’ve got in those areas.)
{source}
Evening gowns provided even more opportunity to use obscene amounts of fabric than day dresses and suits. At least, it must have seemed obscene in those early post-war years. It’s no wonder that the New Look was protested by some: after years of rations and “Make Do and Mend,” skirts that ventured below the knee seemed extravagant. Fabrics were milled in narrower widths in those days, so it’s not unusual to see an evening dress call for ten yards or more of fabric.

{source}


I read an interesting statement in the book Theatre de la Mode: Fashion Dolls: The Survival of Haute Couture that's stuck with me ever since. The author wrote of the marvels of seeing a fresh couture exhibit in a recently war-torn continent: "Today, freed from such preoccupations, are we even capable of being sufficiently amazed?" Likewise, I don’t think we can manage to be suitably impressed by the wonder (and perhaps anger) these huge evening gowns would have instilled in someone of the time period. (Interesting side story: I told Jeff about about the above quote, and he replied, "I don't really think we're sufficiently amazed by anything anymore." How true!)

The pattern for the Evening Dress featured in VoNBBS actually came out a bit earlier than the book. It was originally released in 1949, and I think the styling betrays its late 40s origins. Which I think explains why there’s something relatively restrained about this dress. The skirt could be much fuller than it is. But perhaps that's because this is from the very early days of the New Look, when designers were still testing the waters with the idea of excess and volume.


The pattern was reissued in a new envelope for the publication of VoNBBS. The illustration style certainly changed, didn’t it?


The model pictured has raven (Elizabeth Taylor-esque even) hair and bright red lips. The line quality of the art is different: less restrained, I think. And of course the brilliant pink screams femininity.

Well, that's your Evening Dress installment of the day. I'll be back tomorrow with my adventures in muslin-ing the VoNBBS dress!


Thursday, July 19, 2012

Winner of the Corset Prizes!

Hi all, sorry for the delay in getting this post up! I'm happy to report that longtime reader J. Christina Huh is the winner of the two corset prizes: the ebook Corset Making by Julia Bremble and Laughing Moon pattern #113. Congrats! Thanks to all who entered the giveaway.

I'm putting the final touches on my corset today. More to come!

Friday, July 13, 2012

Corset Week, Part Five (with GIVEAWAY!)

Welcome to the final installment of Corset Week! I will, of course, keep you updated as I continue with the underbust corset. Today we have a very exciting giveaway, but first you have to read about my progress (don't worry, it will be quick!).

I got all the grommets inserted and then I laced up the back for a fitting. I did the "bunny ears" lacing style, meaning that two long loops are left at the waist. This causes the compression to happen at the waist first when the corset is laced up. I also put boning into the channels.


I was so excited to try it on! I'm wearing the same dress that I wore for my muslin fitting so you can see the difference. (Actually, let's be honest. I'm wearing this dress because I've been wearing it ALL the time lately in the summer heat. It's the most shapeless knit sack dress in the world, and I'm ashamed that I love it so much. But not ashamed enough that I haven't considered going back to Uniqlo and getting one in a second color.) Here is the corset, mid-progress.

Here is the initial muslin fitting, for comparison.

I'm very happy with my changes! I did make the waist much curvier, and I took out several inches.

Here's the back.

I'm seeing a lot of wrinkles, which makes sense since the corset only has about half the bones it will have in its finished stage. So I feel good about proceeding with construction with no fitting changes. The next steps will be adding the boning channels at the seams, inserting the rest of the bones, and then binding the top and bottom with bias tape.

Okay, your reward for reading all that is a giveaway! There are TWO PRIZES in this giveaway. Julia Bremble of Sew Curvy has graciously offered up a copy of her new ebook, Corset Making.

You can see a preview of the book here; it looks fantastic. The book comes on disk and also has video components. What could be better for this subject?!

Second prize! I happen to have an extra copy of Laughing Moon pattern #113, which includes the underbust corset I'm currently making.


To enter to win both these fabulous prizes, just leave a comment here by the end of the day on Monday, July 16th. All countries eligible. Please make sure that I have a way to get in touch with you, i.e leaving your email/Twitter handle or making sure your comment is linked to your profile or blog. Good luck, and Happy Corset Week!

P.S. Funny story: last night I was telling Jeff that today is the end of my corset week posts. He replied, very solemnly: "I try to keep Corset Week in my heart all year." May we all endeavor to do the same!

Thursday, July 12, 2012

Corset Week, Part Four


A lot of progress has been made on the underbust corset. Yesterday, I sewed my seams and stitched boning channels on the middle of some of the pieces (but not on any of the seams, in case I need to adjust them in the fitting). I came home late last night to find my package from Corsetmaking.com had arrived, yay! I decided to devote part of today to corset-making, since I don't have any classes to teach or take.

I sewed the right front facing on, leaving openings for the busk fasteners. 

Sliding the busk between the corset and facing felt like a religious experience.

Stitching next to the busk with a zipper foot was slightly terrifying, but I managed to not break a needle.

Whoops! My facing covers one of the boning channels I stitched in yesterday.

I took it out, and stitched it on top of the facing's raw edge to get a clean finish.


This is about the time Pip decided to take a nap on my instructions.

Luckily, I was able to read around her butt.


Next, the left side of the busk! I made the markings.

Made holes with an awl.

And popped in the busk, and then stitched next to it. (My clean record on needle breaking remains! For now.)

It looked magical when I put the two sides together.


Next: grommets! I was tempted to have my grommets professionally inserted at Steinlauf and Stoller. But my DIY pride got the best of me, and I decided to do it myself. My corset kit came with a grommet kit, but I took it out months ago to make a belt, and found I didn't really like it. So I tried a new kit. Unfortunately, I got size 0 rather than 00. You wouldn't think there would be much of a difference, but there really is!

I put the first two in wrong side up, but then I got the hang of it. My grommets look HUGE, but it's kind of a cool effect.

Tomorrow: fitting, plus a corset-y GIVEAWAY!

P.S. I also have an exciting post that I'll put up next week--Melanie, my editor, brought over an advance copy of my book! I'll be putting up a sneak peek for you on Monday! Here I am looking through it for the first time.


© Gertie's Blog For Better Sewing. Powered by Cake