Super exciting news today, readers. Remember when I posted about using stay tapes on wovens, several of you requested a guest post on knits? Well, I have something even better. A whole series on sewing knits from knitwear designer Alyson Clair! Alyson takes her inspiration from vintage designs, so she's a perfect fit here. Please give her a warm welcome! (Also: have specific questions about sewing with knits that you'd like to see addressed in a future post? Please write them in the comments below.)
Hello and greetings from the fair city of Portland, Oregon!
Last month I had the pleasure of finding this blog via a friend, and I have been hooked ever since!
My name is Alyson Clair. I'm an apparel designer/technical designer/pattern grader/marker maker/cutter/sewer/NERD! Basically I just like to make pretty things all day.
I grew up on a llama farm in a small town in Oregon. My mother ran a llama yarn business out of our home. I always had my hands busy with some sort of project. When not running around the woods or being out in the llama fields, I was thrifting from an early age. My family rolled their eyes (and still does) at the treasures I would recover from thrift stores. I have a strong affinity to the 1920s through early 1960's. My first car was a 1961 Bel Air, and the first summer I could drive I had two jobs: one at a thrift store (where I know I didn't make any money), and the other as snack bar gal at the local drive in movie theater. The drive-in was built in 1954 and is still currently in its original state.
I love what I do; working on clothing all day is super fun. And my main focus is sewing and designing with knits. I'm a busy bee and do lots of different projects for a variety of companies and designers: from vintage home patterns to being the patternmaker in an apparel factory. However, my main focus is my clothing line, Clair Vintage Inspired.
The goal of my line is to be the most favorite thing in your closet. I take vintage design inspirations and make them into comfortable knits. I also make a good variety of sizes, XS(4/6) through XL(16/18). As a designer it's more meaningful to me to see people on the street wearing my designs, than seeing them on a runway or in a fashion spread. There's room for boobs, butts, and curves. Fit and comfort are very important to me, as well as looking good. Another priority is making all of my goodies in the United States. Did you know that 95% of apparel is made overseas? I think it's incredibly important to support local economies and to know who is making your clothing, and how and where it's being made.
Here are some of my favorite pieces from past and current seasons.
Be on the lookout for some upcoming posts about sewing with knits from me. Gertie has given me a fun list of questions from you lovely readers. I 'll answer them, and hopefully teach you about something I absolutely love.
Wednesday, June 30, 2010
Tuesday, June 29, 2010
French Darts: A Cautionary Tale
So, as you probably gathered from my post yesterday, I am quite pleased with the results of my first draping project. However, there were a couple, ahem, bumps in the road on the way to success. Can you spot the problems in the above picture? Because, seriously, they're about to poke your eyes out.
Please allow me to share the entire story.
French darts, as you may know, are diagonal darts side seam darts that start a couple inches above the waist and end near the apex of the bust. (Update: as some commenters have pointed out, my darts probably end too close to my apex, causing part of the problem. You can also shorten yours to a couple inches away if you're busty.) I chose them for this dress because they're very 50s, and they provided an interesting challenge as a beginning draper. Well, I had the darndest time trying to get the tip of the dart - at the apex of the bust - to lay smooth. My teacher Sharon eventually suggested that I do two French darts, one on top of each other to divide the dart excess. Did I listen, readers? Well, I did at first. But then when I was sewing the muslin up, I decided to go with just one dart. I tested it, and it seemed to be a-okay.
Fast forward to last Friday evening. I finished sewing the dress, pressed it neatly, and hung it up in anticipation to wearing it on a date with Jeff on Saturday. We had made plans to go to the delicious, fancy new burger joint in the neighborhood, and I thought I would kill two birds with one stone by wearing my new dress and asking Jeff to photograph me in it on the way out to dinner. Sounds like a plan, right?
Well. I got all dolled up, and we headed outside, where Jeff prepared to take a few shots of me. But he paused ominously, stared at my chest, and got a distinctly confused expression on his face.
"What is it?" I asked.
Jeff paused once again, as though weighing his words carefully.
"What?!" I shrieked, sweetly.
"Well, it's your dress. It looks . . . a bit . . .um," he lowered his voice to a stage whisper," . . . nipple-y."
Oh the horror! I felt so exposed out on the street! Jeff took the above shot and showed it to me on the screen. My French darts were, indeed, decidedly nipple-y.
It is at this point that I must explain my state of mind on this particular day. You see, there were (how shall I put it delicately?) certain monthly hormonal challenges I was facing. I did the only rational thing: I burst into tears and ran back upstairs to change my dress. You see, I was afraid that I'd ruined the dress completely by using one French dart instead of two. I did not really regain my composure until I was mid-chow through the most fantastic burger ever and realized I could at least try to fix the situation with some serious steam pressing.
And then, later, the real solution hit me: I had pressed the darts down. But the best way to press a bulky dart like a French dart is to slash it, trim the seam allowances, and press it open. I took this one step further and pressed the apex of the dart flat over one side of my tailor's ham with a lot of steam.
Hallelujah, the nipple-y dart problem was fixed. Here's a test shot from the next morning. (Seriously, I had just rolled out of bed. Hence, the whole . . . look.) But no dart-nipples! Yay!
So, the moral of the story is thus: French darts can be tricky. Always slash and trim them, press the bejesus out of them on a ham, and take some test shots to gauge your bosom situation.
Go forth, dear friends. And may your French darts always behave.
Labels:
disasters,
draping,
techniques
Monday, June 28, 2010
Won't You Be My Facebook Friend?
Guess what, everyone? I finally made a Facebook page for GNBfBS! I was skeptical about doing this at first, but I think it could be a cool thing. I can send out giveaway reminders, post links to interesting articles, tell you what I'm eating for breakfast, and, most importantly, post funny videos of kittens. (Actually, what I'm most excited about is the discussion board feature.) But you have to "like" me on Facebook to get in on all this. I hope you do like me, with or without scare quotes. I like you!
So come on down and join in the fun. Hope to see you there!
Twirl! (First Draping Project)
Circle skirt + horsehair braid + windy day = AWESOME twirling. This is my very first pattern that I designed and draped myself. I've been studying draping with my fantastic teacher Sharon and have learned so much - and now I'm seeing the fruits of my labors! Since this was my first real draping project, I stuck with a simple 50s-inspired design: boatneck, French darts, low v-neck in the back, and a circle skirt.
You can see how the horsehair braid shapes the hem here.
From the side! (With the help of a gust of wind.)
The fabric is a lovely hot pink textured cotton from Mood. Textured cotton is great: simple to work with, yet the texture adds a little extra interest. (Beginners, take note!)
There are things I'll change next time - I think there's a little too much ease in the bodice, for instance. But I'm trying not to nitpick. Every sewing project is a learning experience, and I feel that this one in particular is the step to a new level of sewing. I'm not going to let little mistakes get me down!
I made an all-in-one facing and interfaced it with cotton organdy.
After my post on stay tapes, I have been making an effort to utilize them. I used Seams Great here and clipped it around the curve of the neckline.
And, of course, I hemmed it with horsehair braid. (Check out my tutorial here.)
I can't believe I draped this pattern myself! It's opened up all sorts of creative doors - I'm already planning my next design.
In parting: Wheeee!
Labels:
draping,
finished projects,
techniques
Sunday, June 27, 2010
15% Off at She'll Make You Flip!
My lovely new sponsor, Deb of She'll Make You Flip!, is offering us a discount on her fantastic selection of patterns. Just enter the code GBBS15-2010 in the message to seller box and you'll get a 15% refund via PayPal. Good until September 30, 2010! It must be pointed out that Deb has a truly excellent collection of vintage patterns for sale, many of which I have been lusting after for quite some time.
I already have a copy of this pattern, Simplicity 1944, so I suppose I can let one of you buy this one (also in a bust 36").
Isn't Simplicity 3506 so Peggy Olsen? (Once again, bust 36". Yay!) Seriously, if you can wear a bust 36", get yourself over to this store now. There are a ton of super cute patterns in this size.
Love the buttons on Simplicity 4105 (bust 32" for a change).
Thanks so much to Deb of She'll Make You Flip! for this special discount. (Again, just enter the code GBBS15-2010 in the "message to seller box" and you'll get a 15% refund via PayPal.) Happy shopping!
Labels:
sponsors
Giveaway Winners!
Hello, and happy Sunday, all! There were a record 648 entries into my Blogiversary Giveaway. Wow! I wish I could give all of you a little prize, but alas, only two could win $25 Colette Patterns gift certificates. I drew numbers this morning and without further ado, they are . . .
woolcat and Florence Ann! (Ironically they both seem to be knitters primarily. I hope we can pull them over to the dark side of sewing with their prizes. Bwa ha ha.) Ladies, e-mail me to claim your prizes, okay?
Thanks to all who entered and made the giveaway a raging success! Don't worry, there will be more goodies in the future.
Now, I'm off to sweat my way through an hour and 15 minutes of yoga in a studio with no a/c. (But classes are $5!) Any Astorians in the house? I need a yoga buddy!
Labels:
giveaway
Friday, June 25, 2010
Gertie, Girl Reporter {06.25.10}
Hey, we haven't done one of these in a while! There are lots of good stories out there this week, though, so let's jump in.
- My favorite article of the week is this piece on Mad Men's costume designer Janie Bryant. A great quote from Matthew Weiner, the creator of the show on working withing the time period: "People don’t always change with the times. Part of the story that we are trying to tell is about the loosening of all this stuff—the crudening of manners and style as the period changes. Janie and I talk about that all the time and try to signal it in little ways, like with a character taking off his hat in the elevator."
- P.S. Did you know Janie Bryant has a style book coming out this fall? Pre-order here! I am psyched.
- This article made me want to move upstate and live in a tiny Victorian cottage.
- Definitely go see the images for the 50s-inspired Fall 2010 Louis Vuitton ad campaign (pictured above). Could Karen Elson be any more beautiful? I think not.
- Interesting piece about celebs who get paid to advertise for fashion lines on their Twitter feeds.
- From Jezebel: "Edith Shain, the former nurse whose image became world-famous on August 14, 1945 when an unknown sailor dipped her back for a kiss, died on Sunday at the age of 91."
- On the "Rhetoric of the Real Woman," I say this: THANK YOU.
- A play about Isabella Blow will take stage next month. Will you see it or wait for the John Galliano-produced film?
- Full-Figured Fashion Week happened, to positive response. Hurrah!
Have a happy weekend, friends.
Labels:
Girl Reporter
The Magic of Horsehair Braid (A Little Tutorial)
Have you ever used this stuff before? I'm using horsehair braid for the first time and I'm enamored. I've been working on a very special project: my very first draped design! Don't get too excited, it's a very simple silhouette - no cowls or shirring or pleats. But I draped the thing myself! It's a 50s-style dress (shocker, eh?) with a boatneck and a very full skirt. I'm making it out of the most beautiful textured cotton in what must be Schiaparelli Pink (though it looks a bit Fanta Orange in these pictures!).
I was researching hem methods, and I was thinking about doing a faced hem for a little more body at the hemline. And then I came across the section on horsehair braid in Professional Sewing Techniques for Designers, which is absolutely my new favorite sewing book. I was intrigued! Horsehair braid acts as both a facing and a hem stabilizer. It's used to add structure to hemlines: think of a sculpted mermaid skirt or a full ballgown. It added the perfect swingy fullness to my knee-length circle skirt.
First off, what is it? Horsehair braid used to actually be made of horse's hair, but now it's made of nylon or polyester. You can buy it in various widths. A wider width will give you more body to your hem, and a narrower one will be more subtle. I didn't go subtle! I went with a 2" width. (They had from super tiny up to 3" wide at Steinlauf & Stoller, and it came in both black and white). A quick Google search turned up lots of online vendors for this stuff, in case you can't find it locally.
The braid has a string at the top. See the loopy bit up there?
This is used to pull the braid tight at the top to shape it, resulting in a curve at the bottom. Perfect for a curved hem like a circle skirt!
There are little loops throughout the braid so that you can pull them up incrementally as you go, not just on the ends. Isn't that genius?
*Update: I just learned that the narrower widths of horsehair don't have this string at the top. That's because they're easier to shape on their own. So don't sweat it if yours doesn't have this!
Before you start your project, you need to decide if you're going to either: 1) underline for an invisible hem - the horsehair braid gets catch-stitched to the underlining in this method or 2) top stitch your hem. For formal wear, you'll obviously want to underline. Since I'm making a day dress, I decided to top stitch for ease and a more casual look.
So here's how to apply your horsehair braid. Start with your dress at the desired length plus 1/2". If your fabric is thicker, you might want to add a smidge extra for turn of cloth.
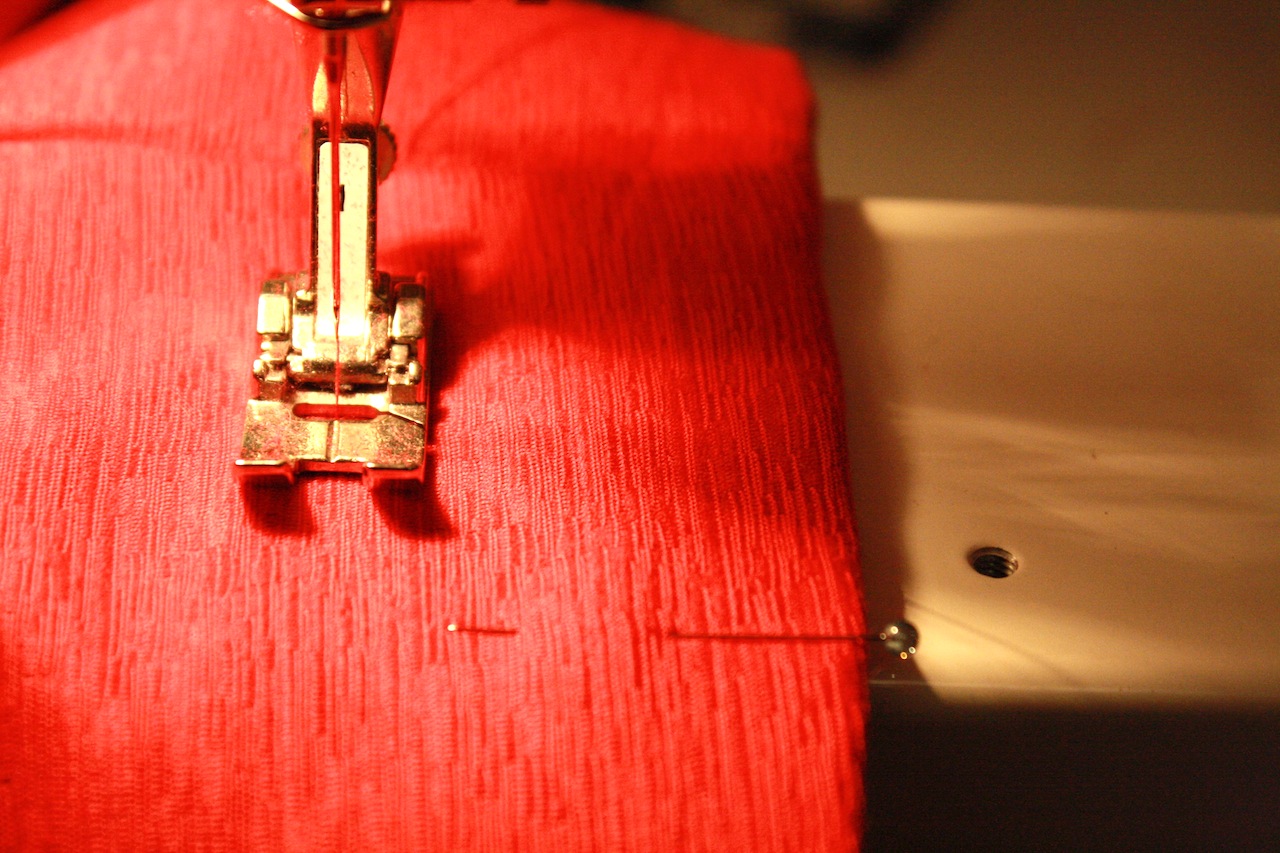
First, you're going stitch the braid to the right side of your dress, lining up the bottom of the horsehair braid and the raw edge of the bottom of the dress. I wouldn't necessarily recommend pinning it first: this is because you don't want to pull the braid as you go, you want it to apply flat. If you pull it as you're applying it, your hem will look twisted. Just keep feeding it and lining up the braid and the dress's raw edge as you stitch.
My 1/4" stitching line is pointed out with that handy yellow arrow. Keep in mind that this is the outside of the dress.
When you get to the end, you'll want to cover up one end of the braid with some sort of seam binding so it won't scratch you. Lap the covered end UNDER the raw end, this way the scratchy raw edge of the braid will be lapped under when flip it to the inside. (Do as I say, not as I do in this picture. I learned the hard way.)
Now flip the braid to the inside and press the hem. Avoid ironing the braid itself, just press the hem.
If your hem is curved, you'll need to pull the loops of string incrementally so that your braid will curve up. You're shaping your hem - isn't it exciting?!
Pin the hem as you go. I'm pinning on the outside of the dress since I'm going to top stitch it and that's the side that will be facing up.
Now take it to your machine and top stitch. Find the right hem width that will catch the horsehair braid near its top. Use a slightly longer stitch width than usual for prettier stitches. I'm using 3 mm here, but next time I'll probably go with 3.5 mm.
*Update: To avoid the fabric twisting as you top stitch, it helps to feed the fabric to the left of your presser foot through as you go with your left hand. If you notice the fabric pulling or twisting, stop stitching and raise the presser foot (with your needle down), and smooth out the fabric around the presser foot to release any tension.
(If you underlined, this is where you'll catch stitch the horsehair braid to the underlining so it doesn't show on the outside of the skirt.)
Press your finished hem. Pretty on the outside!
Awesome on the inside:
And it will be super awesome once I cut those loops off!
I'll be photographing the dress this weekend and I can't wait to show you how rad this skirt looks in action. In the meantime, I hope this tutorial was helpful! Let me know if you have any questions.
Labels:
notions and supplies,
techniques,
tutorial
Thursday, June 24, 2010
Style Inspiration: Maude and Frida
Any Harold and Maude fans present? The 1971 cult classic film is a sentimental favorite of mine. I got to thinking about it one day recently as I was doing my hair. You see, I was trying to remember how I got started doing my hair in a braided updo, which has been my style of choice in this muggy weather. (See my video tutorial for this style here.) And then I remembered - it was Maude's style I was trying to emulate!
It's easy to see why I would have forgotten the original inspiration for this coif, as it spans many eras and cultures. I sometimes get teasing "Swiss Miss" comments when I wear my hair up in Heidi braids, seeing as this hairdo brings to mind yodeling in the Alps. My mother calls it my "fraulein" hair, another nod to its Euro roots. But then there's the glamorous Hollywood side of a braided updo: Casey did a great post on vintage up-dos that included Madelene Carrol's beautiful Heidi braids.
But the reason I love Maude's version the best is that it encapsulates her character as a feisty bohemian. Maude is an eccentric, sexy, glamorous, smart, charming 79-year-old woman, and her hairdo manages to get all that across somehow. Jeff thinks it a little amusingly strange that I should have a geriatric style icon, but it makes perfect sense to me.
I was also recently reminded by a yoga teacher that another one of my favorite women in history sported this hairdo: the excellent Frida Kahlo. (The teacher warned me not to grow a uni-brow to go with my braids. Indeed: I should be so lucky to pull off a uni-brow as Frida did!) This must have been another unconscious style inspiration for me, as I have long been a Frida Kahlo enthusiast. I spent a summer in Mexico City many years ago and I visited La Casa Azul once a week. I loved looking at the relics of her life - colorful dresses, skulls, religious tokens, and jewelry strewn everywhere. It must be said that Frida Kahlo goes down in history as the ultimate accessorizer of the Heidi Braids. Who else could pull off all those flowers right on top of one's head? (I can't seem to get the hang of it. Not for lack of trying, believe me.)
And look at the ribbon woven throughout! Genius!
It's sort of fascinating to make a connection between Maude and Frida: one fictional, one real - but both very off-beat, political, feminine, flamboyant, passionate, glamorous, tragic, and artistic. I think they make perfect style icons, don't you?
Labels:
hair,
inspiration,
personal style
Wednesday, June 23, 2010
First-Ever Museum Meet-up
Last Saturday, a group of 23 readers and I met-up to go to the High Style exhibit at the Brooklyn Museum. What a lovely day we had - and how much fun to meet in person! We met outside the museum and then went in for a guided tour. Here are a few of the highlights (taken inside with no flash, so unfortunately the color isn't perfect. But many thanks to Jeff for capturing all of these!):
This is a House of Worth gown in a lovely lavender with a fantastic scalloped hem. (Bonus: my teacher Sharon came along and gave us all sorts of tips on sewing scalloped hems at lunch!)
This couture puppy ensemble was a hit.
There was a good amount of Schiaparelli on display, including this lovely day dress. The pattern is flower seed packets!
There was a special section on American women designers, where we saw this spectacular sundress.
How fabulous is the silhouette of this gown?
But for me, the real highlight of the exhibit was seeing the pieces by Charles James, an American couturier who had his heyday in the 1950s. His gowns are no less than feats of engineering.
Do go check out this exhibit if you can. The Charles James pieces alone are worth it!
As for the first-ever reader meet-up, I'm declaring it a smashing success. Besides going on the guided tour, we also had a lovely lunch, complete with a sewing Q&A with Sharon. Also, my mom came all the way from Arizona to attend! (I think I promised her a prize for having traveled the furthest to get there. Hmm, will have to figure out what that will be . . . )
Didn't make this one? Don't worry, there will be more! I'm currently cooking up a visit to FIT's Eco-Fashion exhibit later this summer. (See the Threads post on the exhibit here.) Details to come!
Labels:
Meet-up
Subscribe to:
Posts (Atom)