Friday, July 9, 2010

Draping a Dress, Part Three: Making a Muslin

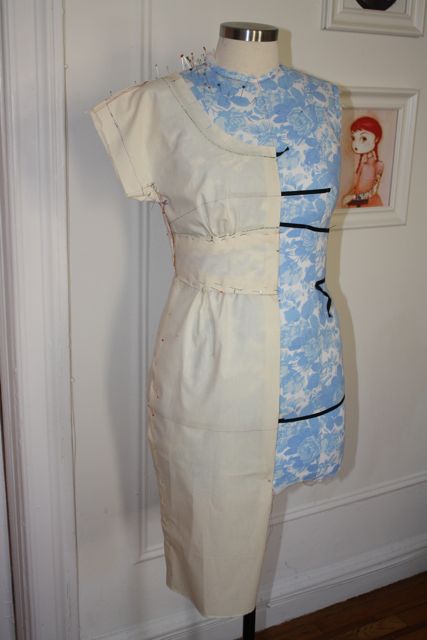
Okay! So now that the dress is all draped and checked, the next step is to make a muslin for fitting purposes. (See the first and second parts of this draping series if you need to catch up.) You use your draped pieces as your pattern, adding a wide seam allowance - I went with one inch. Machine baste your pieces together, as they would be sewn, and hand baste a zipper in.

I should mention that I did some preliminary fitting as I was draping: for instance, I tried on the bodice as I went to check the sleeve depth. That was a very good thing, because on first try, it was so small I could barely get my hand in the sleeve!

When I put on my muslin, I immediately noticed that the waist was too big, so I took it in right away. And here's how it looked. (Yes, I am wearing a bump-it in my hair. Jeff finds this incredibly bizarre. Hey, I'm going for a 60s look!)


From the back:


And the side:


There are certainly some problems with the fit, but I got it pretty close I think! Here's a run-down of the changes I made:

  • added 3/4" width under the armpit to prevent pulling in the kimono sleeves and to widen the back
  • made a sway back adjustment to reduce wrinkling at the lower back
  • made sure all the pieces were "trued" (the back midriff was too small for the back bodice, resulting in some twisting as it was sewn)
  • took 1/4" inch tucks on the scoop neck to prevent gaping
  • lengthened the midriff by 1/4" to elongate the torso
I've also decided to move the zipper to center back. Getting a wiggle dress like this over your head in the sweltering heat is a workout in itself!

I will probably also add another inch to the length - it looks a little too modern to me. Do you agree?

I've now transferred the pattern (with these changes) to paper. Since I made so many tweaks, I will most likely make a second muslin to ensure the fit is good. Once I'm happy with that round, it will be ready to sew!

What do you think? See any other changes you would make?

Thursday, July 8, 2010

Draping a Dress, Part Two: Getting Drapey with It


Hey! And welcome back to my new draping series, which I'll just remind you again are not tutorials, but rather a glimpse inside the process of a draping newb. So, you know, take all of this with a grain of salt, as they say. In my previous post, I talked about coming up with a design and marking the style lines on my dress form. Now it's time to drape! Here's my design, as a reminder:


I should mention that I decided to eliminate the back shoulder darts, as they weren't necessary, and also to add a back slit so I can, you know, walk

I consulted my text to figure out the order I should drape this design in and it will go like this: 1) midriff front, 2) bodice front, 3) midriff back, 4) bodice back, 5) skirt front, 6) skirt back. Each piece builds on the piece before it. Cool, huh?

I prepped my muslin pieces by cutting them to size, blocking them so they were on grain, and folding back an inch at center front. You line this fold up with the center front of your dress form to ensure that everything's on grain.

Here's what the front midriff piece looks like, draped. (See the fold at center front?) The process is really fun, it's like sculpting with fabric. You use your hands to gently smooth the fabric into place. You want everything to look nice and smooth, while pinning along the bottom of the style lines. Those slashes you see in the fabric are to allow it to curve around the dress form without twisting or wrinkling.


(Another disclaimer! Ordinarily one would add a pinch of ease to the waistline. I didn't because I found that my last draped design had a but too much ease in the bodice. Hmm, is it possible I've lost weight since we padded out Veronica? Perhaps all this yoga is doing it! Or maybe I just like a more fitted look. Either way, no ease added on this one.)

My teacher told me to use flat head pins but I apparently did not listen! I kind of like my cheerful, colorful pins.


Now to the bodice front. The dart excess gets pinned into gathers under the bust for this design.

I marked around the style lines with an extra fine Sharpie. (This has to be done with each piece you drape so when you take it off the form you can "true" it - or basically, connect the dots with a ruler or French curve.)


Now you can pin the bodice front to the midriff front to check in on things. (Pin the pieces to each other on the seam lines, rather than the dress form. This way you can see how they hang.)  I immediately saw that my side seam needed to be re-drawn, so I did that with a different color Sharpie. (It's in orange on the below right picture.)


 Now, on to the back midriff.

Back bodice.

The two back pieces pinned together and looking lovely.

Now you can pin all the bodice pieces together to see how they're looking. Keep them on the form so you can drape your skirt in relation to the bodice.

And move on to the skirt! Prepping the muslin pieces is the same process, with the fold at the center front and back to indicate the straight of grain. (You'll also see horizontal grain lines on these pieces; those are called "horizontal balance lines" and they're determined by where your bust or hip line falls.) The length of your muslin piece is determined by how long you want your skirt to be; I went with 24", which hits me right in the middle of the kneecap.

On the skirt front, I converted the dart excess to gathers to mirror the bust gathers.

On the back skirt, I made two darts. And I actually had to re-do these, as I realized their placement was all wrong. See how that first one is so close to the center back? It should be on the far side of that other dart.

When you're happy with your skirt drape, you pin all the pieces together. Again, you pin it as it would be sewn - seam lines pinned to each other, and darts turned to the inside of the muslin. It starts to get a little crazy with all the pins!


Then it's put back on the dress form for evaluation. Hey, it looks like a dress!


This is where I caught my back dart problem, so I re-draped the back skirt. It helps to have Sharpies in many different colors - it starts to get a little out of control, as you can see below!


Next up is the tricky part (for me, anyway): fitting a muslin!

I hope this has been helpful, even in its non-tutorialness. Above all, I just want you to see that this is a fun process, and one that any sewist can learn with a little help and practice.

Wednesday, July 7, 2010

Knits in a Nutshell with Alyson Clair

 Sleeve detail on one of Alyson's knit designs

Look, your friendly neighborhood knits guru is back! Alyson of Clair Vintage Inspired is taking over here today with an intro post on sewing with knit fabric. Thanks, Alyson! Alyson has treated us to a very in-depth post with lots of fabulous photos, so make sure to click on "read more" to see it in its full glory.

Hi again, all! This post is meant to be an overview on knits in general. I can go into more specifics on different seam applications, fabric, stitching, and machine troubleshooting in the future, but first, I wanted to give a broad overview about the fabric and the different machines that can be used to sew and finish it.
 

Tuesday, July 6, 2010

The New Look-Inspired Suit


Hey, it's done! This is the linen suit I first wrote about making way back when I was planning my mini-break wardrobe. The mini-break has come and gone, but the suit idea carried on.

This is a vintage/modern pattern combo. The skirt is a 50s pattern, just a simple full circle skirt with a waistband. The jacket is McCall's 5278, now out of print (but easy to find on eBay!). The fabric is a linen and rayon blend with a very nice drape.

The silhouette was inspired by Dior's New Look suits (blogged about here), though updated for today. I kept the shawl collar, three-quarter length sleeves, full skirt, and peplum but omitted the dropped shoulders, layers of interlinings and taffeta linings, and industrial strength undergarments. (Though this look does benefit from a cincher.)


I pulled out all sorts of fancy techniques for this suit. The skirt hem is reinforced with 1" horsehair braid (tutorial here). I tested the twirl factor: thumbs up!


I did a lapped, hand-picked zipper on the skirt, and it went in beautifully (yet another tutorial here).


I pulled out the big tailoring guns on the jacket. (Hey, while I'm digging up links to tutorials gone by, did you know I did a whole video series on tailoring? Links to the entire series of post are here.) The shawl collar is lightly padstitched. You can see here how you can get a great effect with just a few lines of pad stitching. The stitches are more concentrated below the roll line, and then spaced farther apart on the fall of the collar. The interfacing is hymo, a sew-in stabilizer similar to horsehair canvas.


I used sleeve heads, and unknowingly inserted them backwards. No matter! I actually liked the shaping they gave me so I left them that way.

Bound buttonholes! Aren't these buttons pretty? I found them at M&J Trim.

I had to do some fast thinking on the sleeve lining. I forgot to add a seam allowance on the lining, so there ended up being a gap between the sleeve hem (which I top stitched to echo the top stitching on the skirt hem) and the lining. How unsightly!


I tried to cover the raw edge of the lining with seam binding, but it was too short. And then I thought: lace! I pinned it around the gap, like so:


And then hand stitched it on both edges of the lace with a fell stitch. Look how pretty!


The only downside is that I have to be super careful not to catch my rings on it when I'm putting the jacket on.

Overall, I love it! I got to practice a lot of useful techniques. Plus, I feel downright smart when I'm wearing it.


Monday, July 5, 2010

Draping a Dress, Part One: Inspiration


I'm working on my second draped design, and I thought it would be fun to take you  into the process a bit more this time. Several of you have asked for draping tutorials, and I definitely don't feel ready for that yet! So while this series of posts won't be tutorials per se, I do hope it will demystify the process a bit. I thought it might help you to see how this all works, especially if you're interested in learning draping yourself. Keep in mind: I'm not a draping expert at all! I'm figuring this stuff out as I go along with the help of my teacher Sharon and the excellent book Draping for Apparel Design by Helen Joseph-Armstrong.

The first step is coming up with a design that you want to drape. Lately I've found myself inspired by techniques rather than images or other designs. Since I'm so new to draping, I've been starting with something I want to learn and then building a dress around that. As I was flipping through my draping book, I saw a design with an empire line midriff (pictured above) and knew I'd have to try it. You'll see this sort of shaped midriff on many vintage dress designs, like the patterns below.


The 60s designs made me think of something Joan on Mad Men would wear: if it had a scooped neck, short kimono sleeves, and a pegged wiggle skirt, that is. I found this fantastic green and white polka dot cotton faille at B&J and  thought it would be perfect. It has such a delicious hand and sheen with a subtle ribbed texture. I drew this sketch, and voila! Dress designed.


The next step is to mark the style lines on your dress form: the neckline and the midriff. You can mark your lines with pins or with twill tape, as I've done here. See the scooped neckline and curved empire line?


You only need to mark the left side of your dress form (that's the left side as you're facing it) since you only drape that one side and the pattern is a mirror image. Make sense? Here's the back. The neckline is a shallow curve in the back, and the empire line dips down to center back.


I think marking the style lines is really quite fun; it's so freeing to be able to design your dress in three dimensions, as opposed to working with a flat pattern.

Next up: draping the design in muslin!


Update: you want to start with your dress form as close to your measurements as possible. Here's the post I did on padding my dress form. It doesn't have to be perfect, as you'll fit the muslin on your body, but it's good to get as close as possible on the form.

Sunday, July 4, 2010

Featured Pattern: A Sweet as Pie Party Dress!

Isn't this summer dress pattern so sweet? I just love the gingham insets on that pink version - and look at the little bow in the back! Snatch it up at ZipZapKap - it's in a bust 34". This would be so fun to wear to a backyard barbeque or out to an al fresco lunch, don't you think?

I've got sweets on the brain this 4th of July. Jeff is baking up a celebratory apple pie for us! I'll be back with regular posting tomorrow; I've got a series of posts on draping planned that I'm very excited about. In the meantime, I hope you're enjoying a fabulous Sunday!

Friday, July 2, 2010

Museum Meet-Ups: Nashville and New York

That's right, I'm taking my show on the road! I'm quite lucky to have a husband who caters to my every silly whim. When I found out that the Golden Age of Couture exhibit is in Nashville for the summer (with only this one U.S. stop!), I expected to have to make a detailed argument for why we should take a trip there to see it. But I barely got one sentence out before Jeff said, "Sure, let's go." Sweet! So we're going to spend a few days in Nashville at the very end of August. I hear will be boiling hot, but one must suffer for couture sometimes.

I'll be going to see the exhibit (which I've heard about for years it seems, but I never thought I would get to see!) on Sunday, August 29th at 1:00 p.m. Would you like to join us? I would love to meet you! I'm starting up an e-mail list for interested parties. Just drop me a line at gertie [at] blogforbettersewing [dot] com.

Now, closer to home! How about a meet-up at FIT later this month? The current exhibit is Eco-Fashion: Going Green. It's not the most thrilling topic to me, I admit, but it's an important one and I always enjoy the FIT exhibits. Plus: it's free. I'm thinking Saturday, July 24th. Afterwards, we can do lunch and/or fabric shopping! Again, just e-mail me to get involved: gertie [at] blogforbettersewing [dot] com.

Yay for meet-ups! Hope you can make one of these. If not, don't worry. I'm sure there will be more exhibits in my future - especially with Jeff so easy to convince. I'm thinking I'll push for London next!

Thursday, July 1, 2010

Yay for Sleeve Heads!

So I've been plugging away on my red linen suit lately. The skirt is complete, and the jacket is progressing nicely I think. I ended up using a modern (but out of print) McCall's pattern for the jacket. (It's 5278, view A, if you're interested.) I had just inserted the sleeves and was greeted with a rather sorry sight on my dress form. Look at that saggy, mushy, sleeve head!


Now, of course it will be a bit mushy on the dress form as Veronica does not have the benefit of shoulders. But even so, I could see that I was going to want a crisper look. Enter the magical sleeve head!

I first learned about sleeve heads in my favorite tailoring book when I was making my red winter coat, but I didn't end up using them since the coating was so thick it supported the sleeve head on its own. But this linen is not doing that, definitely. So luckily I had a couple of the suckers on hand to experiment with. The Sewing Divas have a really nice post on sleeve heads that I found VERY helpful in my process, so do give it a read if you're interested in this topic.

Here's what my sleeve heads look like. I bought these at Steinlauf & Stoller, and this is the only kind they sell. They're basically a strip of batting with a bias strip of muslin folded over it and stitched.


To start, you'll want to turn your jacket inside out and work that way.


VERY IMPORTANT: trim your sleeve seam allowances down to 3/8". This keeps your sleeve heads from sticking out too far. You'll see what I mean in a minute.

Find the exact middle of your sleeve head by folding it in half crosswise and marking it with a pin.


Now match this pin to your shoulder seam on your jacket. Pin the sleeve head to your sleeve seam allowance, matching up the edge of the sleeve head with the raw edge of the seam allowance (which you've cut down to 3/8" of an inch, right? See how it would be a little extreme if they were extending 5/8"?).


Baste the sleeve head to your seam allowance. I did mine by machine.

You'll want to try on your jacket and make sure you're happy with how it looks before stitching it permanently. Then stitch it on by machine, making sure that you're within the seam allowance. Here's how it will look. See the red stitching line?

Now look how nice the right-hand sleeve head looks compared to the other, headless one.

And from the back, now on the left-hand side. Whoa!


You can also add shoulder pads at this point, but I feel like that would be overkill for this jacket. Also, it's worth noting perhaps that this jacket will have a huge shawl collar, so the sleeve heads will probably be covered up anyway. Ah well. At least I'll know they look good, right?

Update: Ann from Gorgeous Fabrics wrote me a really nice e-mail explaining that there are two ways to use sleeve heads. The way I'm doing it here is kind of backwards if what you're going for is support of the sleeve. Since the bulk of the sleeve head is pointing toward my chest, what I'm actually achieving here is chest support, not sleeve support. If you turned the sleeve head around, you would get support in the sleeve. Perhaps I will take pictures both ways to show you the difference!

Also, a couple people have pointed out that you can make your own sleeve heads. Good materials include flannel, lambswool, muslin, and organza, among others. Whew, this could be an exhaustive topic! Thanks to Ann for the heads-up. (Ha, HEADs up, get it?)
© Gertie's Blog For Better Sewing. Powered by Cake