
Hey! And welcome back to my new draping series, which I'll just remind you again are not tutorials, but rather a glimpse inside the process of a draping newb. So, you know, take all of this with a grain of salt, as they say. In my previous post, I talked about coming up with a design and marking the style lines on my dress form. Now it's time to drape! Here's my design, as a reminder:

I should mention that I decided to eliminate the back shoulder darts, as they weren't necessary, and also to add a back slit so I can, you know, walk.
I consulted my text to figure out the order I should drape this design in and it will go like this: 1) midriff front, 2) bodice front, 3) midriff back, 4) bodice back, 5) skirt front, 6) skirt back. Each piece builds on the piece before it. Cool, huh?
I prepped my muslin pieces by cutting them to size, blocking them so they were on grain, and folding back an inch at center front. You line this fold up with the center front of your dress form to ensure that everything's on grain.
Here's what the front midriff piece looks like, draped. (See the fold at center front?) The process is really fun, it's like sculpting with fabric. You use your hands to gently smooth the fabric into place. You want everything to look nice and smooth, while pinning along the bottom of the style lines. Those slashes you see in the fabric are to allow it to curve around the dress form without twisting or wrinkling.

(Another disclaimer! Ordinarily one would add a pinch of ease to the waistline. I didn't because I found that my last draped design had a but too much ease in the bodice. Hmm, is it possible I've lost weight since we padded out Veronica? Perhaps all this yoga is doing it! Or maybe I just like a more fitted look. Either way, no ease added on this one.)
My teacher told me to use flat head pins but I apparently did not listen! I kind of like my cheerful, colorful pins.

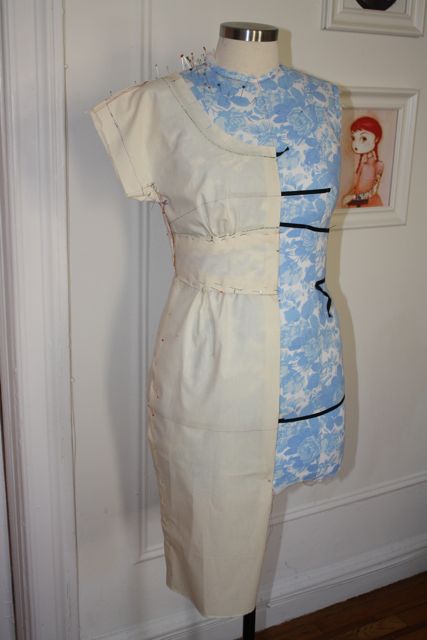
Now to the bodice front. The dart excess gets pinned into gathers under the bust for this design.


Now you can pin the bodice front to the midriff front to check in on things. (Pin the pieces to each other on the seam lines, rather than the dress form. This way you can see how they hang.) I immediately saw that my side seam needed to be re-drawn, so I did that with a different color Sharpie. (It's in orange on the below right picture.)


Now, on to the back midriff.


The two back pieces pinned together and looking lovely.

And move on to the skirt! Prepping the muslin pieces is the same process, with the fold at the center front and back to indicate the straight of grain. (You'll also see horizontal grain lines on these pieces; those are called "horizontal balance lines" and they're determined by where your bust or hip line falls.) The length of your muslin piece is determined by how long you want your skirt to be; I went with 24", which hits me right in the middle of the kneecap.
On the skirt front, I converted the dart excess to gathers to mirror the bust gathers.


Then it's put back on the dress form for evaluation. Hey, it looks like a dress!
This is where I caught my back dart problem, so I re-draped the back skirt. It helps to have Sharpies in many different colors - it starts to get a little out of control, as you can see below!

Next up is the tricky part (for me, anyway): fitting a muslin!
I hope this has been helpful, even in its non-tutorialness. Above all, I just want you to see that this is a fun process, and one that any sewist can learn with a little help and practice.

so interesting seeing your dress take shape! thanks for sharing.
ReplyDeleteWow that is really interesting. It looks like a much simpler (though perhaps not easier) process tahn I thought. Thanks so much for sharing these.
ReplyDeleteWow--this is amazing to watch this come together! I seriously need to get the Armstrong book on draping--I think it might go on my Christmas wishlist. ;) Can't wait to see the next part/finished dress!!!
ReplyDeleteNow, I do have one question for you... when you say you cut your muslin to size, it looks as though you had already cut the arm/sleeve shape in the muslin for the bodice, rather than just draping a rectangle of muslin and shaping the sleeve from there. Is this correct, or did I miss a detail? Going to have to keep this little series handy next time I drape something! ;)
♥ Casey
blog | elegantmusings.com
You make it look so easy! It's going to be a gorgeous dress.
ReplyDeleteI had the same question as Casey! :)
ReplyDeleteThanks for showing us your process - it's fascinating!
according to the books I've got on sleeves including the armstrong one, sleeves are drafted, since very few dressforms have arms. you could drape them on a person though.
ReplyDeleteTania
I meant to say. Books on drafting, not on sleeves.
ReplyDeleteTania
I'm going to repeat what everyone else is saying, but wow! This is awesome! I definitely want to give this a shot. I don't know if my dummy will be up for the challenge though. She's an adjustoform style dummy and not very solid.
ReplyDeletevery nice work! I always found draping easier than flat pattern drafting as you can see what is going on all the time. Nice design! Can't wait to see it in the spot.
ReplyDeleteCasey, good question and sorry that wasn't clear! I did start with a rectangle on all the pieces, but with the bodice, I ended up cutting away a bit under the arm as I went. (Kind of like how you slash the top of the skirt to get it to lay flat.)
ReplyDeleteFor a set-in sleeve, you draft it, just like Tania says. But since this is a cut-on kimono sleeve, I'm draping it on the form. I basically just marked a spot a couple inches out from the armscyle and made that my sleeve line. Does that all make sense? The sleeves took a lot of adjusting in the muslin stage, which you'll see next!
So interesting and fun to see this process! It's amazing, you make everything look so - not simple, but do-able =) Very inspiring! I want to go home and sew, right now =)
ReplyDeleteI've always been intimitated by draping, but you're making me rethink that. Thank you!
Wow, I always thought draping was a magical mystery method that designers learned when they took their classes. Thank you for showing the process (it's a *gorgeous* dress) and showing me that this might be something I can do someday (if I can get a dress form)
ReplyDeleteThank you so much for sharing this.
ReplyDeleteDo you prefer flat pattern drafting or draping? Which is more accurate?
Wow, this is interesting. I had the same question as Casey, had thought for a moment that perhaps you had cut out muslin copies of slopers of some sort, but your explanation makes more sense :) Thank you for demystifying the whole process!
ReplyDeleteAmazing and you really do make the whole process look like a lot of fun. I'm excited to see the next step.
ReplyDeleteThanks for sharing this. It's so interesting, and it looks like a lot of fun!
ReplyDeleteHere's a series of draping videos. They're in French, but they're not hard to follow. "Le bolduc" is style tape.
ReplyDeletehttp://ww2.ac-poitiers.fr/mdlmode/spip.php?article171
I've done almost no draping, but in the session I took the teacher recommended the use of a 1H pencil and blue and red pencils. The blue was used for initial changes and the red was used for further corrections. Maybe they think it's better to use pencils because Sharpies can bleed, I don't know. Obviously, whatever works.
In addition, before draping, we had to block the muslin (draping muslin, which is coarser than sewing muslin), and with a very sharp pencil "score" a straight vertical line and a horizontal one to ensure that the muslin was indeed correctly blocked. If the pencil is sharp and the muslin fibers are at the required 90-degree angles, it's pretty easy to do this.
vegetablog:
ReplyDeleteYes, it is a magical process that fashion design students are introduced to in their first semester. There are several levels, usually starting with structured silhouettes, I think. There are lot of subtleties and the students get constant practice, which is why they're so good at it by the time they graduate.
B & J, a wonderful fabric store in New York, used to have a terrific display featuring an intricately draped gown that was held together by pins.
tania-gru:
ReplyDeleteI believe that most draping books have tables for drafting basic sleeve slopers. I believe there at least two kinds, a fitted sleeve and an unfitted sleeve (I believe the former has a dart in the elbow.)
This is very exciting Gertie! Thank you so much for taking time to show us this process. You are a designer now!
ReplyDeleteIt would seem that your success would depend in large part on the size/shape of the dress form. Yours is a perfect you, but the only other folks I've seen using this draping process is the Project Runway folks, and they are using a "regular" form -- how on earth do they "make it work"?
ReplyDeleteThis has been unbelieveably helpful to me! I have a late-1950's Barbie dress almost exactly like this that I have been trying to re-create (for Barbie) and your post has finally de-mystified it for me. Thanks!
ReplyDeleteLizzy:
ReplyDeleteI think it's easier for the PR people to drape. Standard draping books are geared towards "ideal" figures, which mannequins represent, with some minor variations from year to year. If you drape on a Size 6 or Size 8 (the equivalent of commercial Sizes 0 to 6, depending on the manufacturer) mannequin all the time, some of the proportions must become second nature.
For example, I think in books the standard hipline is something like 7-9 inches below the natural waist. A fashion mannequin will invariably fit in that range. A mannequin also will have equally balanced hips and shoulders, unlike a real person.
A tutor and person with a lot of experience in the garment industry told me that mannequins usually are slightly narrower in the back, although real people seldom are.
Whenever I've thought of trying to draft a sloper for myself I've always wondered whether I should follow the instructions and then adjust, or simply plug in my measurements from the start because clear my shape deviates from that of the standard sloper. I'm a lot shorter than the average mannequin and my proportions are different: the waist always hits me too low, for one thing.
I hope to buy a dress form at some point and pad it. That will solve a lot of problems.
I love how this dress is taking shape. Would you consider posting the pattern as a downloadable pdf? I have almost the exact shape as you do from the waist up and would love to copy this (and I live on the west coast so we wouldn't suffer the embarrassment of wearing the same type of dress to the same social gathering).
ReplyDeleteAnd I'm curious about what type of fabric you'll use for this. I could see this in a wool crepe for winter, or a lightweight (lined) cotton for summer.
Love that you're sharing your draping experience. It's taking a lot of the mystery out of the process, for sure.
ReplyDeleteThere's no doubt about it… I'm going to have to learn how to do this, too. Thanks, doll!
What a great process! Thanks for sharing.
ReplyDeleteThis is soo interesting! I havnt even tried to sew from pattern (well, in school) and im such a newbie at sewing (curtains, apron etc) but its ever so intresting and fascinating.
ReplyDeleteBeing from Sweden i didnt understand what you meant by draping (draping=greece style) until the post where you put the tape on Veronica, I went "aaah" and project runway clips went through my head (as i said, no experience) ;D
Thank you for your great blog! I learn something from every post! (And your look is awesome, there´s nothing like a sober smart look flavoured with tattoos!)
i love learning from you! It's great to see the reality of what I read in books.
ReplyDeleteWow this is such an awesome series! I have a dress model but it's not to my size and basically functions as a hanger. This is really inspiring me to get it stuffed more to my own measurements. Gosh the possibilities are just endless with this technique!
ReplyDeleteThat is so neat. I love that you are showing us this. Now I dream of a dress form.
ReplyDeleteGertie - following you this draping journey is delightful! So much to learn.
ReplyDeleteOh man, I have taken a draping class as well, and it is so much fun! It made me never want to flat pattern anything ever again.
ReplyDeleteI am also a big fan of stripes, so my final draping project was this:
http://sugardale.blogspot.com/2008/12/fun-with-stripes.html
It was a really long process: I had some cheap black striped cotton, that I used just to figure out where the stripes should go, then I re-draped it in muslin, then I made it in black wool. I was quite happy with the result.
When I see what you have finished I can understand all the work that has already gone into the dress, and it is looking good. Can't wait to see the final project.
Thank you for posting. This sounds like something I would really love to learn some day.
ReplyDeleteThank you so much Gertie! I have been focusing on drafting flat patterns, and just got a dress form yesterday. Yipee! So I can learn along.
ReplyDeleteMy problem now, on getting this bad boy (girl) out of the box, is that I have no idea how to adjust this correctly. I think the dials are in centimeters, but there are so many!!! Maybe I should have started with the "home" model, and not the "pro", because I am definitely not feeling like a pro now...
So cool - it does look like fun! And more instantly satisfying than drafting patterns flat on paper. Loving the un-tutorials!
ReplyDeleteJust reading through the comments and I have a question...
ReplyDeleteIs it better to go with a fully adjustable dress form or a solid one and pad it to fit?
I'm a bit confused as to why an adjustable one would not be good when you need to pad the solids because they are apparently aren't made like a real woman...
Thanks for any insights ~
xox,
b. of Depict This!
Great job! I love your writing but I'm totally a visual person. I can easily understand this process without even reading - umm, should I be proud of that?? Thanks anyway!
ReplyDeleteThanks for posting these demos, it helps my visual brain so much! I've tried reading how to drape but couldn't grasp the whole concept. This connected the dots :)
ReplyDeleteincredibly impressive! this is the real deal. Can't wait to see the finished result.
ReplyDelete