Showing posts with label work in progress. Show all posts

Monday, December 28, 2015

Dirndl Progress

Well, I'm back home from my wonderful Austin Christmas trip and surveying the crazy state of my sewing room. I left it in a mad flurry of different projects: the sew-along knit wrap top (final posts coming this week!), my Christmas dress for my card with Henry, and then the dirndl I've been obsessing about.

I wrote about making this dirndl months ago, and I'm finally doing it. The thing is, it's such a big project--and a type of sewing I knew little about. So of course it's consumed me to the point where I once woke up in the middle of the night to work on because I couldn't sleep! Yep, it's a sewing obsession.

I started with Burda 7443, but I've made about a million changes to the pattern. The lucky thing is that I now have two high-end dirndls that I'm using as research: one from Tostmann Trachten and one from Lena Hoschek. I love them both dearly, but the Lena Hoschek one has been my primary inspiration. It has something about it that I find completely sublime.

I used tiny piping on the bodice back princess seams and all around the neckline and armholes, just like the Lena Hoschek dirndl. The main fabric is one of my fall jacquards and then the piping is in a contrasting shantung.


One of my favorite things about the Lena Hoschek dirndl is the skirt: it's fully lined and has hand-stitched rows of shirring all the way around (except under the apron, where there are pleats).

I debated about whether to imitate this detail for my very first dirndl; it seemed ambitious to the point of stupidity. However, that is often my specialty! So I dove right in. I used polka dot quilting cotton for the lining, which also served as my guide for making the hand rows of shirring.

These rows had to made along long stretches fabric--almost three yards. Great for the middle of the night when you can't sleep. If the stitches somehow get alternated on one row, you have to re-do that part. Ask me how I know!

Anyhoo, the shirring finally came together in a rather lovely way, though nowhere near perfect.


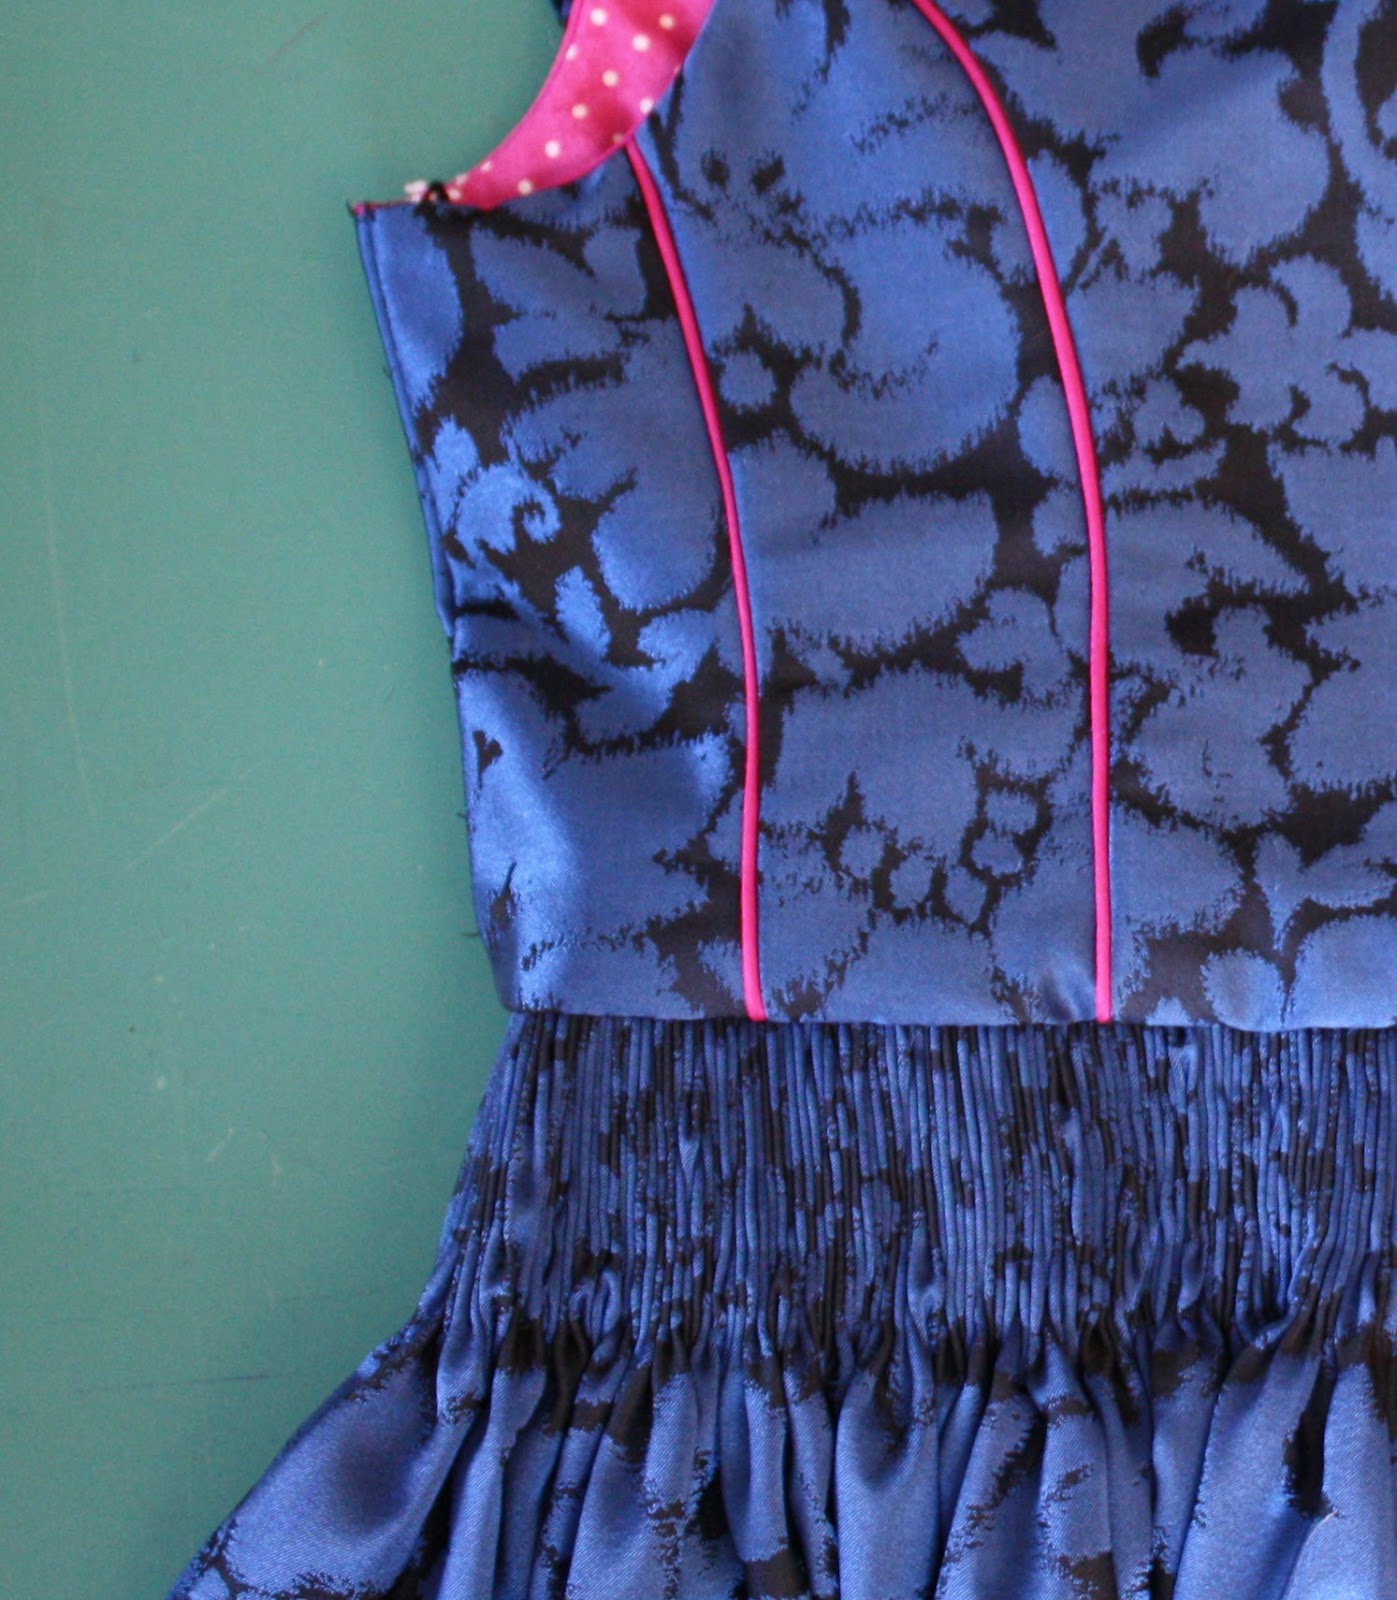
I decided to use hooks and eyes at the center front bodice opening (rather than the called-for zipper). This meant changing the pattern a little (it now needed self-facings at center front), and also adding a placket that serves as a little modesty panel underneath the hooks and eyes.

I used steel boding on either side of the center front. It has another row of vertical stitching next to the boning channel, which helps keep the layers together where the hooks and eyes are sewn (I learned this from my Tostmann dirndl).

I've also been playing around with trim at the neckline, I know I want something very 3D and girly, in the vein of Lena Hosheck. This ruffle won't quite do, but it's on the right track. I also want to try a piped box-pleated trim.


Of course, I also have to make the blouse! I picked out this white with black swiss dots.


And then there's the apron, which will be in the same fabric as the piping on the bodice. 
So there's still quite a lot of work to be done, and I have to give attention to several other things at the moment. But I thought I'd share a bit of my process as I go. Wish me luck!

Tuesday, December 10, 2013

Next Up: Ombre Chiffon Dress

I have a musical performance coming up tomorrow--and as always, I love to set self-imposed deadlines to make complicated dresses in less than a week.

The musical theme this time around is Classic Country, so I felt that it must have a flouncy skirt. Right? When I came across McCalls 4414, I knew it was the one. That skirt has EIGHT gathered panels. I ran out of fabric around 6, but I think that's ok. I don't want to get buried in chiffon.

I found this amazing green ombre chiffon at B&J.


Aren't the colors gorgeous? I'm using the pale green at the top and the darker at the bottom.

Off to sew! Next time I say I'm going to whip up a complicated chiffon dress under a deadline, please talk some sense into me.

P.S. I think I was subliminally influenced by this video of Tammy Wynette wearing a flouncy green chiffon dress.

Wednesday, October 2, 2013

Butterick 5953 In Progress

First of all, thanks for the great response to yesterday's post about a potential Hudson Valley sewing retreat! There was tons of interest, so I'm going to start getting price quotes and such. (Actually, Jeff is going to do that. He's an event planning wizard!) I will keep you updated as we go along.

I also wanted to share with you my progress on Butterick 5953, one of my latest designs in my pattern line.


I had hoped to finish it to wear to ASE (I love to set myself needless deadlines in the middle of stressful times for some reason) but that didn't happen. Now it will probably hang out mid-process while I do the sewing for my book.

It was actually a good thing I didn't finish it for the expo, because I found the perfect buttons there! 1960s carved pearl, in excellent condition.


Anyone else working on this pattern?

Friday, August 30, 2013

Skirt Options for the Leather Accent Dress

It's on its way! I was having trouble deciding what style leather dress to make for an upcoming performance (girly or babydoll)--so I made muslins of both of them. I think the fuller-skirted version will be best for playing music (I'm on the drums for one song, so I can tuck the skirt between my legs to avoid flashing everyone). But! I'm going to make the babydoll version next, since I loved it too. Why limit myself to one dress? I never have before, so why start now?!

Anyway, more decisions! Now I'm having trouble deciding what fabric to use for the skirt of the dress. I was originally thinking this lace.


Maybe with a black lining. 


But it didn't totally wow me. So I tried sequins.

Not feeling it. So I tried metallic lace.
Definitely a contender! Finally I draped some tartan, for a Westwoodian vibe.

I'm digging that one too! It speaks to my beloved Grunge era, and has more of a color pop for stage presence, too.

I'm loving the last two, but can't really decide. Opinions, anyone?

Thanks, friends!

UPDATE! I tried the tartan on the bias too, thanks to some reader feedback. 


P.S. I will give construction notes in an upcoming post.

Tuesday, December 11, 2012

UFOs to the Rescue!


I'm talking about Unfinished Objects, readers. You may not know this, but I'm just as guilty of having UFOs as any other lady who likes to sew. I organize all my "in progress" projects into these cool huge Ziploc bags, and keep all their notions and the pattern together.


When my mother-in-law saw my (admittedly large) collection of these bags, she asked: "Are you going to live long enough to finish all these projects?"

Fair question! Probably not.

But! Sometimes the UFO comes in handy. Like now! Right around this time of year, I always have the urge to sew a holiday season frock--forgetting that I don't have the time and there's a million other things I should be focusing on (millinery class finals, anyone?).

But HA! I've outsmarted myself. I have the party frock I started last year, almost complete! It's this vintage pattern, done up in this cool peacock blue cotton brocade. It's like Gretchen Of Christmas Past knew that Gretchen of Christmas Future would have pink hair and that peacock blue would be the color for her this year!


I put the gussets in and everything.

And past Gretchen was so clever that she put the whole thing in a handy bag, complete with matching thread and a zipper for future Gretchen to find this year.

So, just saying, don't knock the UFO. Who knows what you could be starting for your future self!

Anyone else with me in attacking some UFOs?

Thursday, March 1, 2012

Also in Progress: Vintage Surplice Bodice Dress


Man, I am all over the place right now. It's like UFO Land at Chez Gertie. I'm making a quilt, trimming a hat I blocked (I'm taking a millinery course at FIT!), and knitting some socks. And then last night I madly started dyeing 5 yards of extra-wide muslin in a tiny bucket in my kitchen sink to make a duvet cover. I'm basically out of my mind. So, what to do? Add another project, of course!

In December, I blogged about making the pattern above in velvet. Well, I've clearly missed the velvet train so I'm making it in cotton brocade! Peacock blue cotton brocade!

This pattern has a one-piece underarm gusset, as opposed to the two-piece gusset I wrote a tutorial on. It's different in its application in that you have to sew the entire underarm and side bodice seam first, leaving a diamond-shaped hole for the gusset. Then the gusset is inserted in one go, pivoting at each corner. It's kind of tricky, and I'm still working on sewing them a little more, um . . . effortlessly.
This brocade has a really lovely geometric pattern and a soft sheen.

I used fusible stay tape to stay the neckline and top of the sleeve, both of which are cut on the bias.

It really helped keep things in place. I didn't stay the back sleeve, and it stretched by a couple inches! Not to self: stay BOTH sleeves next time.

P.S. Oh, I'm also doing the final check on the pattern sheets for my book. Pippi is helping.


Wednesday, February 22, 2012

In Progress: a Dressmaker's Quilt


The home dec sewing has begun! And I discovered a way I can make it more interesting: by using remnants of my favorite garment fabrics. I once saw an exhibit of quilts at the Folk Art Museum, and some of my favorites incorporated scraps of fancy dress textiles: silks, velvets, and the like.

This past weekend I made a dress out of this amazing magenta rose-motif brocade (it's for a magazine article, more to come on that in the future!) and I had a little over a yard left. I thought about putting it aside for a blouse, but then I realized how luxurious it would be made into a throw quilt. And so the piecing began!

I added some length to the brocade I had by piecing together some scraps. And then I remembered this vivid pink dupioni I have in my stash, and that became part of the mix as well, just in a corner (I love little quirky details like that in quilts.) The finishing touch? A silk velvet backing, also from the remnant stash.

I sandwiched cotton batting in between the layers and basted them, and now I'm in the process of hand quilting it. I was inspired by these quilts from West Elm, which are made from vintage saris and have prominent hand stitching in a contrasting color.

I loved the idea of a humble running stitch on these luxe fabrics. So I'm using some Coats Button and Craft thread (the same stuff Alabama Chanin uses for handstitching) in ivory.

 I absolutely love how the hand stitching looks on the velvet.
I'm planning to bind the edges in the velvet, I think.

I also found out that my throw looks pretty great with a pink chandelier, so I'm going to start convincing Jeff we absolutely need one. I'll let you know how that goes.

Friday, February 10, 2012

In Progress: The Joan Rose Applique Dress

I realized that I don't do a lot of posts as I'm working on a project lately. Being a drama queen, I'm all about the "big reveal." But I feel like there's something useful in watching the progression of a project, right? So I thought I'd do a little post about what's in my sewing machine right now.

So, you all realize I'm obsessed with Joan from Mad Men, right? I know I'm not unique in this obsession. But I do feel a personal connection to that character. It has nothing to do with her personality, it has to do with her hips. That's right, hips.

I know lots of us find it refreshing to see Christina Hendricks's body type on a current program. And for me, it's become almost therapeutic. You know those "OMG my hips are huuuuge!" moments? When that happens, I say two words to myself: Joan Holloway. ( I refuse to call her Joan Harris, it's true.) And it actually works! Instant therapy. Actually, it only works in conjunction with a mental image like this one:

So, long story short. I think about Joan a lot. I also think about her dresses a lot. And one of my favorites is the rose applique dress she wore on what I call the "accordion dinner party episode."

I recently had the idea to copy this style by taking vintage rose fabric and using it for appliques. I found this tablecloth:

source
It has many large stains on it, so I didn't feel bad about cutting it up. (I don't think I could bring myself to cut a usable vintage tablecloth!) The background matches the pinky-red merino wool I have. So I started cutting out individual roses, leaving 1/4" around them. I experimented with appliqueing them by hand, but found I preferred the polished look of machine applique instead.

I assembled the bodice of my dress and arranged my roses around the neckline, pinning them in place.


This took a lot of playing around and squinting at it. I even had to sleep on it one night, and come back to it fresh the next day. When I was happy with the arrangement, I glue-basted the roses in place.

Next, I began machine appliqueing them in place, using a narrow zig zag on a very short stitch length. I did a couple samples to get the setting I liked best.

And here's where I am! It needs a little work cleaning up the edges of the appliques, but you get the idea.
More to come!

Wednesday, January 5, 2011

Beading Work in Progress

Hey, want to play show and tell? Here's what I did with my Christmas vacation! I thought I'd show you my beading progress as I go, since this dress will probably take me a long time to make. This hand beading stuff is intense work, right?

Remember when I wrote about being inspired by the Alambama Chanin books? Well, the idea of this project has been in the works ever since. The dress pattern and stencil are taken from Alabama Studio Style and Alabama Stitch Book, respectively. This is the left side panel of the princess seam dress:
As I suspected it would be, the biggest challenge was tailoring the Alabama aesthetic to work with my personal style. I made about a million little samples on swatches trying out the different techniques, which generally include a lot of applique. In the end, the applique never looked quite right to me and so I decided to do a completely beaded look. (I took beading advice from Kenneth D. King's excellent Designer Bead Embroidery.) I used the stencil to make the pattern and transferred it to my fabric (a lime green wool double knit) with a silver Sharpie. You can still see the Sharpie marks on the areas I haven't beaded, but they'll be completely covered by the time I'm through with 'em!
I plan to bead at least one other panel, the adjoining side back panel. I'll probably make a bunch of construction changes to the Alabama Chanin instructions, like adding a silk organza backing for stability (I tried doing that before I beaded, but the layers kept shifting and bunching, oy). It'll be more finished looking than the book projects as well, without the unfinished hem and all that jazz that never looks quite right when I do it! It will probably also need a crinoline and a matching belt, don't you think?

I'm heading to Palm Springs at the end of this month (to guest teach at one of Heather Ross's Weekend Sewing Workshops, yay!) so I'm looking forward to having more travel time to work on this. Though planning and sampling this project was initially frustrating, I've really enjoyed the process of hand beading. So relaxing! Plus, it's nice to have a portable sewing project. Goodness knows lugging a Bernina about with you and holing up in your hotel room with it is hardly socially acceptable!

Do you have projects you like to take with you on the road?

© Gertie's Blog For Better Sewing. Powered by Cake