Well, it's happened again: I've got the corset bug. And it's a good thing--I've finally pulled out the
underbust corset kit from Sew Curvy Corsetry that I've had in my sewing room for . . . well, a long time now. I'm feeling quite high on the whole thing. It's so exciting to sew something different from the usual! So I thought I would make this Corset Week 2012. Today's topic is making a mock-up corset, using
Laughing Moon Pattern #113, view B.
Julia from Sew Curvy has written many a valuable post on the topic of corsetry, and
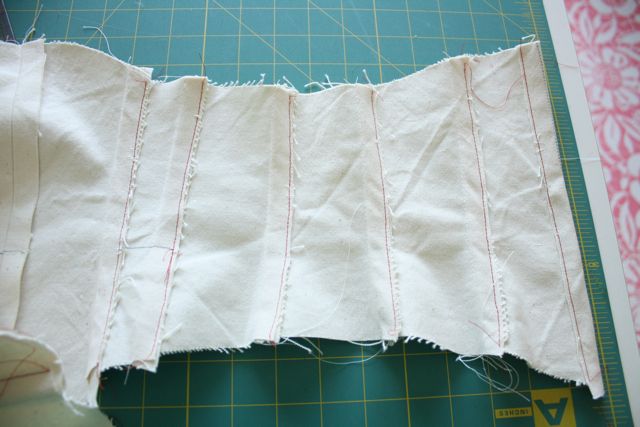
her instructions on mock-ups are no exception. I followed her tips very closely, starting with making a muslin out of a heavy-ish material. I used some plain unbleached canvas. I cut all the pieces, minus the facings. I sized up to an 18, though some of my measurements were closer to a 16. I figured it was better to start big and size down through fitting.
You have a pair of each pattern piece, one for the right side and one for the left side of the body. I marked one side 12, 13, etc, and the other side 12a, 13a, etc. (A genius tip from Sew Curvy.) I marked the waistline on each piece.
When I got to the back, I used tracing paper to transfer the eyelet markings.
I divided the pieces into right and left sides and then sewed all the seams. Instead of the busk at center front, you can sew a seam there for the purposes of fitting.
Center front gets pressed open and all the other seams get pressed toward the back.
Just like with a muslin of a dress that will have a boned bodice, it helps to add boning to the mock-up of a corset. Actually, it's essential since boning is such an integral part of a corset and you can't get a sense of the fit without it. To make boning channels, you stitch down the edge of each seam allowance to make a little pocket for boning. I changed to red thread here so you can see it easier, hopefully.
I used rigeline here instead of steel boning. I will be using spiral steel in the actual corset though.
I made holes for the lacing with an awl. (They later turned out to be too small, so I just cut the holes wider with small scissors.)
I put in lacing. The instructions say to do it "like a shoe." Apparently I need to go to remedial shoe lacing school.
I put the whole thing on and bothered Jeff to take some pictures.
There are a few issues. First of all, it's supposed to have a two-inch gap at center back to account for the negative ease of a corset. So I need to reduce the whole thing by two inches. Secondly, I didn't like the fit under the bust--it comes up too high. I drew a new line where I'd like the corset to hit under the breasts.
I also drew a new waistline, about an inch higher.
Lastly, I noticed the center front being especially loose and flappy (for lack of a better term.)
I wet on to start some pattern alterations: taking each seam in by 1/8" (to lose 2" total), lowering the under bust line, raising the waistline, and taking in the hips at center front.
So that's your first installment for Corset Week 2012. I'd love any feedback you have on my muslin! Tomorrow I will be cutting out my beautiful white floral coutil.


This is the first corset I ever made and it is a really nice pattern, the only alteration I needed to make was to curve the side seems in a bit as they were a bit straight up and down, your muslin is looking good!
ReplyDeleteI don't know anything about corsetry so I can't really comment on your muslin, except to say that it looks great!I've never even worn a corset but I really like the look of it and I think making a series of posts on this subject (if, as I understood, this is what you're planning to do) is great! So, thank you, Gertie!
ReplyDeleteYou went from sewing on rick rack to grading and fitting for corsetry in 3 days. My head exploded a little.
ReplyDeleteYour step-by step makes this seem easier than I assumed it would be, though!
Yea corset making! Have fun!
ReplyDeleteJust a word of warning before you take out too much width at the hips: Did you try sitting down for more than 5 minutes with the musselin? Or drink a large glass of water?
ReplyDeleteFor me, the small amount of "flabbiness" at the hip is a life saver at the situations mentioned above. If you are worried that the corset might not hold in your belly (this is ment in the nicest of ways), you should invest in a spoon busk for increased strength!
I think you once made a video about putting in boning - was it for a strapless sundress?
ReplyDeleteI remember the cutting to size wasn't easy.
We must be in sync! I've got the corset bug too! Just started the muslin for your bombshell class & figured I may as well order some corset supplies at the same time lol.
ReplyDeleteYour muslin looks great!! Not too many adjustments needed so it'll come together in no time! :)
This is awesome! I have this pattern waiting for me to make a mockup, it will be my first ever corset, I've been inspired by making your Bomshell dress (which I haven't got a photo of yet) which I really enjoyed making.
ReplyDeleteI love that underbust pattern but it took me several tries to get the fit right (it looked more tubular on me than hourglass). I had really really good luck with the Laughing Moon Dore pattern made into an underbust. Chopping the upper chest portion was easier than expected. So much fun!
ReplyDeleteHow fun! I'm working on a corset this week too!
ReplyDeleteThanks for the post! Making a corset is on my to do list this year (although I was thinking of a regency - perhaps the corset you propose will be a bit easier to start). . .I'm exciting to see where this goes. . .
ReplyDeleteI just made my first corset this past winter, and I'm hooked! In fact, it was Jo's sew along, so check out her stuff. (bridgesonthebody.blogspot.com) She's very helpful! Yours looks great!
ReplyDeleteI've made a couple Renaissance Fair outfits for ladies that included simple corsets. Not a full on, strap it down, squeeze you in style, but a little bit of a shape enhancer. I was nervous at first, but I found them to go along fairly drama free. Maybe it's high time to make one for myself.... *wheels turning*
ReplyDeleteThe muslin looks fine, if a bit too big (the exact position of your waistline is hard to make out in the pictures) but you haven't laced it correctly. A corset should indeed be laced 'like a shoe', in the sense that you have to criss-cross the laces. However, for a 'real' corset, one with some waist reduction, you have to keep in mind that the point of the most pressure will be at the waist. So, you have to lace from the top of the corset down to the waist and from the bottom up, tying the laces at the waist (some corsets use one long set of laces, leaving long loops at the waistline, others use two sets). Here, you can see how it should be done: http://www.fairygothmother.co.uk/docs/corsetcare.pdf
ReplyDeleteYou should also not lace it like a shoe. You should decide where you want the smallest point to be (often the waist) and have it lace BOTH directions towards that spot.
ReplyDeleteThis often means two set of laces and two sets of bows.
I missed the point where you talked about taking out width at the hips, but MindLess's comment mentions it. I usually try to have corsets curve OVER the top of the hip bone, so that the hips are not involved in any way.
Have fun! Corsetry is my fave costuming.
I made a few corsets with this pattern, it is very nice :) The fitting was easy and it fits very good. Cant't wait to see yours.
ReplyDeleteThis will be fun, I have had an interest in corsets, went as far as to order some patterns, but then, never even gathered the supplies. I look forward to seeing you make this one.
ReplyDeleteYou are far braver than I! Sew on!
ReplyDeleteAs corsets are something I have done many, many of, here is some tips!
ReplyDeleteLacing:
The "tightening point" should be at the waist. Eiter you have too laces, one from the bottom to middle and one from top to middle OR you do the "bunny ears" as I prefer.
Bunny ears:
http://www.scribd.com/doc/20614707/How-to-Lace-a-Corset-Properly
I also like to posision the tow eyelets I use for the "ears" a bit closer to eachother then the rest of them.
The flappy waist? Well, it you take anything in, be careful. It could end up been hard to sit. One thing I like to use so take away the flappy is to use a steel front. A hard steel front!
http://www.venacavadesign.co.uk/Products/Solid_Steel_Busk.html
This keeps my extra punds in check! ;D
Do not use the flexible ones as they are comgy, yes, but gives no stability to the floppy front or belly part. Some times you even end up giving tour self an extra little belly due to thight middle pushes body downwords and give your regular belly a bit extra flesh if your not careful with the sweing/boning/busk.
Oh, and I think you should tak away more then tow inches. Perhaps three! You have the perfect body to sculp into an hourglass figure! <3
The "bunny ears" not only put the pressure at the waist but actually let you tighten the corset to the degree you want without help from another person.
ReplyDeleteYour readers have left some excellent comments here. Thanks. I learned a lot. I purchased an ebook to make corsets but have not done it yet.
ReplyDeleteWhen I make corsets or bodices, I use the awl to start the eyelet hole and the use progressively larger knitting needles to enlarge it to the size I want. Also, make sure your hand is to the side, not underneath when you stab the awl/needle thru. (did you know there is a nerve in your palm that runs all the way up to your shoulder? I do now!!!)
ReplyDeleteExciting stuff - I've been gearing up to make a corset myself as I love the concept, so i'll be watching the week of corsets closely! Thanks as always Gertie :)
ReplyDeleteThanks Gertie! I have the same pattern you're using and plan to follow along this week myself. Your blog and posts are always so inspiring!
ReplyDeleteGoogle bridgesonthebody
ReplyDeleteIf you don't want to have to lace the mock-up you can make a reusable zipper panel. Top stitch a big plastic separating zipper into strips of canvas then machine baste canvas into your mock-up so that 2" of zipper panel is exposed. Fit your corset then remove the panel remembering that you now have a 2" gap for lacing (so slightly smaller if you lace it tighter). You can reuse the zipper panel for other corsets.
ReplyDeleteI would take out more than two inches. Once you have removed those twoinches you will be able to lace the corset tighter, so you might want to take out three, or even four inches so you still have a gap at the back.
ReplyDeleteOther commenters have mentioned lacing from the top to the middle and the bottom to the middle so the pressure point at the waist is the control point.
I did some serious corseting for a while, and the corsetiere told me that the corsets that come up right under the bust get extremely uncomfortable when you sit and advised me to get the "short corset": down well below the bust so as not to chafe the underside of the breasts, but still up over the base of the ribcage.
ReplyDeleteI was also warned that corsets with built -in cups are REALLY uncomfortable when you sit and are difficult to get right. Remember, I am not talking about a strapless dress or bustier that merely "fits snugly"; I am referring to a real corset that actually squishes ones' waist down (and even a 2-inch reduction takes a LOT of getting used to!)
The combo of cups pushing up from under and the pinching of the waist can be just too much discomfort for people who are not used to the restrictive clothing of yesteryear!
But you do look GREAT in a corset; women with a little flesh look PERFECT in corsets; skinny women just look RIDICULOUS.
O.K. so, when I went into the Navy ( in 1974) we were required to wear girdles... ahem, it was considered part of the uniform... at least in boot camp) as soon as I got out of bootcamp... i tossed it! I didn't need it to be able to wear the uniform.... I love the retro patterns and all... but no thanks I just don't think that I will be getting into corset making. Enjoy!
ReplyDeleteNo matter what you make, you always seem to do a great job!
The Missouri History Museum, here in St. Louis, just opened a new exhibition on undergarments, "Underneath It All." http://www.mohistory.org/node/7255
ReplyDeleteI haven't managed to get over there yet, but I'll report back when I do!
Corsets are my specialty and I personally can't stand this pattern. I've heard that the instructions are great and all, but it's just not shaped like a corset. Corsets work on displacement, not constriction like most people assume. That being said, a straight up and down corset can only constrict. You need a corset pattern with a much more defined nip in the waist. They are more comfortable and safer for you. There is a free step by step guide for drafting a corset on foundationsrevealed.com and a lot of great patterns at corsetmaking.com.
ReplyDeletehTere's a new UK pattern company called Ralphpink.com and he has some pretty awesome corsets. They're more in an anime/cos play vein but are still really cool
ReplyDeleteThis was very helpful! i've been looking to make a corset for the longest time and a little afraid! Your tutorial defiantly helped ease the pain! i can't wait to purchase a pattern and dive right in! i look forward to following your blog!!
ReplyDeleteLauren
Hey Gertie!
ReplyDeleteI make corsets for burlesque performers and girls who are looking for alternative bridal wear etc. Shout if you need any help - I eat, sleep and breath corsets!
Wow! What an adventure! I think I've learned as much from your tutorial as I did from the comments! There's a lot of information out there. I don't know if I'll ever make a corset (I love to wear them though), but it's great to know everything is available out there. I recently purchased a sewing box, and in it was a grommet tool! I don't know if it would ever work with leather, but it would sure work great for a corset!
ReplyDeleteHow wonderful! I'm making a corset myself right now, also using one of Sew Curvy's kits. Looking forward to seeing more of yours! :)
ReplyDeleteWOW!I am so glad you are doing this and showing us!!! I've been dreaming about making a corset for quite a long time now. If you have to buy the real thing they are VERY expensive, so you will be saving money as well!!
ReplyDeleteAs for your toile, I like it a lot. I agree with underbust and width alterations, but I don't quite see the flapping problem in the centre front. I suspect it is caracteristic of corsets, but if you seee how to repair that, good!
I can't wait to see your finishing embellishments. Please keep us posted!!!
Some inpiration:
http://mertxeshomesewing.blogspot.com.es/search?q=corset
It's so great of you!Such an amazing idea!
ReplyDeleteLove it!
mirc indir mevlana sözleri kapak sözler abiye modelleri moda sitesi
ReplyDelete