

Have you ever used this stuff before? I'm using horsehair braid for the first time and I'm enamored. I've been working on a very special project: my very first draped design! Don't get too excited, it's a very simple silhouette - no cowls or shirring or pleats. But I draped the thing myself! It's a 50s-style dress (shocker, eh?) with a boatneck and a very full skirt. I'm making it out of the most beautiful textured cotton in what must be Schiaparelli Pink (though it looks a bit Fanta Orange in these pictures!).
I was researching hem methods, and I was thinking about doing a faced hem for a little more body at the hemline. And then I came across the section on horsehair braid in Professional Sewing Techniques for Designers, which is absolutely my new favorite sewing book. I was intrigued! Horsehair braid acts as both a facing and a hem stabilizer. It's used to add structure to hemlines: think of a sculpted mermaid skirt or a full ballgown. It added the perfect swingy fullness to my knee-length circle skirt.
First off, what is it? Horsehair braid used to actually be made of horse's hair, but now it's made of nylon or polyester. You can buy it in various widths. A wider width will give you more body to your hem, and a narrower one will be more subtle. I didn't go subtle! I went with a 2" width. (They had from super tiny up to 3" wide at Steinlauf & Stoller, and it came in both black and white). A quick Google search turned up lots of online vendors for this stuff, in case you can't find it locally.
The braid has a string at the top. See the loopy bit up there?

This is used to pull the braid tight at the top to shape it, resulting in a curve at the bottom. Perfect for a curved hem like a circle skirt!

There are little loops throughout the braid so that you can pull them up incrementally as you go, not just on the ends. Isn't that genius?

*Update: I just learned that the narrower widths of horsehair don't have this string at the top. That's because they're easier to shape on their own. So don't sweat it if yours doesn't have this!
Before you start your project, you need to decide if you're going to either: 1) underline for an invisible hem - the horsehair braid gets catch-stitched to the underlining in this method or 2) top stitch your hem. For formal wear, you'll obviously want to underline. Since I'm making a day dress, I decided to top stitch for ease and a more casual look.
So here's how to apply your horsehair braid. Start with your dress at the desired length plus 1/2". If your fabric is thicker, you might want to add a smidge extra for turn of cloth.
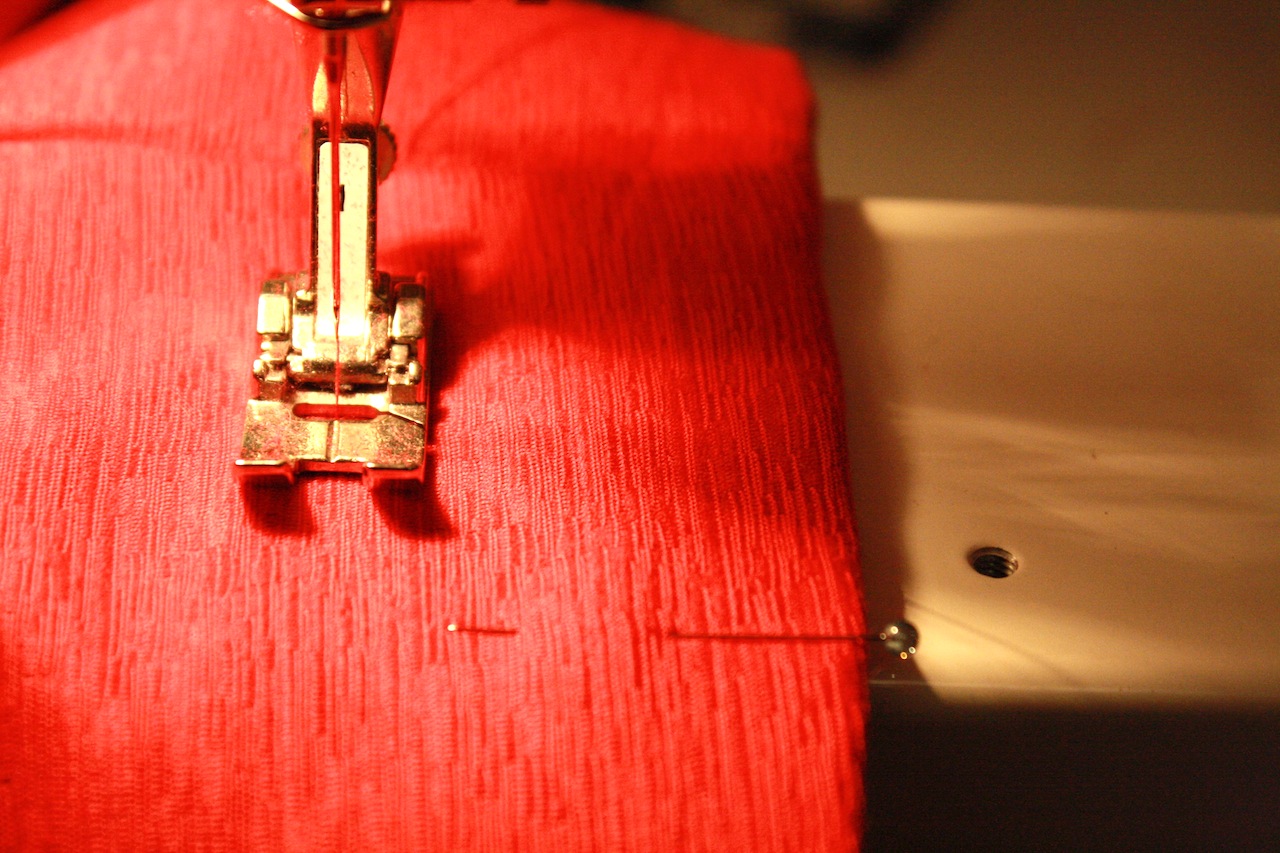
First, you're going stitch the braid to the right side of your dress, lining up the bottom of the horsehair braid and the raw edge of the bottom of the dress. I wouldn't necessarily recommend pinning it first: this is because you don't want to pull the braid as you go, you want it to apply flat. If you pull it as you're applying it, your hem will look twisted. Just keep feeding it and lining up the braid and the dress's raw edge as you stitch.
My 1/4" stitching line is pointed out with that handy yellow arrow. Keep in mind that this is the outside of the dress.

When you get to the end, you'll want to cover up one end of the braid with some sort of seam binding so it won't scratch you. Lap the covered end UNDER the raw end, this way the scratchy raw edge of the braid will be lapped under when flip it to the inside. (Do as I say, not as I do in this picture. I learned the hard way.)

Now flip the braid to the inside and press the hem. Avoid ironing the braid itself, just press the hem.


If your hem is curved, you'll need to pull the loops of string incrementally so that your braid will curve up. You're shaping your hem - isn't it exciting?!

Pin the hem as you go. I'm pinning on the outside of the dress since I'm going to top stitch it and that's the side that will be facing up.

Now take it to your machine and top stitch. Find the right hem width that will catch the horsehair braid near its top. Use a slightly longer stitch width than usual for prettier stitches. I'm using 3 mm here, but next time I'll probably go with 3.5 mm.
*Update: To avoid the fabric twisting as you top stitch, it helps to feed the fabric to the left of your presser foot through as you go with your left hand. If you notice the fabric pulling or twisting, stop stitching and raise the presser foot (with your needle down), and smooth out the fabric around the presser foot to release any tension.
(If you underlined, this is where you'll catch stitch the horsehair braid to the underlining so it doesn't show on the outside of the skirt.)
Press your finished hem. Pretty on the outside!

Awesome on the inside:

And it will be super awesome once I cut those loops off!
I'll be photographing the dress this weekend and I can't wait to show you how rad this skirt looks in action. In the meantime, I hope this tutorial was helpful! Let me know if you have any questions.

LOVE it! Thanks for such a great tutorial.
ReplyDeleteI've been thinking about applying horsehair to some of my projects, so I'll be bookmarking this for when I do.
ReplyDeleteThis looks like a great technique, thank you for sharing! I will be trying this sometime soon I think, as I also love full skirts.
ReplyDeleteHello!
ReplyDeleteI love your blog- I've been lurking here for ages!
I've often wondered, how does applying horsehair affect the laundering of the item?
Also, I'm in the UK- we have something similar called "crin"- I'm not sure it has those nifty loops though. Does anyone know if its the same?
Best Wishes,
Kaye.
Golly, I don't know anything about sewing but this is just fascinating. At the moment I'm still working on stitching in a straight line, but I can't wait until one day I can do something like this!
ReplyDeleteThat's a great tutorial,thanks. I had heard of horsehair braid but always presumed it was something to do with 'serious' tailoring never realised it was like this - perfect for shaped hems. I can see this coming in handy for all sorts of projects.
ReplyDeleteI'm a bit freaked out by the timing of this post as I am googling horsebraid hair at the moment to see if it would be suitable for hemming a 1960 knee-length full-skirt dress (my fabric is med-light crepe and I'm worried about it collapsing). I'm struggling to find the answer then google brings me to your blog which I follow already (should've looked at my dashboard!)
ReplyDeleteIs your dress also a shorter length? Most references of horsehair braid are for floor-length skirts and not having used it, I'm not sure how subtle or not its effect is? While I don't want my hem to flop, I don't want an overly perky skirt that looks like like its had a caffeine overdose! My dress pattern (9265) is on my blog page. I can't wait to see your photos, the fabric looks lovely.
PS. Kaye, "crin" is the same thing, its also known as "Crinoline tape", I learned that in the most random way, translating a pattern from Japanese! I'd only ever heard of it has horsehair braid before even in the UK.
ReplyDeleteI have used it before; in a Snow White costume I made for one of my daughters several years ago. It makes a full skirt really stand out. I had forgotten about it. Thanks for the reminder.
ReplyDeleteawesome! I love garments with serious structure to them...
ReplyDeleteI imagine this is the same stuff that's used for big ruffles and serious stand-up collars and peplums and such.
Awesome! Now I know what I can do to my fishtail skirt to make it look the way I want to. This is such a nifty notion and I never knew about it.
ReplyDeleteIs it machine washable?
Excellent! I look forward to trying this, and thank you *so much* to alerting all us other nerds about this technique! You rock!
ReplyDeleteThis is fantastic--I had read about horsehair braid but never seen it in person or in action. Thanks for the very clear pictures and instructions!
ReplyDeleteHorsehair braid is like magic, right? I love that something so simple can add so much glamour in a no fuss manner. Your tip about facing with bias tape to cover up the scratchy surface is genius, because it's more practical than putting an entire lining in. Think of the effect horsehair braid could add to a swing coat.. I cannot wait to see the fruits of your labor..
ReplyDeleteIf you love this technique, be sure to look at padded hems too. They're definitely more of an application for a floor length dress, but it adds fullness and just enough weight to make a formal look really stunning. And fun to apply engineering-wise.
What a great tutorial. I have used such a braid before but mine did not have the gathering loops! (it was for a costume) great photos, can't wait to see the finished product. Ladies in dresses and skirts again...what a great idea, reclaim our femme!
ReplyDeleteThank you for another wonderful tutorial. Not sure when I'll ever have an occasion for horsehair braid, but you have certainly made me want that book! And I am eager to see your dress.
ReplyDeleteHi guys, glad you like it!
ReplyDeleteRe: laundering. I don't know what the professional recommendation is, but I personally wouldn't dream of machine washing a dress with this in it. You know how underwire bras get all twisted in the machine? Well, this stuff is more pliable, and I used six yards of it in my dress, so it would turn into a mess! Better to hand wash or dry clean.
Molly, I'm glad my timing was good! Love it when that happens! Yes, my skirt is knee-length. A good way to see how much volume you'll get is to pin the braid to your hem as a test run. Try a couple different widths of braid. You might want to try 1" wide or less for subtle shaping.
Gertie I want to use horsehair braid for the bottom of a ballroom dress but I want very accenuated ruffles. I also want to use a contrast colour so I want it to show. Is it best to use a narrow braid and what is the best way to apply it. There will be absolutely loads of meterage and I have both a serger and sewing machine.
DeleteGORGEOUS!!!!!! Wow--I'm totally in awe. Thanks for another hemming option.
ReplyDeleteYES.
ReplyDeletethey sell horsehair braid at my local indie fabric store, along with a million other horsehair delights. i feel like i might be obsessed with horsehair. i've played around with horsehair interfacing and horsehair crinoline, but i've always been eyeballing the horsehair braid and wondering what i could do with it. thank you for posting this - now i need to work my own horsehair magic :)
can't wait to see the dress :)
Wow! This is fantastic! If I ever finish the skirt that's been sitting on my sewing table for a month, I definitely want to try a project that calls for this next. Thanks for the info!
ReplyDeleteI'm so excited about your first draped garment. Can't wait to see it. This was a great tute.
ReplyDeleteTrudy
www.sewingwithtrudy.blogspot.com
I recently used horsehair braid for the first time too! I used a narrow (3/4"?) width and I enclosed it in the hem of my underlined dress. I have since laundered the dress with no ill effects! (Of course, your mileage may vary.)
ReplyDeleteI am seriously thinking about using horsehair braid in all my light summer dresses with full skirts because I love the fullness but sometimes it's just too hot to wear the fluffer underneath. I think a horsehair braid hem will keep my skirt fluffed out for maximum breeziness.
You can see my dress with the horsehair braid hem here: http://chronicallyuncool.blogspot.com/2010/05/vogue-8956-finished.html
great tip! and btw- if you are ever doing a full lining to the skirt anyway, cut your lining to the exact hem length and stitch it right-sides-together into the same quarter-inch seam with your skirt fashion fabric. So- closest to your feed-dogs is the wrong side of your fashion fabric, then lining, then horsehair braid on top. When you turn it all right side out, the horsehair is trapped upright between the skirt and lining- no topstitching required! It's a bit of a brain tangler, but gorgeous and easy- a one-seam hem for a lined and stabilized hem!
ReplyDeleteI'm absolutely in love and can't wait to try this on my own garments! Great tips! Thank you for sharing. I think I need that book too!
ReplyDeleteI love this comment:
ReplyDelete"I think a horsehair braid hem will keep my skirt fluffed out for maximum breeziness."
And aren't we all going for maximum breeziness, really? :-)
Love the tutorial, Gertie.
I've never used this stuff before but I love full skirts, so I could see its benefit for swingy fullness! Thanks for the excellent tutorial, I'll definitely be bookmarking this for later :)
ReplyDeleteI can not wait to see this dress. Your description of it made me swoon. I started a new job recently and don't have time for creative sewing anymore. So jealous!
ReplyDeleteCool stuff! Can't wait to see the finished project.
ReplyDeleteWell SHUT UP! I used to work at a fabric store back in the day, we carried horse hair but NO ONE ever bought any... I always wondered the proper way to use it. AND after sewing my first 1947 repro pattern, I wished I had it for the hem of the skirt.
ReplyDeleteYou've taught me something again :)
This was super helpful! Thank you very much! I was always afraid of horsehair braid, but now I feel empowered and ready to go!
ReplyDeleteI must admit when I first read the title of your post, I immediately thought of horse tail hairs, braided. It was a relief to learn that it is made from nylon now. Thanks for the tutorial.
ReplyDeleteYou made me think I could do this...that's the sign of a good teacher! Thanks a ton.
ReplyDeleteTina
Another awesome tutorial. Thank you so much! You are just the coolest!
ReplyDeleteThanks for the tip Gertie as well as the great tute, feel reassured to hear its worked on a similar skirt too. In fact you've got me thinking now of all sorts of projects to use it for!
ReplyDeleteI look forward to seeing the pics :-)
That is the most awesome and wonderful thing in the history of awesome and wonderful things! Look at how awesome and wonderful your hem looks! You're blowing my mind, Gertie!
ReplyDeleteThank you so much for the tutorial. My grandmother had some couture clothing and it's so interesting to see the why's of a lot of the structure engineered into such garments.
ReplyDeleteIf you don't mind my asking, how are you going to ensure that the cord at the top doesn't pull out after you cut off the loops?
Enjay, I don't think it matters if the cord comes out since the horsehair is topstitched in place. I wouldn't cut out the loops if I'd catch stitched it to an underlining, though. Does that make sense?
ReplyDeleteHI Gertie?s i love you sewing... It is fabulous...Hugs
ReplyDeleteDeni
Hey everyone! I just added a couple updates to the tutorial. I'm making my second skirt with horsehair braid tonight and I noticed a couple other things. :)
ReplyDeleteI work in costumes for theatre and we use horsehair ALL the time- it's one of my favorite toys! I've been dying to make a hat out of it for ages. Can't wait to see the finished dress!
ReplyDeleteGertie, that does make sense. I'm a new sewist with a background in spinning and knitting so the thought of unravelling is forefront :)
ReplyDeleteI love horsehair braid - and wouldn't it be great to see a sample from the past century - it must have been made from actual horsehair? I just used it on a dress I made and wrote a bit about it.
ReplyDeletehttp://sunnygalstudio.blogspot.com/2010/05/tulle-time-part-deux.html
Alright already. Thank you. I adore you. You're swell! You're smart, funny and beautiful. Really. I am just starting to embark upon the journey of sewing clothing. I've sewed costumes, the obligatory bag, and too many pillows, and am finally confidant enough to start sewing garments, yes, really. Sorry to ramble, but every time I search for a sewing, term, review, opinion, technique, guess who comes up? That's right, you. Really.
ReplyDeleteSo much so, that you might say that my dear husband may actually be a bit weary of hearing about Gertie from Brooklyn already.
So, thank you Gertie from Brooklyn, you always do such a wonderful job and I appreciate your sharing your projects, musings, and knowledge.
Hugs to you
Beverly from Chatham
Laundering horsehair braid isn't a problem. IF you machine was on your delicate/handwash cycle. Also, it's the clothing fabric that really determines the wash method. I've never had a problem washing my horeshair braided dress in the washer and hanging it to dry.
ReplyDeleteI think i love you lol no seriously you've just made my day. I found you through Orchid in May's blog. I'm just about to start on a vintage dress that calls for horse hair braid and i now feel alot more confident about using it:)
ReplyDeletethank you so much for this practical hemming solution. your method is sooo much easier than what I was finding in other sources.
ReplyDeleteI knew that horsehair braid was the way to go, but this dress is "for real life" and not Musical Theatre Costuming.
Gertie - I'm in the process of making my daughter's wedding dress, which calls for 3" horsehair braid. I've never used it before and am very excited to see what the outcome will be. Thanks for sharing your tips and photos. They really helped me to visualize what I will need to do.
ReplyDeleteThanks again,
~Darline
Oh, Gertie! You are a gem so you are. I knew when your name popped up on Google for horsehair braid hem that I should have just looked at your blog in the first place. Please forgive my lack of faith. xxx
ReplyDeletewow this tutorial is amazing, this seems like a magic tool, horsehair who knew?
ReplyDeletethanks for sharing!
I love your blog! I'm just starting to sew and it seems that every question that I have is answered by your blog! A big, big thank you!
ReplyDeleteI really like it, and the tutorial is easy to follow! :) Thank you
ReplyDeleteGreat tutorial, very easy to follow. Thank-you so much for taking the time to create it.
ReplyDeletethanks admin good blog and text. mirc indir mevlana sözleri kapak sözler abiye modelleri moda sitesi
ReplyDeleteThis blog is one of the best documented I have ever seen! bravo! it’s rrally wonderful! I wish I could participate to one of these beautiful period costumes events! 90s costumes
ReplyDeleteSOLD! Says the girl from the south. I was just reading this in your book before I left home to come post on my blog. I am doubly sold and can't wait to purchase and use this, Gertie. As always, thanks for the tips.
ReplyDeleteOh, and get this. When I purchased your book I read it cover-to-cover. Well, this morning I felt like some Gertie time and pulled it out again. Actually wanted to read up on the Portrait blouse. I saw so much stuff in there that I have been wanting to learn, don't know why I didn't recall it there but it looks as if I have a way top sewing reference in my own home. No need to run to the 'net as much as I thought I was going to have. The only thing funner than my Gertie book is actually sewing.
Cheers,
Lyric
http:///www.SewAndCro.com
Thanks for visit my blogs
ReplyDeleteHello there, just become alert to your weblog through Google, and located that it is truly informative.Urgent Care Centers
we appreciate the best services of Snoring Doctor
ReplyDeleteDo you think this would work on tulle underskirt? The underskirt is long under a circle skirt made of cotton bottomweight. It's a costume. Or do I just need to make the underskirt super thick?
ReplyDeleteLooked for it for ages and finally found some - about to have my first attempt at fitting - wish me luck!
ReplyDelete