
 Have you ever noticed how vintage dress patterns usually have side zips instead of the back zips found in most modern patterns? A well-made vintage dress will almost always have a side lapped closure - and a metal zip, of course. I think there's something so sophisticated about a perfectly-executed side zipper. It adds that lovely authentic touch to your retro sewing projects. Here's how!
Sew the left side seam of your dress, leaving an opening for your zipper (the opening is generally 14" long). With a a side zip, your seam will be sewn about 2-3" above the zipper (below the armhole), left open for the length of the zip, and then sewn shut below it. Make sense?
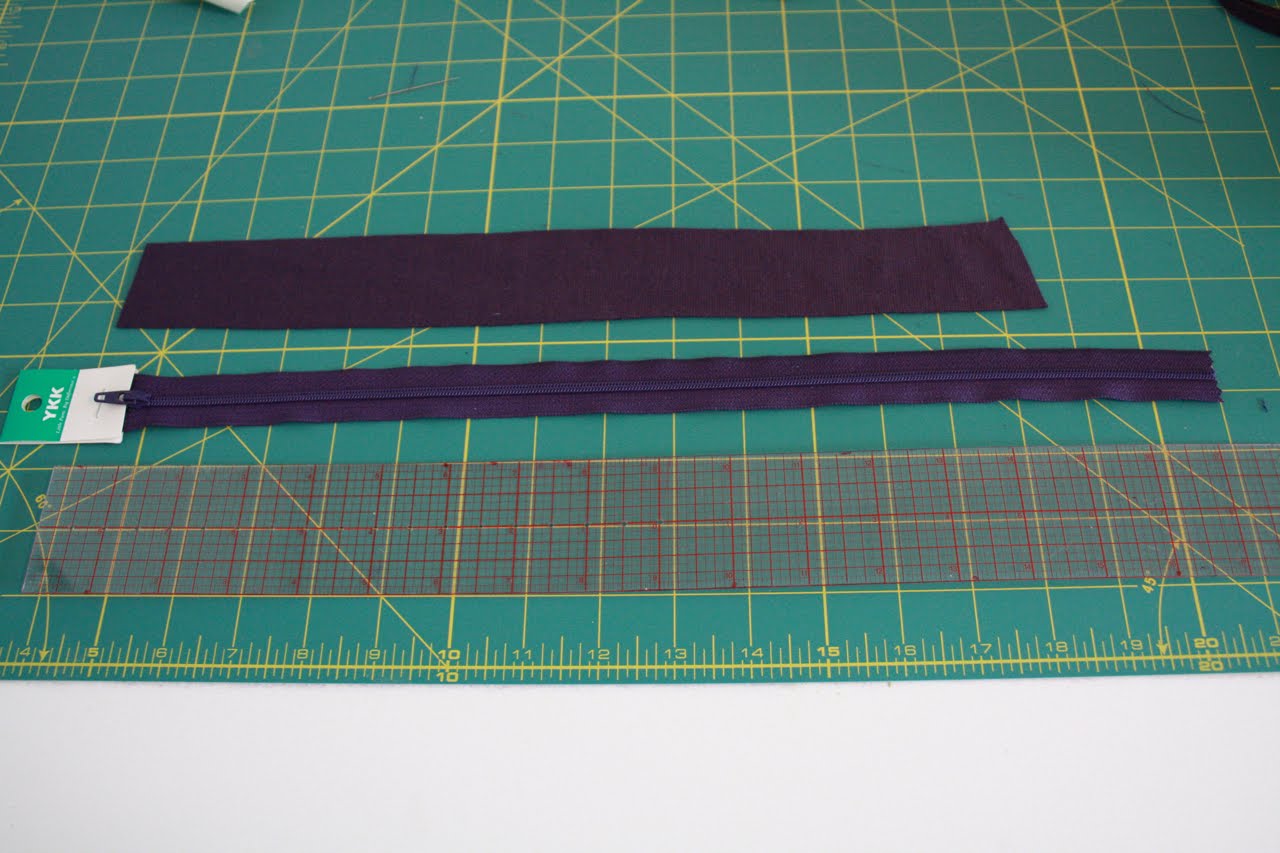
You're going to create a placket, which is basically just a little facing for your left side opening (that's the side that's lapped). This makes your seam allowance a little bigger and also stabilizes the lap. Cut an on-grain strip of your fabric that's 1-1/2" wide and as long as your zipper opening. If your fabric is filmsy or soft, you will probably want to interface the strip. A bit of silk organza works well for this.
 Now, pin the strip to the left side of your zipper opening, right sides together.
Stitch the strip on with your usual 5/8" seam allowance.
 Here it is stitched:
Trim and grade the seam allowances. The narrower seam allowance will be the strip.
 Turn the placket to the inside of the dress and press.
 You might want to put in some temporary diagonal basting to keep the strip in place after turning it in.
 Turn the right side seam allowance under 1/2". (NOT the full 5/8" of your seam allowance.)
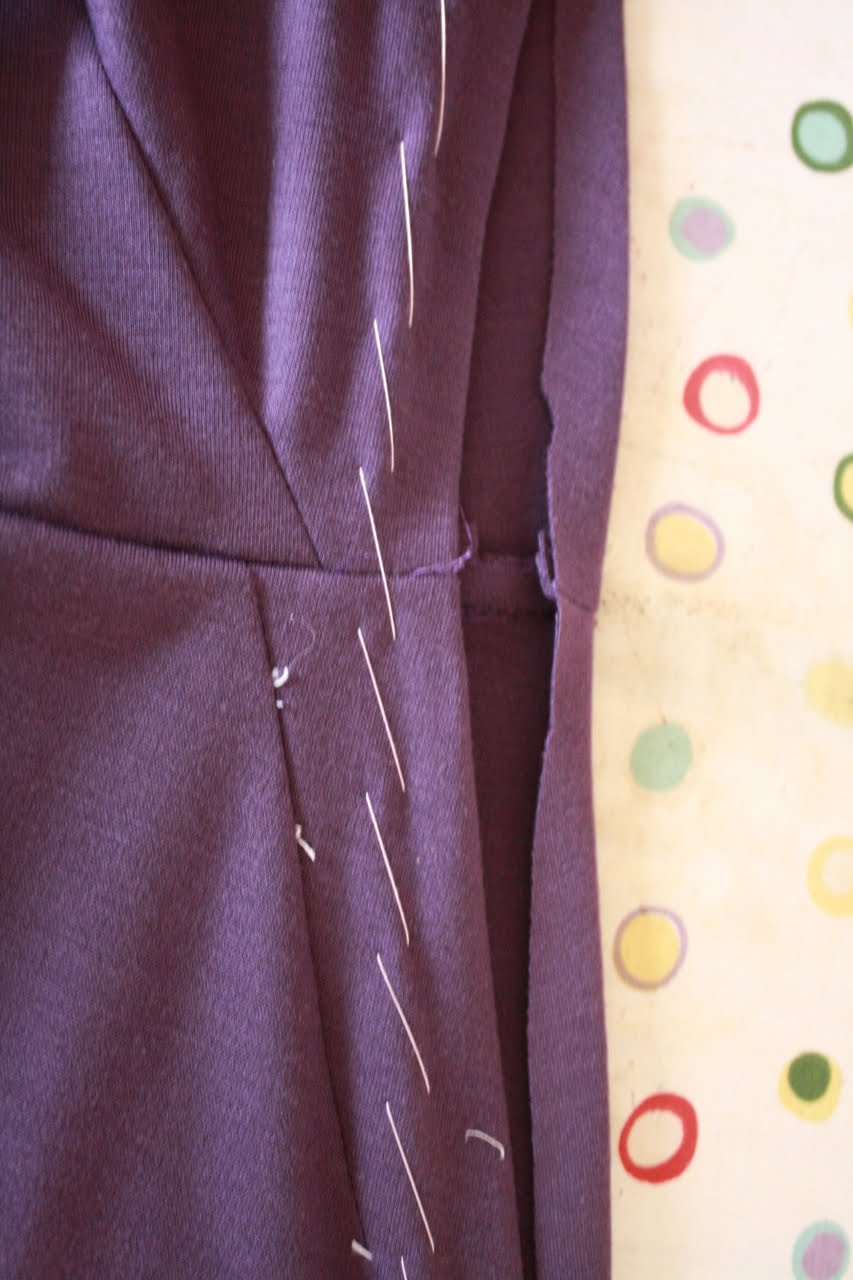 Pin the zipper to the left side of the seam allowance, aligning the folded edge right next to the teeth of the zipper.
 Using a zipper foot, stitch close to the folded edge, next to the teeth. Here's what your stitching will look like.
 Now, keeping the zipper closed, fold the left lapped side over the right side of your zipper. Pin in place along the left side, where the lap will be stitched.
Now you can stitch the lap on your machine if you like. Use chalk to mark a line 1/2" away from the fold to maker your stitching line. Or use a foot with a gauge like this:
 Or - my preferred method - you can hand pick the lapped side. I've always found stitching a lapped zipper by machine to be somewhat frustrating - the zipper tab gets in the way, and it's hard to get a straight line even with a gauged foot. With a hand-picked zipper, you get so much control that the zipper always goes in perfectly the first time.
To do this, unzip the zipper, keeping the lapped side pinned in place and pick stitch about 1/2" away from the lapped edge, as well as horizontally across the top and bottom of the lap. For a fantastic article on this method, click here.
I ended up hand-picking the Background Dress zipper:
 I just adore the look of hand-picking in conjunction with a beautiful metal zip. Here's my lemon dress to refresh your memory:
 Hope this all makes sense! Please leave any questions in the comments.
Update: It's easy to incorporate this into a dress that has a center back zip. You'll probably want to eliminate the center back seam by cutting the back pieces on a fold (make sure you eliminate the seam allowance first!). Then leave a 14" opening on the left side seam of your dress. Start the opening two inches down from the armhole. Insert your zipper as directed above. That's all!

Thanks for the tutorial! And I love the background dress, great job. Must try to handpick a zipper sometime.
ReplyDeleteIs there a reason to do it this way other than that you like how it looks? Just wondering, as the 'why' is so prominent in the title of this post.
OK, I do have questions because I am starting to explore this whole side-zipper thing and having never done one, I feel my mind a little blown. :) So with a side zipper (whether lapped or invisible) there is a few inches sewn shut above the zipper before you get to the armhole seam? Am I interpreting your photos correctly that you are inserting the zipper with the seam sewn both above and below the zipper opening? If you use an invisible zipper, do you sew the seam closed above the zipper, insert the zipper, then sew the seam below the zipper? I get how to insert the actual zipper, but I feel fuzzy on how to deal with the rest of that seam.
ReplyDeleteHi ladies! I went back into the post and edited to answer your questions. Let me know if it all makes sense!
ReplyDeleteNice work, Gertie, thanks. The dress is gorgeous, and you look tres fab in it!
ReplyDeleteBasically, this lapped zipper thing is a bit like putting a fly on pants, right? You've got the bit that you sew onto the side seam to act like a cover for the zip?
I could follow what you're doing, but it would be more clear to do a demo one with the placket in a different colour... but no prob's if you can't be bothered. It's a great tute, thanks.
My sewing mojo has gone somewhere. I'm v.anxious about sewing again. Weird.
WIll keep reading your blog - hopefully the mojo will return.
Awesome tutorial!! I linked to it on Craft Gossip Sewing:
ReplyDeletehttp://sewing.craftgossip.com/tutorial-add-a-side-lapped-zipper/2010/05/13/
--Anne
Jenny: exactly! The left side creates a little overlap, just like a fly front pant. It hides the zipper.
ReplyDeleteI wish I could have done a demo with a different color lap, but I've been so time-crunched it didn't happen. Hope this works anyway!
Casserole - thanks for the link!
Dear Miss Gertie: How do you practice?
ReplyDeleteAllow me to explain: I'm what you call a beginner, as in, I've never completed one garment (that I felt I could be proud of). I'm trying to teach myself garment-making, but I often sit on a project for weeks at a time. Because I'm terrified. I'm terrified of screwing up a project, I'm terrified of doing something permanent to fabric that I paid good money for, I'm terrified of wasting the scarce money I have to buy supplies and fabric and as a result, I look at tutorials like this and I'd love to try but I can't force myself to. How in the heck am I going to get over this hump?
Koritsimou: don't be terrified! The only way to get better at sewing is to be bold. Yes, you may ruin fabric. I certainly have. I have things I made just a year ago that I don't wear anymore because my techniques were not as good as they are now. But that's okay! My techniques are better now BECAUSE I made those garments. And I imagine I'll feel the same in a year from now. It's a great thing!
ReplyDeleteFor techniques like this, you can practice first with a yard of muslin (or old scrap fabric) and a spare zipper. The investment for this would be a dollar or two. Just cut the muslin into two pieces and then sew them together at the top and bottom to simulate a side seam.
Be bold!
I have a question! Why the placket? Isn't the lap created with the 1/2" vs. 5/8" turn back, so couldn't the other side of the zipper just be attached directly to the dress? I'm lazy about measuring, so I always end up just putting in the zippers with no measuring, so they end up centered, not lapped!
ReplyDeleteAnd Korit... I feel your pain! It's very helpful to make an actual muslin, out of, you know, muslin, so you don't feel as bad if things don't work out! I'm working on a dress for my Maid of Honor (vogue 2902 - super easy looking, right?) and I made at least 5 muslins of the bodice before I really got started!
Patty
Thanks for the tute! I seriously considered trying a lapped zipper on my latest project (Vogue 8956, from 1956) but I went with the centered zipper recommended in the instructions. It's a good thing I did because the lapped zipper would never have worked with the "pleats hide the side seams" trick that is so common with vintage full skirts. If I ever sew a sheath I'll definitely try the lapped zipper!
ReplyDeletePatty, the lap is the standard 5/8" turnback. (It's the other side that's turned back 1/2") The placket helps for two reasons:
ReplyDelete1) it does help to have a wider seam allowance. 5/8" can work, but it's cutting it close.
2) the placket creates a more substantial lap - it's not flimsy.
Fantastic! Thanks for tutorial.
ReplyDeleteHi Gertie,
ReplyDeleteGreat tutorial! I'm about to try my first handpicked zip.
One question: Do you have tips for moving the zipper to the side seam when the pattern calls for it to be in the back? I don't like back zips - it's easier to dress oneself when they're on the side. :)
Thank you ! I was curious about those zipper issues that seems to be blooming in vintage blogs right now. The tutorial is duly bookmarked ...
ReplyDeleteI think I'll stick to my usual invisible zippers, for now, but I may feel bold someday and try it :)
Great tutorial? But am I alone in preferring the centre back zippers? Whenever I have a pattern with a side zip, 9 times out of 10 I'll convert it to a centre back zip. I think it's the assymetricality of it, and I just find back zips easier to get in and out of, plus you can make better fitting alterations with a CB seam in there...
ReplyDeleteSarah, see my updated bit in bold above!
ReplyDeletemelissa - different strokes for different sewers!
Brilliant! With the summer dresses coming up, I'm sure going for lapped zips, whether it's a side or back zip. Inspiring indeed!
ReplyDeleteI think side zips are more elegant too and have several dresses with them. You have a nice clean back to the dress and the zipper is mostly hidden by your arm. I also have some vintage side zippers from garage sales. The zipper has a metal "stopper" on the top as well as the bottom, but they are mostly 12" zippers.
ReplyDeleteThe only downside to the side zip is when you've already done your hair/makeup, and then you go to put on the dress and have to wiggle it over your head. I've done this ...a lot. Stepping into a back zip is simpler and more casual.
Thanks for posting this! I've been wanting to use a lapped zip in something but couldn't quite work out how! The background dress of doom looks wonderful, by the way! I'm almost tempted to make one myself (but only almost...)
ReplyDeleteYour side zips look really classy, and as always I'll bear your advice in mind the next time I come to do one. But I agree with Melissa that a centre back zip has the advantage of being useful for fitting alterations - good for those of us whose fitting can be slapdash - plus it makes it easier to get into and out of something in expensive fabric without rubbing it all over one's makeup. I was inspired by the exposed zip on your blue dress in fact to subsitute a back zipper for a side zipper on a Butterick retro reprint pattern.
ReplyDeleteBeautiful job.
ReplyDeleteNext tutorial, please: side zipper when the skirt has pockets. I do it, but sometimes it looks a little fiddly. Must be a better way.
ReplyDeleteThanks for this great tutorial! I'm about to sew in a lapped side zip in a vintage dress so I came back for a refresher :) Good idea about the placket!
ReplyDeleteJust used this for my colette macaron dress, finished it up this morning and I'm very happy with it!
ReplyDeleteThanks!
Thank you thank you thank you! I've been doing the vintage-style lapped zippers for years (discovered it works WAY better with the bias facing!), but the handpicked zipper is a REVELATION! I've never had a zipper go in so hassle-free. Thanks!
ReplyDeleteGreat tutorial. Thanks for taking the time to post photos and explain the process.
ReplyDeleteI know I'm way late to the party, but thanks for this tutorial. I had put a lapped side zipper in by machine per my pattern instructions, but it was wonky and sad. ripping it out and following these directions and the result was much smoother!
ReplyDeleteI have always liked the side seam zipper - yet, even after over 40 years of sewing, I never bothered to make one! It is so nice! I remember them, and find the look of the dress flows without the obvious back "interruption" and I never liked the fact the back zipper always ended somewhere in the middle of one's best intentions. Most unflattering and immodest.
ReplyDeleteThank you for the clear tutorial. i know it will help many people.