Showing posts sorted by relevance for query wiggle dress. Sort by date Show all posts

Monday, November 12, 2012

Butterick 5814: The Draped Wiggle Dress

Now that my coat is finished, I'm embarking on a new project: sewing up my other new Butterick pattern for myself! (It's Butterick 5814, and it's currently on sale for $3.99 online.) While I don't quite have the stamina to do an official sew-along for this one, I will be doing a series of detailed posts on its fit and construction. Like I did with the coat pattern, I wanted to start with a post on the design and its inspiration.

From the beginning (when I proposed this design to Butterick), I've always called this "The Draped Wiggle Dress." When I think of the classic wiggle dress, I usually think of something in wool, with sleeves and a higher neck. (Like the one in my book!) But then there's also the cocktail-style wiggle dress, in a fancier fabric. The genesis for this one was the green dress Joan wears in a Mad Men poster.


I loved the side drape on the dress she wears here. From this point, I started looking at other designer dresses from the era, particularly the work of Peggy Wood. It was her use of little raglan sleeves and bodice draping that inspired by own bodice design. Here's an example of a typical Peggy Wood bodice:

{source}
So now you can see how my own design was born; it's a mish-mash of a couple favorite styles.

It's certainly an interesting way to design. It's obviously nothing original, but that doesn't mean it doesn't have its challenges. While working on a pattern like this, things constantly need to be tweaked and re-imagined. Taking cues from photos is one thing, but then the process of putting those details into an original pattern can be quite time-consuming and difficult.

Tomorrow I'll write about the construction of this dress. While it looks drapey and soft, it has a serious inner structure, including steel boning, underlining, and a grosgrain waist stay!

Friday, December 23, 2011

Cupcake Wiggle Dress


This is a project that has been hanging around my sewing room for MONTHS. But it's finally done! It's a simple black wiggle dress with pink soutache trim (more on that in later in this post). The pink swirls remind me of a Hostess cupcake. Yum. The black fabric is a tropical wool of excellent quality and drape that I scored in the Paron's 50% Annex years ago.


I made the pattern by attaching the bodice of this dress that I draped last year:

 To this vintage skirt pattern, purchased on etsy.
I really love how the pockets stand slightly away from the body--perfect for embellishing!

So let's talk soutache. I read an article on soutache in Sew Beautiful magazine (issue 139) a couple months ago, and got really obsessed with the idea of using it on a dress. Sew Beautiful is an heirloom sewing magazine, but I've found that it has lots of great techniques for retro garment sewists too. Here's a little snapshot of the dress they featured:


I ran out to Mokuba (OMG, have you guys ever been to that store? It's a Japanese trim place and it sells the most amazing stuff. Worth a blog post on its own) and they had soutache in dozens of colors and varieties.

Soutache is a fascinating trim. Here's how it works. It's a rayon braid with two cords inside it.
You have to fray the ends slightly to get to the cords.

Pull one cord and the soutache will curl up. If you pull the other cord, it will curl in the opposite direction.
I made my embellishments by arranging the soutache how I wanted it, pinning it to the dress, and then attaching it by hand with a small back stitch. Any ends have to be covered up and sealed with a product like Fray Check.


Kinda cool, right? It's kind of painstaking work, so I think it's best for small areas. I had a fantasy of embellishing the hem of a circle skirt this way, but I'm thinking better of it now.

The inside of the dress is both faced and lined with bemberg.


I learned this technique from an article in Threads. You cut out both facings and linings, turn the facing edges under 1/4" (I staystitched at 1/4" first to make this easier), and lay the facings on top of the linings. Baste together, and then edgestitch the facing so it's attached at the bottom to the lining.

Also: pink lace!
All in all, a fun project. I love this pattern and can imagine making it in other colors and varieties. Sans soutache--I only have so much patience!

Tuesday, May 29, 2012

Pink Floral Wiggle Dress


Hello, readers! I made a dress. And there are several exciting things to report about this dress.

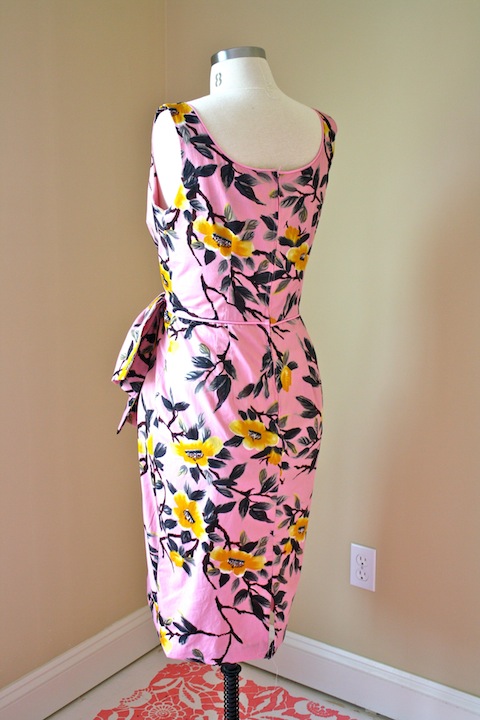
First, it's made from this really lovely pink floral cotton poplin, marked Ascher Studio in the selvage (just like this other floral dress I made).

Secondly, we took some of the photographs in front of my new favorite wall. (What, everyone has a favorite wall, right?) It's just off Main Street here in Beacon, New York, and it has the most darling pink patches of paint. In fact, the pink paint matches my dress!

Third exciting thing: this is based on a pattern from my forthcoming book! I wanted to include a glam sheath/wiggle dress, but then I spiced it up a bit with a sweetheart neckline. In the book, this design is made in a really luscious, really expensive duchess silk satin, so it's nice to make some more "everyday" versions, if you will.


Fourth exciting thing: I added a drape at the waistline, as that's a feature I've admired in many vintage dresses of the late 50s/early 60s. 

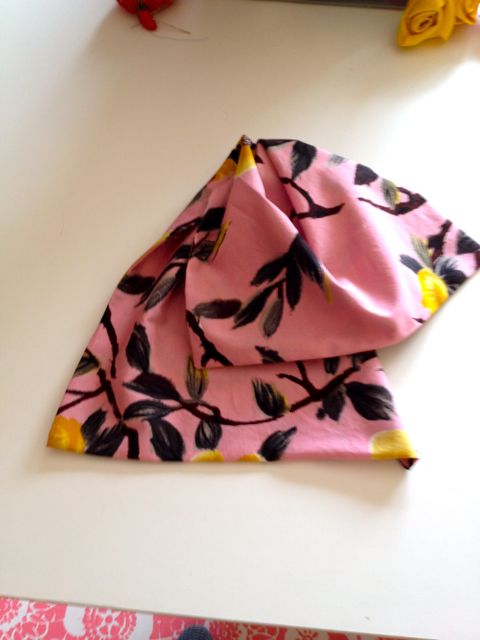
It was easy. I just sewed two pieces of fabric into a rectangle, leaving a space to turn them right sides out. Then, I closed up the hole by hand sewing. 

Then, I pinched the fabric at a point just off-center. 

Then I twisted the fabric draped onto itself.

Then I basted it to the dress waistline, just underneath the twist. When I was happy with the positioning, I sewed it in place permanently by machine. 

There's also pink piping on the neckline and waist seam. 


 Also exciting: it looks really pretty in my studio. 


And the last exciting thing? By popular demand, I'm starting to offer made-to-order dresses in my Etsy Shop. And this is the first! (You can also buy the white flower hair clip here.) People always ask me if I sell my designs, so I figured I'd give it a try. 

Hope things are exciting in your corner of the world!

Saturday, August 8, 2009

A Poll: The Wiggle Dress/Overskirt Combo Pattern!

The pattern above is for sale at this shop (in three different sizes!), and it's a style that inspires some ambivalence for me. Specifically, the third view, which is a wiggle dress with a sheer overskirt. At first glance, I adore it. But how do you think it would actually look sewn up? Would it be as fab as in the illustration or would you look like you couldn't decide what style skirt to wear, so you thought you'd wear two at once?

I also adore a poll, and this is a perfect excuse for one. Let's hear your thoughts!


What do you think of the vintage wiggle dress/overskirt combo?(answers)

Sunday, September 6, 2009

Swatch Time: a Love Story

So. I can't thank you all enough for your help in narrowing down fabrics for the overskirt/wiggle dress combo pattern. And I went to the fabric store intending to buy the blue fleurs, just like we talked about. But then there was a problem. Another fabric caught my wandering eye and before I knew it, we went home together. It was a moment of passion, I must confess. I think you'll understand, though.

Just look at this dreamy fabric. It's black embroidered illusion with silver beads and sequins. Be still, my heart. As soon as I saw it, I just knew it was the one. You can see why I fell so hard, right?


Here's a close-up of the embroidery:


And here's how it looks over a bit of black crepe, for dramatic effect.

I hope you can forgive my fickleness!

Now I have to find the right black fabric to coordinate with it, which isn't as easy as I thought it would be. It needs to be fairly firm, to tailor into a jacket and wiggle dress. I considered a cotton sateen, but I think it needs to be silk, to match the dressiness of the illusion. But I don't want it to have too much sheen, and therefore look too dressy for work without the overskirt. Ah, what a conundrum.

I will let you know, however, that I've decided to wear the wiggle dress/overskirt ensemble to my friend's wedding later this month - if it works out, that is. And the LBD and jacket will be perfect for work. So once I get the fabrics right, I think I'll actually get a lot of wear out of this!

Wednesday, August 26, 2009

Swatch Time, Part Two!

Readers, you were so helpful with your input on my fabric choices for the wiggle dress/overskirt combo pattern. Thanks to you, I've narrowed it down to three finalists for the overskirt, which I wanted to show you with fabric options for the wiggle dress.


So first off, we have the fleurs, which were quite popular with you ladies. At Paron's I found this blue rayon shantung, which I think is the perfect shade of blue to match.

However, I have to say, I'm hesitant about this one. I think it looks too heavy or something, and I think there needs to be some small sort of contrast between the dress and overskirt.

Then, we have the tulle with flocked velvet polka dots, which would also match the electric blue shantung.

I rather like this! I think there's just the right amount of contrast between the two fabrics.

Finally, there's the embroidered black flowers on ivory illusion. I would pair this with a black fabric with some body like shantung or taffeta. I'm showing it here with a black crepe de chine for effect.

Again, I like the bit of contrast that would set the skirt off from the dress.

So. What do you think? I'm drawn to the vivid blue (particularly the dots, I think), but I worry that the effect will be a little Violet Beauregarde from Charlie and the Chocolate Factory ("It happens every time; they all become blueberries.").

The black could be chic - I could use an LBD anyway. But is it not dramatic enough?

Help!

Thursday, October 14, 2010

Has Mad Men Really Changed the Way We Dress?

Isn't it interesting how Mad Men has become synonymous with retro fashion? Anything from sheath dresses to skinny ties to regular old pencil skirts are now described as having "Mad Men style." I'm a huge fan of the show, and the fashion is undeniably one of the main attractions. It's given us a language for clothes, in a way. I look at vintage sewing patterns (or even things on ModCloth) now and think, "Oh, that's totally a Joan dress" or "Peggy would so wear that." And the show has definitely put early 60s fashion—which can become a gray area between poodle skirts and love beads in the cultural lexicon—on the map.

But perhaps the descriptor has become a little broad. I've seen patterns from the 40s marketed as "Mad Men style" (huh?) and chain stores like Banana Republic have gotten in on the action to push what looked like pretty straightforward business casual to me.

Banana Republic window display
And it's not as though retro was not a trend before four years ago. But there is something undeniable about the way the show has touched a sartorial nerve. Perhaps the stage had been set—after all, companies like Stop Staring had been making reproduction wiggle dresses long before a certain curvaceous redhead graced our screens. Is it possible that Mad Men came along at the perfect time in the zeitgeist and helped us put a name to something that was already building? Or do we really dress differently because of Mad Men? Perhaps a little of both. One thing is for sure: we can probably never  look at a red wiggle dress the same way again.

What do you think? Has Mad Men changed the way you dress?

Tuesday, January 8, 2013

Pattern Changes for the Pinkie Pie Dress

Hello, readers! As promised, I wanted to walk you through the bodice pattern changes I made to turn the Wiggle Dress pattern from my book into the Pinkie Pie dress. Here's the original in wool tweed:

And then here's the Pinkie Pie version:


Here's an overall map of the bodice pattern changes.

Here's how I did it:

1. Underarm. The pattern, as published, has gussets under the arms for a close fit. They look like this when sewn.


I eliminated the gussets to form a dolman sleeve, which is similar to a kimono sleeve. This is a great option if you're feeling a little intimidated by sewing gussets or if you're using a fray-prone or delicate fabric (these fabrics may tear at the stress points of the gussets during wear).

It's helpful to use a French Curve ruler for this. Here's what mine looks like. (You can most likely find a household item to substitute, like a saucer or other small round object.)

Start with the bodice side front. Place the French curve under the arm, connecting the side seam to the underarm seam. Draw a new line, as indicated in red below. You're adding a little triangle that extends down about 1.5" from the original underarm point.


2. Trace this underarm curve onto your back bodice pattern piece, so that the underarm seams match up perfectly.

3. When sewing, eliminate the gussets. Stitch the front bodice to the back bodice at the overarm seam, and then stitch the underarm seam. Reinforce at the curviest part of the underarm seam by stitching again 1/8" away from your original seam line (in the seam allowance) and then trim close to the second line of stitching. Clip and then press the underarm seam open above and below the underarm curve.

4. Waistline pattern changes. Draw a new seamline at the waistline curve on the dress front, side front, and back pattern pieces. Give yourself a 1" seam allowance (indicated by the dotted purple line) so that you can adjust the waistline if needed during fitting. Cut off the pattern below the 1" seam allowance.

5. You can add any skirt you like to the new bodice. Check out pages 98-103 in my book for full directions on making dirndl and circle skirt patterns. What I did for the Pinkie Pie dress was essentially a dirndl skirt, but with side pleats rather than gathers. Baste the new skirt to the dress bodice and then try on to make sure you're happy with the waistline placement.

That's all there is to it! Let me know if you have any questions.

Monday, July 5, 2010

Draping a Dress, Part One: Inspiration


I'm working on my second draped design, and I thought it would be fun to take you  into the process a bit more this time. Several of you have asked for draping tutorials, and I definitely don't feel ready for that yet! So while this series of posts won't be tutorials per se, I do hope it will demystify the process a bit. I thought it might help you to see how this all works, especially if you're interested in learning draping yourself. Keep in mind: I'm not a draping expert at all! I'm figuring this stuff out as I go along with the help of my teacher Sharon and the excellent book Draping for Apparel Design by Helen Joseph-Armstrong.

The first step is coming up with a design that you want to drape. Lately I've found myself inspired by techniques rather than images or other designs. Since I'm so new to draping, I've been starting with something I want to learn and then building a dress around that. As I was flipping through my draping book, I saw a design with an empire line midriff (pictured above) and knew I'd have to try it. You'll see this sort of shaped midriff on many vintage dress designs, like the patterns below.


The 60s designs made me think of something Joan on Mad Men would wear: if it had a scooped neck, short kimono sleeves, and a pegged wiggle skirt, that is. I found this fantastic green and white polka dot cotton faille at B&J and  thought it would be perfect. It has such a delicious hand and sheen with a subtle ribbed texture. I drew this sketch, and voila! Dress designed.


The next step is to mark the style lines on your dress form: the neckline and the midriff. You can mark your lines with pins or with twill tape, as I've done here. See the scooped neckline and curved empire line?


You only need to mark the left side of your dress form (that's the left side as you're facing it) since you only drape that one side and the pattern is a mirror image. Make sense? Here's the back. The neckline is a shallow curve in the back, and the empire line dips down to center back.


I think marking the style lines is really quite fun; it's so freeing to be able to design your dress in three dimensions, as opposed to working with a flat pattern.

Next up: draping the design in muslin!


Update: you want to start with your dress form as close to your measurements as possible. Here's the post I did on padding my dress form. It doesn't have to be perfect, as you'll fit the muslin on your body, but it's good to get as close as possible on the form.
© Gertie's Blog For Better Sewing. Powered by Cake