Readers, I don't know how you feel about underarm gussets, but I am mad about them. (That's British for I love them.) I wanted to share a little tutorial based on a design of mine, a wiggle dress with fitted kimono sleeves and a super curvy body. To avoid any drapiness underneath the arm, I added an underarm gusset--a little triangular pattern piece that adds width in way that increases mobility but maintains a close fit. The vintage pattern above also utilizes a two-piece gusset.
There are two types of gussets: one piece and two piece. I'm showing you a two-piece gusset, which is a bit easier to insert. It has a seam down the center of the gusset.
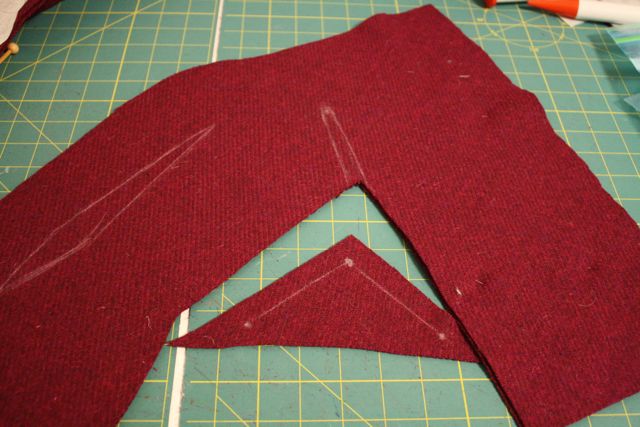
Here's the gusset pattern piece. I know the pattern says "cut 2" but you actually need to cut 4. (Oops!)
And here's the side front piece, where you can see the cut-on kimono sleeve.
What you're looking for is the "gusset stitching line." There will usually be a large circle at the top of the stitching line and then a dashed "slash line" that goes down the middle of the stitching line.
1. To start, you need to cut and transfer these marks to the RIGHT side of the fabric. I usually forget and mark them on the wrong side, but it's no biggie to then transfer the marks you need to the right side.
2. Next, we'll reinforce the gusset. Gussets can get lots wear and start to rip at the inner point (ask me how I know). I've adapted this organza method from a segment of Kenneth King's article in Threads magazine. I love it!
First, you'll cut four pieces of on-grain sheer silk organza (you'll need to see your pattern markings through the organza). They need to be big enough to completely cover the gusset stitching line. Pin a patch of organza over the gusset stitching line.
3. Using a regular stitch length, stitch along the gusset line. When you get to the point, take one stitch across the point. (Making a sharp pivot results in a less-crisp point.)
4. Slash down the middle of your stitching, cutting as close to your stitching as possible without cutting through it.
5. Turn the organza to the wrong side of the garment and press. Pull the organza to the inside as you press so that no organza shows on the right side of the fabric.
6. Okay, here's the part that's a little bit tricky. What you're going to be doing is sewing a triangular insert, which has a sharp pivot point. You want to keep the pivot point smooth and pucker-free.
Start by matching the circle on the gusset pattern piece to the point of the gusset opening, right sides together.
On the inside, pin along the gusset stitching line. The stitching line on the gusset matches up with the stitching you made in step 3.
7. Start by stitching along one side, with the garment side up. You'll be stitching just to the left of the stitching you made in step 3.
When you get to the pivot point, stop with your needle down. Pivot the fabric to the left, getting all the excess fabric out of the way of the needle, and making sure that there are no puckers before you continue to sew.
Stitch along the remaining side of the gusset.
9. Press the gusset flat.
10. From the right side, edgestitch around the gusset for added security.
Repeat this whole process on the back piece of the garment. Trim away any excess organza from the gussets and pin the front and back garment pieces together, being sure to carefully match the gusset seams.
Stitch the seam and press open.
You now have a two-piece gusset! That wasn't so hard, was it?
If you have a one piece gusset, you need to make your gusset openings with silk organza as above, and then stitch the side seams and underarm seams of the garment, which will leave you with an open triangle. Next you will insert the gusset into the triangle, which requires pinning it in and then pivoting at 4 points. Not impossible, but a little bit trickier. If you want to make a one-piece gusset into a two-piece gusset, just cut the pattern piece down the middle and add a seam allowance.
There you have it: fun with gussets!