
There are two types of gussets: one piece and two piece. I'm showing you a two-piece gusset, which is a bit easier to insert. It has a seam down the center of the gusset.
Here's the gusset pattern piece. I know the pattern says "cut 2" but you actually need to cut 4. (Oops!)

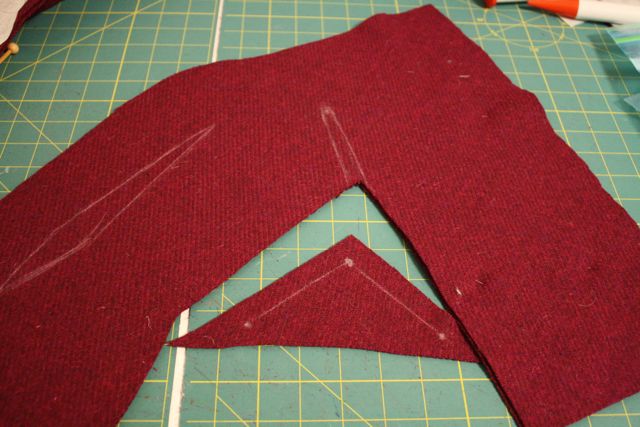
And here's the side front piece, where you can see the cut-on kimono sleeve.

What you're looking for is the "gusset stitching line." There will usually be a large circle at the top of the stitching line and then a dashed "slash line" that goes down the middle of the stitching line.

1. To start, you need to cut and transfer these marks to the RIGHT side of the fabric. I usually forget and mark them on the wrong side, but it's no biggie to then transfer the marks you need to the right side.

2. Next, we'll reinforce the gusset. Gussets can get lots wear and start to rip at the inner point (ask me how I know). I've adapted this organza method from a segment of Kenneth King's article in Threads magazine. I love it!
First, you'll cut four pieces of on-grain sheer silk organza (you'll need to see your pattern markings through the organza). They need to be big enough to completely cover the gusset stitching line. Pin a patch of organza over the gusset stitching line.

3. Using a regular stitch length, stitch along the gusset line. When you get to the point, take one stitch across the point. (Making a sharp pivot results in a less-crisp point.)


4. Slash down the middle of your stitching, cutting as close to your stitching as possible without cutting through it.

5. Turn the organza to the wrong side of the garment and press. Pull the organza to the inside as you press so that no organza shows on the right side of the fabric.


6. Okay, here's the part that's a little bit tricky. What you're going to be doing is sewing a triangular insert, which has a sharp pivot point. You want to keep the pivot point smooth and pucker-free.
Start by matching the circle on the gusset pattern piece to the point of the gusset opening, right sides together.

On the inside, pin along the gusset stitching line. The stitching line on the gusset matches up with the stitching you made in step 3.


7. Start by stitching along one side, with the garment side up. You'll be stitching just to the left of the stitching you made in step 3.

When you get to the pivot point, stop with your needle down. Pivot the fabric to the left, getting all the excess fabric out of the way of the needle, and making sure that there are no puckers before you continue to sew.

Stitch along the remaining side of the gusset.

9. Press the gusset flat.


Repeat this whole process on the back piece of the garment. Trim away any excess organza from the gussets and pin the front and back garment pieces together, being sure to carefully match the gusset seams.

Stitch the seam and press open.

You now have a two-piece gusset! That wasn't so hard, was it?

If you have a one piece gusset, you need to make your gusset openings with silk organza as above, and then stitch the side seams and underarm seams of the garment, which will leave you with an open triangle. Next you will insert the gusset into the triangle, which requires pinning it in and then pivoting at 4 points. Not impossible, but a little bit trickier. If you want to make a one-piece gusset into a two-piece gusset, just cut the pattern piece down the middle and add a seam allowance.
There you have it: fun with gussets!

Great technique! I think I would be willing to try! Thanks for sharing. Kari
ReplyDeleteGertie, Gertie, you are my hero! I've been thinking about underarm gussets for kimono sleeves quite a bit, because I love the look of them on vintage patterns, and because I managed to design myself a wedding dress that needs to have them. I have some time to experiment with them before it's time to make The Dress, but WHEW! I suspect that this tutorial will save me a lot of hair-tearing-out and trawling the internet. Thank you! Oh - will this pattern you describe be in your eagerly awaited book? It sounds lovely!
ReplyDeletethis is wonderful! I hate the gaping with a kimono sleeve pattern
ReplyDeleteWhoops, I think my brain just blew a gasket. That's British for OMFG.
ReplyDeleteThat colour is amazing, I am green with jealousy! Thanks for the tutorial, look forward to seeing the fit on a finished garment. I have a couple of vintage patterns on my to do list which are kimono sleeve, but as I dont like the bagging under the arm was to redraft for set in sleeve, this may be my answer...
ReplyDeleteThanks for sharing! I'll definitely file this away for future use!
ReplyDeleteI'll confess: I had to do some quick google research to wrap my mind around the workings of a gusset. But, now that I've sorted that out, I'm totally going to do this all the time. Thanks for sharing!
ReplyDeleteawesome! i'm in the middle of a jacket (may have bitten off more than is chewable) and I would love to use this. might just finish the usual pattern though and add it into another creation, since this is my first jacket and I've added a lining.
ReplyDeleteThanks for the fabulous tutorial Gertie.
ReplyDeleteLove the colour of your fabric......will we see the finished piece soon??
This is a great tutorial I can understand thank you! I really need gussets to give me more room to raise my arms and not be so tight.
ReplyDeleteThat tip was so great!! I have made this kind of sleevs a few times and always been a bit scared of cutting in the arm piece and see how it behaves.
ReplyDeleteGreat post! I was wondering if this silk organza you are using is pure silk? Can I use synthetic instead and the results are same?
ReplyDeleteThanks in advance!
Thank you!
ReplyDeleteYou are my savior! When we were learning gussets at school, I was just rolling my eyes. Now I understand how great they are and will have to learn to do them all by myself :D
ReplyDeleteCan't wait to see the finished garment :)
Thank you Gertie. I really needed this tutorial.Looking at the vintage clothes photos I wondered how to do that since I have not the original pattern.
ReplyDeleteA two-piece gusset would be so much easier to insert! Brilliant. I too am mad for gussets :) You see them all the time on early 30's patterns with really closely fitted sleeves.
ReplyDeleteOooh, thanks for this Gertie - I've been wondering how to do this for a while - I always get intimidated sewing things into sharp points or corners and could never entirely work out how to do it without puckers or bubbles appearing.
ReplyDeleteAlso, this is hugely immature, but I do find the word "gusset" tremendously amusing.
Fantastic! Will definitely be using this when I next make a kimono sleeve. Mine have a tendency not to gape, but to rip under the arms otherwise...
ReplyDeleteAwesome! And so timely. I've been trying to get up the courage to try making a vintage pattern I bought which has kimono sleeves and gussets.
ReplyDeleteC.B.
Thanks for another great tutorial!
ReplyDeleteYou can do oval gussets, too. A long oval inserted into a side seam, from waist to elbow, can transform a dress for someone who has a larger-than-average bosom, or heavy biceps. And crotch gussets can relieve stress for someone with a heavy bottom or thighs. J'adore gussets.
ReplyDeleteGreat tutorial! Thanks! I usually LOATHE sewing gussets... but this makes it SO much easier. Love using the silk organza!
ReplyDeleteThanks Gertie. Would it be possible to post a photo of you wearing the garment? Arm up and down so we can see what it does for the fit and motion.
ReplyDeleteYAY!!! Thank you so much. I have a vintage pattern that has underarm gussets...
ReplyDeleteAND...love the pics of Henry.... :)
I learned of this technique from a gorgeous early '60s dress of my mom's cousin's that my sister wore (my Shera arms worked against me!). I hadn't noticed whether it was a two-piece gusset, but I bet it was. I've done the one-piece, but this is WAY better! Thank you so much for the excellent tutorial and photos.
ReplyDeleteThanks for the tutorial Gertie! Might we suppose that there is a wiggle dress with and underarm gusset in your book?
ReplyDeleteI have so many responses to this post and the comments:
ReplyDelete1. This was one of my mothers favorite dress patterns! I think I fit into it for 2 months during high school. I loved it, nonetheless.
2. Have you seen the new ad on tv for the men's jeans with "ball room"? I think it is Duluth Trading. The pants and the ad make me giggle, but I bet it makes the pants wicked comfortable.
3. @LinB - thanks for the comments about oval side seam gussets...have been thinking about modifying some old t-shirts, and an oval gusset is exactly what I need!
4. @Laura - no it doesnt have to be silk organza, but it does need to have a soft 'hand'. If the organza adds any extra stiffness to the underarm gussett, it will look strange and be very uncomfortable and itchy.
Thanks for posting this! I have a pretty blue cocktail dress with underarm gussets--I was going to wear it to a party last night but one of the gusset seams has torn. Looks like I'm going to take it apart, underline it (like I should have done to begin with), and resew it. I will use your gusset tutorial when I do!
ReplyDeleteThanks so much for this tutorial! I will definitely be doing the gusset on my dress this way!
ReplyDeleteHoney you are a sewig queen! Thanks so much for the tutorial, this will come in handy as I really want to get out all my vintage patterns. I think I'm going to have to practice it first but your tutorial has really helped. Is there anything that you can't do!?!? You make me feel like a complete beginner! XxxX http://thesecondhandrose.blogspot.com/
ReplyDeleteCan't wait to see the finished product! That fabric is gorgeous!
ReplyDeleteThank you very much for the tutorial on gussets. Do you have any tips for adding gussets that are not part of the original design? In general, how long should the sides be? Any info on this would be appreciated. I appreciate the content of your tutorials. They're "meaty"--clear and straight to the point.
ReplyDeletegwoman
Thank you for this tutorial. It came in good time. I am in the middle of sewing a vintage dress pattern with a one piece gusset. I had already sewn the side seams when you posted this so tried to insert a one piece but it was not going well. Decided to unpick seams and follow your tutorial. I think I also need to look at the shape of my gussets as I changed the bodice pattern. For a new and accurate gusset pattern would I just measure from main bodice and add seam allowances?
ReplyDeleteThanks so much, Gertie! As a woman who does a lot of FBAs, I think the gusset is a great invention. I am wondering how big the seam allowances are when you stitch the legs? I would think, as small as practical. Love your tutorials, you're a born teacher. Can't wait for the book.
ReplyDeleteOh I love gussets too, they are a miracle-maker, sort of like the FBA - armed (no pun) with FBA & gussets, there ain't nothing you can't fit, but more importantly lots of empowerment here! Great tutorial.
ReplyDeleteGreat tips! Several vintage patterns I acquired over the holidays have one-piece gussets, so this was really helpful to visualize exactly how I'd insert them (I'm so much better with pictures than words ;). Thanks for sharing!
ReplyDeleteThanks for the tutorial. You made them less scary! I won't run away next time...
ReplyDeleteGreat tutorial !
ReplyDeleteLove the colour of your fabric ..
I think this is a great technique that I will learn to use. Since my arms are heavier at the top, I've read that gussets can make a top fit better and look great! Thanks for a wonderful tutorial!
ReplyDeleteBrilliant, thanks for posting this!
ReplyDeleteThanks for a great tutorial! I just finnished sewing the GPD from the blog of Honig Design. Unfortunately the fabrics leaning over mye chest and out to mye arm pits are to tight! It is allso to tight under the armpit, and I cant raise my arms. Dokke you think arm gussets can solve the problem? Hoping for youre answer! Tone
ReplyDeletethanks admin good blog and text. mirc indir mevlana sözleri kapak sözler abiye modelleri moda sitesi
ReplyDelete